Showing posts with label Embroidery Floss. Show all posts

Thursday, February 18, 2010

Just Because

Hello my friends! Aren't these flowers from the Year of Flowers: Violets stamp set just gorgeous! I just had to play with the set again. My last violet card showcased the flower as the focal point, this time I used the image as more of a background... Stamped the violets and leaves in Pure Poppy onto Berry Sorbet cardstock and pulled out my embroidery floss to tie a few french knots onto the flower centers.
Love the texture the french knots add!
Fillable Frames #1 and the matching die are a must have (IMO), the possibles with them are endless. I die cut the frame from White cardstock, stamped it and the sentiment in Pure Poppy. Stamped an additional violet into the frame, in Berry Sorbet, then embellished with french knots and a ribbon tab.

Thanks for stopping by and I hope you enjoyed!

Maile


Just Because:

Friday, January 8, 2010

Celebrate Today Cupcake

Hello all! Happy Friday! Today I bring you a little birthday card... This cute little cupcake is from Cupcake Collection. I stamped it in raspberry fizz, ocean tides and vintage cream (for the frosting). Topped it with an aqua handmade flower, which was created from the smallest Blossom Nestabilites, and a button.
Attached the cupcake to the center of an embossed frame. To create the frame I punched a circle from white cardstock, rounded the corners, embossed it with swiss dots, stamped the sentiment (I should have done this before embossing), wrapped with embroidery floss and attach to the card base with dimensional adhesive.

Hope you all have a wonderful weekend. My weekend has pretty much started today since my hubby has been home. Tomorrow I get to go shopping with a friend of mine, with out any kids! :)

Thanks for taking the time to visit today!

Maile


Celebrate Today: (All PTI unless noted)
  • Stamps: Cupcake Collection
  • Ink: Ocean Tides, Raspberry Fizz & Vintage Cream
  • Cardstock: Aqua Mist, White & Aqua Mist
  • Accessories: Cream Vintage Button, Embroidery Floss, Cuttlebug Swiss Dots Embossing Folder, Blossom Nestabilities, Marvy Uchida Circle Punch & Corner Rounder.

Card Measures: 3 1/2" X 5 1/2"

Wednesday, January 6, 2010

Be Mine

Happy Wednesday to you! I am on my way out the door to visit with a friend, but I wanted to pop in a share another Valentine's Day Card with you.

By the way, in case you are unaware, the super sweet Winter Sims has put together a Card Drive for the children at St. Jude's Children Hospital. She is planning on hand delivering the cards (on her own vacation time!) in time for Valentine's Day. So stop by her blog and check it out (there is a prize available too!) and hopefully you too can create some cards to cheer up some children in need.Now on to the card... The tree top and scalloped border were both punched from spring moss cardstock, stamped with text (from Background Basics: Text Style) in ripe avocado and then distressed. I think I may have gone a little crazy with my Edge Distressing Tool! Lol! Wrapped the scalloped border with pink embroidery floss.
Then embellished the tree top with pink heart brads, placed it over a white cardstock block stamped with the tree base and sentiment (from Heart Prints), rounded the top corners and distressed the bottom edge.

Hope you are having a great week, talk at you later!


Maile

Be Mine: (All PTI unless noted)
  • Stamps: Beyond Basic Borders (Tree), Heart Prints & Background Basics: Text Style
  • Ink: Ripe Avocado, Dark Chocolate & Pink
  • Cardstock: Kraft, Spring Moss & White
  • Accessories: JoAnn's Heart Brads, Embroidery Floss, CTMH Edge Distressing Tool, Circle Punch, Embossed Curves Border Punch & Corner Rounder.

Tuesday, November 10, 2009

Inspire Me Challenge #3

Happy Tuesday to you all!I really wanted to participate in the latest Inspire Me Color Challenge hosted by Dawn over at her blog Stamp Away With Me. The deadline was last Sunday but I really wanted to give this fun color combo a try. So even though the deadline has passed, here is my card...I don't have the exact colors she listed, so instead I used PTI colors: Enchanted Evening, Spring Rain, Scarlet Jewel and Vintage Cream.
Isn't this a fun way to put those huge buttons to use?! The button ornaments were stitched directly to the cardstock. I pierced a hole just above each button, strung the embroidery floss through, wrapped it back around to the front and tied the ends into a tiny bow.

Thanks for stopping by!

Maile


Happy Holidays: (All PTI unless noted)
  • Stamps: Signature Christmas & Background Basic: Text Style
  • Ink: Enchanted Evening & Scarlet Jewel
  • Cardstock: Scarlet Jewel & Vintage Cream
  • Accessories: Spring Rain, Enchanted Evening & Scarlet Jewel Vintage Buttons, DMC Embroidery Floss & Corner Rounder

Monday, November 9, 2009

Hi Friend

Hello there! Hope you had a great weekend. So how about an idea for those bits of scrap ribbon we all have laying around...
The ribbon strips were adhered to the left side of the card base. Next I strung buttons onto twine, wrapped the twine around a white strip of cardstock. Stamped the sentiment in black (from Beautiful Blooms) then adhered the strip over the end of the ribbon onto the card base with dimensional adhesive.

Hope you found this helpful. Have a wonderful start to your week and thanks for stopping in today!

Maile


Hi Friend: (All PTI unless noted)
  • Stamps: Beautiful Blooms (Sentiment)
  • Ink: True Black
  • Cardstock: White & True Black
  • Accessories: Ribbon Scraps, Vintage Buttons, DMC Embroidery Floss

Thursday, October 29, 2009

Just Swinging By To Say...

Hello my friends! Today I wanted to share a simple invitation I made for a friend (Hi Jamie!). Her son is turning one and they are celebrating with a jungle theme party. The other day we went to the craft store and she picked out these Stampendous monkey stamps for the invitations (Changito Dos). I kept the design as simple as possible since I needed to make a bunch of them.
The vine image was stamped twice at the top of the circle, then the monkeys were stamped to look like they were hanging from the vines. The green panel was stamped with leaves in Versamark. For some texture and interest I added a torn edge and wrapped the green panel with embroidery floss. Finished it off with a sentiment stamped in brown.

Thanks for stopping in today, hope you have a blessed day!

Maile


Just Swinging By To Say... (All PTI unless noted)

  • Stamps: Stampendous Changito Dos
  • Ink: Dark Chocolate, Ripe Avocado & Versamark
  • Cardstock: Dark Chocolate, Ripe Avocado & White
  • Accessories: Marvy Uchida Circle Punch & DMC Embroidery Floss

Tuesday, October 20, 2009

French Knot Tutorial

Hello! A few of you had been asking for a tutorial on how to create the "French Knots" I have been using on my cards lately. Here and here are a few cards for example. Here is how I do it...

1. Supplies needed are: paper piercing tool, mat, cardstock with stamped image, needle, embroidery floss, scissors & a pin cushion (because with out it, I would loose my needles and step on them later).


2. Pierce all holes before starting.


3. String needle and tie a knot at the end of the embroidery floss.


4. Pull the floss through the hole from the bottom up. (The first knot is already tied as a reference)

5. Hold the needle close to the hole.


6. Wrap the embroidery floss around the needle three or four times, while holding the floss firmly in place with your finger.


7. Insert the needle back through the hole you came up through, making sure to hold the floss in place.


8. Pull the needle and floss all the way through and pull tight.


9. Repeat. And there you have it!


Sorry for the format, since this was my first attempt at a tutorial I had no idea how it would turn out.
I do hope you find this tutorial helpful. This is really an easy process and I hope you too will give it a try. If you do give it a try I would love to see what you create, so leave me a comment linking me to your project!

Let me know if you have any questions at all, or if I need to clarify anything. Thanks for spending a little time with me today, hope you enjoyed.

Maile

Wednesday, October 14, 2009

Holiday Greetings

Happy Wednesday! I just can't believe Christmas is just under 2 1/2 months away! So with that in mind, yesterday I was in the mood to make a Christmas card... I stamped the flourish Christmas Tree, from Tree Trimming Trio, onto a piece of PTI rustic cream cardstock. Matted it with spring moss cardstock punched with the upper crest border punch. Wrapped with brown floss and then attach three ornaments in scarlet jewel.

The sentiment, from Signature Christmas, was stamped onto a hand cut label from Vintage Labels. The sentiment label was a little lonely in the corner by it self, so I attach a couple strips of scarlet jewel twill ribbon.

Have a wonderful day!

Maile


Holiday Greetings: (All PTI unless noted)
  • Stamps: Tree Trimming Trio, Signature Christmas & Vintage Labels
  • Ink: Spring Moss, Scarlet Jewel & Dark Chocolate
  • Cardstock: Scarlet Jewel, Spring Moss & Rustic Cream
  • Accessories: Scarlet Jewel Twill Ribbon, DMC Floss & Upper Crest Border Punch

Tuesday, October 13, 2009

Frolic

Hello all! Today's card was made using the Twitterpated Collection again. Isn't that little fox just the cutest thing, I just had to use him. The cloud pattern paper is a lot of fun to work with too. I found out that one of my new PTI colors, Melon Berry, was a perfect match to the fox and some of the coordinating pattern papers. I think I am becoming addicted to this color, it took me a while to actually break down and buy it, but I am glad I did. One of my new favorite color combos is Melon Berry, Aqua Mist and Dark Chocolate.
Hope you have a great day and thanks for stopping by!

Maile


Frolic:
  • Pattern Paper: Twitterpated Collection from Imaginisce
  • Cardstock: PTI White (for base), PTI Melon Berry & Core'dinations Brown
  • Accessories: Die Cuts & Brad from Twitterpated Collection, DMC Floss, Melon Berry and Dark Chocolate PTI Vintage Buttons & Fiskers Upper Crest Border Punch

Wednesday, October 7, 2009

Fun With Felt

Happy Wednesday to you all! I have a fun polka dot felt card to share with you today... The polka dots were made using bright pink felt. To create these fun polka dots...first you need to punch circle from cardstock, in the desired sizes, to make templates. Next cut circles from the felt, when cutting the circles I found it easiest to place the template onto the felt then cut around it. Randomly place the felt polka dots onto the cardstock, of your desired size, using extra tacky double sided adhesive tape. Then trim the edges.
For the button and floss detail... all I did was thread the buttons, wrapped the floss around the cardstock a few times, then tied the ends together on the back side. Anyways, just thought I would share a little info with you. Hope you found it helpful!

Thanks for stopping by today, hope you enjoyed your visit!

Maile


Hello: (All PTI unless noted)
  • Stamps: Polka Dot Basics II & Beyond Basic Borders (Sentiment)
  • Ink: Dark Chocolate
  • Cardstock: Dark Chocolate, White & Aqua Mist
  • Accessories: Bright Pink Felt (Craft Store), Vintage Buttons, Embroidery Floss, Cuttlebug Tag Die, Circle Punches & Corner Rounder.

Monday, October 5, 2009

Raspberry Suite Color Challenge #17

Hello again my friends! Thanks so very much for bearing with me in my absence. Yesterday I finally had a chance to play around with the newest color challenge by Dawn McVey. Here is what I came up with...
I really liked the flower paper in the picture so this is my handmade version, I randomly stamped the flower image in Versamark, red and aqua inks onto craft cardstock.
Last week when my mom and I were shopping for the party we had this weekend, we stopped by the craft store and I had a chance to pick up some fun fabrics. For this card I stamped a label, from my new Vintage Labels stamp set, onto some burlap and then cut it out (I don't have the coordinating dies for this stamp set, but I did find out that Nestabilities do work on burlap).
The flower was die cut from red felt then stitched onto the burlap with a button and brown floss. Using the same brown floss I stitched "Hi" onto the label.

I hope you had a great weekend and thanks for stopping by!

Maile

"Hi": (All PTI unless noted)
  • Stamps: Vintage Labels & Inque Boutique - Floradoodles
  • Ink: Aqua Mist, Dark Chocolate, SU Real Red & Versamark
  • Cardstock: Dark Chocolate, Kraft & Bazzil Red
  • Accessories: Burlap, Flowers Cuttlebug Dies, Aqua Vintage Buttons, DMC Floss, Aqua Mist Twill Ribbon, Upper Crest Border Punch

Wednesday, September 30, 2009

For A Special Friend

Happy hump day to you my friends! Today I am taking a very special friend out to lunch for her birthday and this is the card I made for her... I stamped four square panels with a flower and leaf image from In Bloom, detailed the flower centers with french knots. Punched the bottom edge of the purple panel with the Fiskers Upper Crest Border Punch, stamped the sentiment and wrapped it with white floss. Stamped white tiny polka dots, from Polka Dot Basics II, on the card base.
I hope she likes it, I know she likes purple and my cards with the square panels are her favorite. Something I like to do when giving cards out is to write out the message on a piece of white computer paper then lightly tack it into place on the inside. That way the message can be easily removed and the receiver can reuse the card.

Hope you all have a wonderful Wednesday! Thanks so very much for visiting me to day!

Maile

Friend: (All PTI unless noted)
  • Stamps: In Bloom, Polka Dot Basics II & Beautiful Blooms (Sentiment)
  • Ink: Ripe Avocado, SU Perfectly Plum & SU Craft White
  • Cardstock: Kraft, White & SU Perfectly Plum
  • Accessories: DMC Floss, Upper Crest Border Punch

Tuesday, September 29, 2009

Pink, Green, Blue & Chocolate CAS34

Hello my friends and happy Tuesday to you all.

This weeks CAS Challenge is a color challenge... to use pink, green, blue & chocolate (optional). Here is what I came up with...
I went with my With Sympathy stamp set, I haven't used this one in a while. Stamped the vine image in moss and incorporated the other colors for the challenge through the flowers. The tiny flower image was stamped directly onto the white cardstock. The larger flowers were stamped then cut out and attached with dimensional adhesive.

The sentiment was stamped onto a pink strip, punched holes on either side, strung the floss through, wrapped it around the card and tied it off into a bow.
Finished off the card with some Liquid Pearls in the center of the flowers.

It sure is a nice day in my neighbor hood today, the temperature has finally gone down (it's a cool 68 deg). They say its supposed to get cooler as the week progresses, yeah it finally feels like fall is actually here!

Glad you stopped by today! I do hope you enjoyed your visit.

Maile


The Earth Laughs In Flowers: (All PTI unless noted)

  • Stamps: With Sympathy & Green Thumb (Sentiment)
  • Ink: Spring Moss, Dark Chocolate, Spring Rain & Sweet Blush
  • Cardstock: Spring Moss & White
  • Accessories: Liquid Pearls (Ranger), DMC Embroidery Floss, Fiskers 1/8" Hole Punch

Monday, September 28, 2009

Stitched Trio

Hello my friends! I hope you all had a great weekend!

My cards for today were inspired by the Loonie Stampers Challenge #59. This week Dee chose the challenge, to create a single layer card...This sure was a fun challenge, I couldn't stop at just one card. Playing again with embroidery floss, I stitched French Knots onto images from Beyond Basic Borders. Here is a shot of each card...
Well, that's all from me today. I hope you all have a great start to your week! Thanks for stopping by today.

Maile


Supplies for all three cards: (All PTI unless noted)
  • Stamps: Beyond Basic Borders
  • Ink: Ripe Avocado & Dark Chocolate
  • Cardstock: Kraft
  • Accessories: DMC Embroidery Floss & Corner Rounder

These cards measure 4 1/4" X 2 3/4".

Wednesday, September 23, 2009

Heart Prints

Hello my friends! I know Valentine's Day is a long ways away, but when I made this card last week I made today's card as well (since my Heart Prints stamp set was already out). When creating today's card I was inspired to play around with the sentiments and make some hand stamped pattern paper. The "Be Mine" and the small heart are separate images. So to make things go faster, I adhered them next to each other, on my acrylic block, and then stamped away.

The large heart was die cut from kraft cardstock and then crinkled, the small heart was stamped in berry sorbet. Wrapped the patterned paper with berry and brown floss and tied it off with a brown button.
Thanks for stopping by today! Hope you have a wonderful day!

Maile


Be Mine (All PTI unless noted)
  • Stamps: Heart Prints
  • Ink: Berry Sorbet
  • Cardstock: Kraft, Dark Chocolate & White
  • Accessories: Dark Choc Vintage Button, DMC Floss, Cuttlebug Heart Dies, Edge Distressing Tool.

Card Measures 5" X 5"

Friday, September 18, 2009

Going Gray

Hello my friends and happy Friday! Just playing around some more with my Heart Prints stamps set, I really don't use this set enough. The color gray is something I don't use often enough either. I love how it adds a softness to the color combo.

The card is created with a gray card base, the flourish was stamped in gray ink and then added a few tiny hearts in raspberry ink. Attached a raspberry apron lace border and wrapped it with black floss. Embellished the card with a polka dot heart, button and twine. Then finished it with a "XOXO" in the rounded corner.
So what do you think... Could this pass as a wedding card for the CAS32 Challenge?

Did you see the new Polka Dot Paradise Color Challenge over at Embellish Magazine? What a fabulous color combo! I do hope to give it a go today. I've decided to make the best of a weekend spent at home (instead of camping) and create! We will probably take a day trip to somewhere on Saturday.

Anyways, hope you have a fun weekend! I'm very glad you stopped by today, hope you enjoyed!

Maile


"XOXO": (All PTI unless noted)
  • Stamps: Heart Prints
  • Ink: Raspberry Fizz, True Black & SU Going Grey
  • Cardstock: White, Raspberry Fizz & SU Going Grey
  • Accessories: Raspberry Fizz Vintage Button, DMC Floss, Apron Lace Border Punch & Corner Rounder

Monday, September 14, 2009

Make A Wish

Happy Monday to you all! Hope you had a great weekend!

I had a very busy weekend so no crafting time for me. So today's card was one I had created sometime last week.Using one of the single candle images from PTI Cupcake Collection, I stamped and punched a few candles out. Popped them onto the card with dimensional adhesive, wrapped some floss, stamped the sentiment (in craft white ink), rounded the corner and embellished the candle flames with my stardust stickles.
So we had a busier than usual weekend. We hit the beach on Saturday, it was overcast but we still had fun. Then visited with family, my cousin and his little family were visiting from Eastern Canada. Sunday was the PPS birthday party (Princess, Pony & Superhero) and my son had a blast, he did not want to get off of the pony.

Anyways, enough about me. I hope you enjoyed the card and thanks for stopping by!

Maile


Make A Wish: (All PTI unless noted)

  • Stamps: Cupcake Collection
  • Ink: Berry Sorbet, Summer Sunrise & SU Craft White
  • Cardstock: Berry Sorbet & White
  • Accessories: White DMC Floss, Ranger Stickles Glitter Glue, Circle Punch & Corner Rounder

Thursday, September 10, 2009

Third Time's The Charm

Hello all!

I'm back with a card to share with you today. For this card I had played around with some goodies I had received earlier from Lynette, you can see them here.
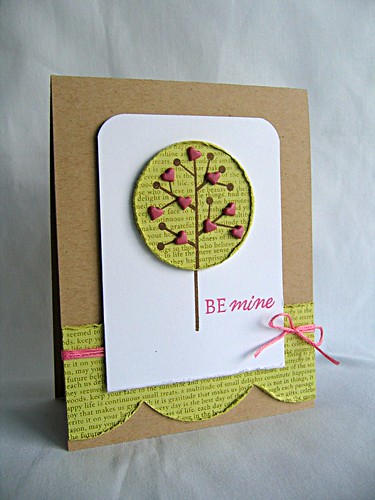
To creat my focal image I stamped the flower stems then punched them out using my circle punch. Instead of adding buttons I used brads as my little flowers. Stamped some polka dots on the green panel in Versamark, stitch a row of white floss and added one last brad.

I am really happy with the way the sentiment came out, it just took me a few tries to get it right. :) I knew I wanted part of the sentiment to pop with white, so the first thing I tried was stamping the first part in green, then the "love" in craft white ink. That didn't stand out enough, so the next option was to heat emboss with white embossing powder. I tried this on a scrap piece of cardstock first to see if it would work and it turned out fine. But when I tried it on the final piece, it of course didn't turn out. So to cover up the mess I stamped "love" in green, on white cardstock, and punched it out with my small circle punch, popped it on with a dimensional, and it was perfect. I love it when mistakes lead you to the perfect solution, I mean... Why did I not think of that first?! Ha,ha!

I guess this card would also work for the latest CAS challenge, to Pop It Up. I think I'll stop by SCS an post it over there too.

I hope you enjoyed your visit with me today and have a wonderful Thursday!

Maile

All Thing Grow With Love: (All PTI unless noted)

  • Stamps: Everyday Button Bits & Polka Dot Basics II
  • Ink: Ripe Avocado & Versamark
  • Cardstock: Raspberry Fizz, Ripe Avocado, Kraft & White
  • Accessories: DMC Floss, SU Brads, Large & Small Circle Punchs, SU Top Note Dies & Corner Rounder

Tuesday, September 8, 2009

CAS31 Hugs & Kisses

Happy Tuesday my friends!

This weeks CAS Challenge is Pop It Up, to use dimensionals/pop dots on your card. Here is what I came up with...I pulled out my neglected PTI Heart Print stamp set for this one. Stamped and cut out each heart and popped them up with dimensional adhesive. Super simple!
This challenge was a breeze, adding dimension is something I do on every card. It's always a fun detail to add.
Thanks for stopping by today, hope you enjoyed.
Maile

Hugs & Kisses: (All PTI unless noted)

  • Stamps: Heart Prints
  • Ink: Raspberry Fizz, Dark Chocolate & SU Real Red
  • Cardstock: White, Raspberry Fizz & Dark Choc
  • Accessories: DMC Embrodery Floss

Wednesday, September 2, 2009

Something Other Than Christmas and Goodies!

Hello there my friends!

It's time to give the Christmas Cards a break! So here is a simple birthday card I have to share today... It's based off the same layout as this card. Just changed the colors around and used a different image. This is such a versatile layout, you could pretty much use any image you choose. Just add a few fun details to the image and your good to go!
I also wanted to share these wonderful goodies with you too. Lynnette was kind enough to send all of this to me in exchange for some stamped Everyday Button Bits images. She is so very generous and is a very talented card maker as well. Please check out her blog and fabulous work, your sure to enjoy!
Isn't this card adorable!

It amazes me how many new friends I have made through this blog, you all have been a blessing to me!
I hope you all have a wonderful Wednesday!
Maile
Happy Birthday: (All PTI unless noted)
  • Stamps: Everyday Button Bits & Mixed Messages
  • Ink: Raspberry Fizz & Dark Choc
  • Cardstock: Raspberry Fizz & White
  • Accessories: Raspberry Fizz Vintage Buttons, DMC Floss, Apron Lace Border Punch
 
BLOG DESIGN BY: SHERBET BLOSSOM DESIGNS