Showing posts with label Valentine's Day. Show all posts

Friday, February 4, 2011

Embellish Color Trends Challenge with Hearts

Embellish Color Challenges are back! Check it out... The Challenge: To create a project using the colors pictured above and to incorporate hearts. The Sponsor: Tiffany Doodles! Check them out here.
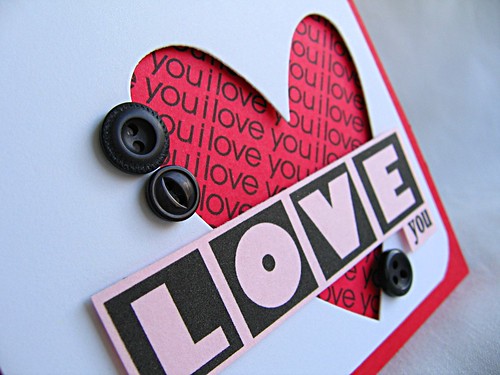
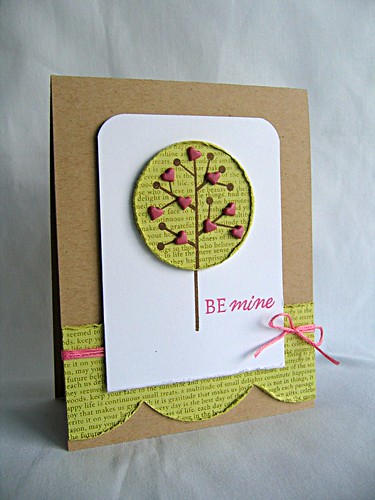
For today's project, I've used Labels 3 and Birdies Housework. Started today's card by die cutting three hearts from Pure Poppy cardstock, impressed them with Sheet Music Impression Plate and attached them to a white card base with dimensional adhesive.

Printed the Labes 3 onto Simply Chartreuse cardstock, the birds (from Birdies Housework) onto Hibiscus Burst and Hawaiian Shores, cut out and attached over the hearts. To finish the card off, I stamped "XOXO" and embellished with a few black Rhinestones.

Now it's your turn to join in on the Embellish Color Trends Challenge fun! Look here for the challenge details, the Design Teams amazing creations and the fabulous prize. To share your projects, either link here (just below) or over at the Embellish blog. Hope to see your challenge creation soon!

Thanks for stopping by and have a great one!

Maile


XOXO:

Tuesday, January 11, 2011

Be Mine Valentine

Hello all! Just quickly popping in to share a simple Valentine's Day card using 2010 Love Tags...Link Today's card started with a die cut Hibiscus Burst scalloped circle. Die cut a circle from the center of the scalloped circle (both dies are from Limitless Layers: 1 3/4" Circle Die Collection). Then stamped the solid heart circle image in Hibiscus Burst, punched it out, die cut a heart from the center, layered over the scalloped circle and attached it to the card base with dimensional adhesive.
Attached white cardstock strips to either side of the circle and stamped with a sentiment in Hibiscus Burst. Finished the card off with a few die cut Pure Poppy felt hearts.

That's it from me, hope you have a great one!


Maile


Be Mine Valentine:

Saturday, January 8, 2011

I Feel Lucky

Hello and Happy New Year to you all! Forgive me for my unannounced leave of absence. I really didn't expect to leave you hanging for so long. I've had a lot on my plate these days and just needed time to focus on my family and my ever growing to do list. I've got some new and exciting ventures coming up, but I can't share at this time.

However, I did want to let you know that I am fine, and thanks to those who contacted and checked in on me. It sure is nice to know that I was missed!

Today's card is in honor of the New Year and Valentine's Day. Pulled out an older set, Luck of the Irish , for this one... Started with a white base and then impressed it with the Linen & Canvas Impression Plate.
Stamped a row of frames (in Pure Poppy and Raspberry Fizz) and a sentiment (in True Black) onto a strip of cardstock. Attached the strip to the card base with dimensional adhesive. Finished the card off with a True Black heart (also impressed with the Linen & Canvas Impression Plate) and a few True Black Buttons and white twine.

Thanks for stopping by today and have a great weekend!

Maile


I Feel Luck In Love:

Sunday, December 19, 2010

Love Birds

Hello! Hope you all enjoyed your weekends. Today I wanted to share a card I had made before the last Papertrey Ink release, using Love Birds. Don't look to closely. You may notice the wet ink I accidentally smeared (once I finished stamping the tree panel of course... arg!). This card started with the idea of using the two heart images, from Love Lives Here, to create leaves. Stamped the tree trunk, from Merry Little Christmas, in Dark Chocolate.
Stamped both hearts repeatedly, in Simply Chartreuse ink, at the end of the branches.
Die cut, stamped and attached the bird cage below the stamped chain (both from Love Birds). Stamped the grass image (from Love Lives Here) along the base, in Simply Chartreuse. Die cut a scalloped border from kraft cardstock and impressed with the Sheet Music Impression Plate. Attached the border and wrapped with baker's twine. To finished the card off I attached the tree panel to a kraft cardstock base, along with a strip of Happy Spots pattern paper.

That's it from me today, hope you all have a great Monday! Thanks for stopping by!
Maile

Love Birds:

Monday, December 13, 2010

Love Tags

Hello, and welcome to the final day of the Papertrey Ink December Countdown and the second Design Team Group Post. Today we are showcasing the lovely 2010 Love Tags set. We are putting this set to use and making both Valentine's Day and "year-round" project, to show just how versatile this set truly is. Each design team members is working with a different image and I chose to work with my favorite, the Solid Heart Background.

First up a Valentine's Day favor...
My Valentine favor started by die cutting and assembling a kraft Favor It Box 3. Stamped a sentiment from 2010 Love Tags in Pure Poppy into a white cardstock strip and attached it across the bottom of the favor box.
Die cut a Pure Poppy scalloped circle, using the Limitless Layers: 1 3/4" Circle Die Collection. Topped the scalloped circle with a punched Pure Poppy solid heart background circle image and attached it to the box with dimensional adhesive. Embellished with a medium heart, die cut from a stamped Hibiscus Burst solid heart background image, and a Hibiscus Burst button. Finished it off with a Hibiscus Burst ribbon bow to tie the top shut.
Next up, a "year-round" baby card. This baby card started with the a hand stamped Bloom Builders #2 flower, which then needed a base.
Here's How: For the card base, I started with one of my favorite images, from the Mat Stack #2 Collection set, to create a rather large circular doily pattern. After marking the center of the pattern, I lined up one of the image corners with the center and stamped.
Inked up the image again and stamped a second time over lapping the first image.
Repeated the step above, rotating the image slightly each time I stamped. I found that the process went much smoother if I located points, in the image, to line up the same way each time I stamped.
I continued until I had stamped all the way around and completed the entire circle.

I am so in love with the way this turned out!!! At this point, you could finish it off with a stamped sentiment and you'd have yourself an amazing single layer card! But I topped mine with a flower I had already made.
Here's how: Once the flowers were die cut from white cardstock, I masked off each petal (using Post It Notes) and stamped each with the solid heart background image from 2010 Love Tags. The small flower was stamped in Sweet Blush and the medium flower was stamped in Hibiscus Burst. Then assembled, see Nichole Heady instructions here.
Here's A Idea: Once the flower was assembled, I gave it a bit more dimension by curling back the end of each petal using the round handle of a paint brush. Embellished the center with a button and then attached to the card base. Finished the card off with "baby" stamped in True Black.

That's it from me today. Now, be sure to stop by and see what the rest of the Design Team has in store for you tonight:

Thanks for visiting, hope you have a great one!

Maile


Happy Valentine's Day Favor Box:

Baby:

Wednesday, January 6, 2010

Be Mine

Happy Wednesday to you! I am on my way out the door to visit with a friend, but I wanted to pop in a share another Valentine's Day Card with you.

By the way, in case you are unaware, the super sweet Winter Sims has put together a Card Drive for the children at St. Jude's Children Hospital. She is planning on hand delivering the cards (on her own vacation time!) in time for Valentine's Day. So stop by her blog and check it out (there is a prize available too!) and hopefully you too can create some cards to cheer up some children in need.Now on to the card... The tree top and scalloped border were both punched from spring moss cardstock, stamped with text (from Background Basics: Text Style) in ripe avocado and then distressed. I think I may have gone a little crazy with my Edge Distressing Tool! Lol! Wrapped the scalloped border with pink embroidery floss.
Then embellished the tree top with pink heart brads, placed it over a white cardstock block stamped with the tree base and sentiment (from Heart Prints), rounded the top corners and distressed the bottom edge.

Hope you are having a great week, talk at you later!


Maile

Be Mine: (All PTI unless noted)
  • Stamps: Beyond Basic Borders (Tree), Heart Prints & Background Basics: Text Style
  • Ink: Ripe Avocado, Dark Chocolate & Pink
  • Cardstock: Kraft, Spring Moss & White
  • Accessories: JoAnn's Heart Brads, Embroidery Floss, CTMH Edge Distressing Tool, Circle Punch, Embossed Curves Border Punch & Corner Rounder.

Friday, January 1, 2010

The New Embellish Magazine Design Team

Hello and Happy New Year my friends!!! Boy, have I got some exciting news to kick this new year off with. It's been very hard to keep under wraps, but now I can share! Along with starting a new year, I am starting a new venture in my life. I am taking part in my first ever Design Team with Embellish Magazine, and am working with some of the most talented ladies in the business:

What a blessing and honor it has been to be given this opportunity (thank you Ashley!), and to get to know these wonderful ladies better.

So please join us, in participating in the new and first Embellish Color Challenge of this brand spanking New Year. Which is sponsored by The Cutting Cafe, a wonderful resource for Printable Stamps and Cutting Files.

So here is my first creation as a Design Team Member (Woo-Hoo!)... The first step, print the I Love You Background, on red cardstock and attach it to a red card base. Using dimensional adhesive, attach a heart die cut. Creating my own heart die cut was a breeze! All I did was cut a square from white cardstock, round the corners, then carefully placed my Cuttlebug Concentric Heart Die precisely where I wanted it and ran it through my CB machine.
Adhered a pink "Love", from All About Valentine's Day, and embellished with black buttons.

I can not wait to see what you all create!

I am so excited about sharing more of my Embellish Challenge creations with you over this next year! Thanks for stopping by and for sharing in my excitement! Hope you have a blessed year!

Maile


Love You:

  • Printable Stamps: The Cutting Cafe
  • Cardstock: Pure Poppy, White & Sweet Blush
  • Accessories: PTI Black Vintage Buttons, Cuttlebug Concenteric Hearts Die, Corner Rounder

Card Measures: 4 1/4" Square

Wednesday, September 23, 2009

Heart Prints

Hello my friends! I know Valentine's Day is a long ways away, but when I made this card last week I made today's card as well (since my Heart Prints stamp set was already out). When creating today's card I was inspired to play around with the sentiments and make some hand stamped pattern paper. The "Be Mine" and the small heart are separate images. So to make things go faster, I adhered them next to each other, on my acrylic block, and then stamped away.

The large heart was die cut from kraft cardstock and then crinkled, the small heart was stamped in berry sorbet. Wrapped the patterned paper with berry and brown floss and tied it off with a brown button.
Thanks for stopping by today! Hope you have a wonderful day!

Maile


Be Mine (All PTI unless noted)
  • Stamps: Heart Prints
  • Ink: Berry Sorbet
  • Cardstock: Kraft, Dark Chocolate & White
  • Accessories: Dark Choc Vintage Button, DMC Floss, Cuttlebug Heart Dies, Edge Distressing Tool.

Card Measures 5" X 5"

 
BLOG DESIGN BY: SHERBET BLOSSOM DESIGNS