Thursday, April 14, 2011

Papertrey Ink - April 2011 Release Projects

Hello guys! I hope you've enjoyed this months Papertrey Ink release. I have a bunch more release cards to share with you today. So let me get started... First up, Grunge Me by Tiffany Pastor. This set is a ton of fun and right off the bat I knew it would work perfectly with my set Modern Basics. Boy was I right, I love the end result.
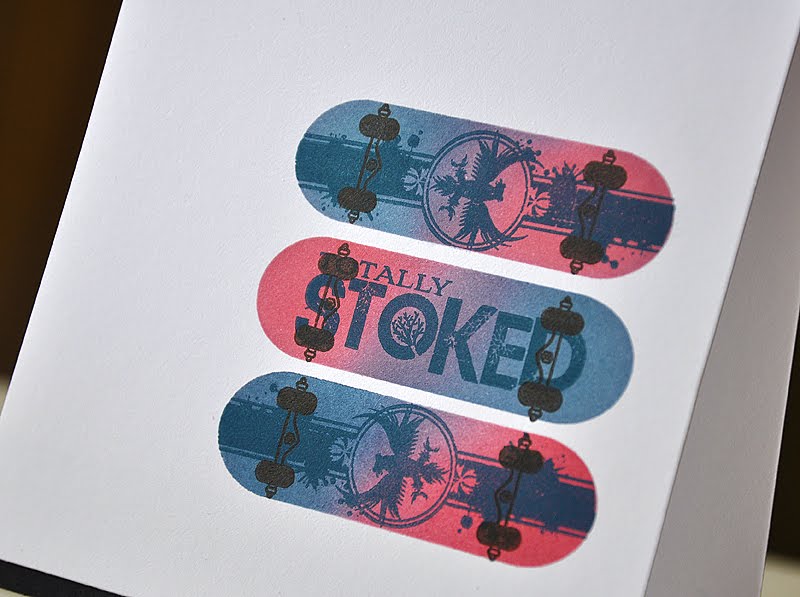
I started by stamping the large Modern Basics border image in Summer Sunrise. Then layered a few Grunge Me images in Enchanted Evening and Raspberry Fizz and a sentiment in True Black. I can't wait to pair these two together again.
Next, Tag-its #3 by Heather Nichols. So far this is my favorite of the Tag-it series, although I think I say this every time. I love the style of this card! It's a bit out of the normal for me, but it makes me happy.
I love how easy it is to turn the tiny flower bunch into a flowery row, by simply stamping the image over and over again. What do you think of the butterfly?! I attached five Love Lives Here butterflies together, in the center, and the spread the wings apart with dimensional adhesive. Gives the card a ton of dimension!
How about some My Hero, My Dad, another set by Tiffany Pastor. This set includes a ton of sentiments perfect for guy cards but it also includes a few very versatile images.
I was able to create this awesome pattern with a few of those images. I love sets like these, that give you unlimited pattern building options.
Next up, Flower Fusion #3 by Melissa Bickford. I've been waiting for for this third set! I've been anxious to recreate this (third card down in blog post) card idea, using all of the coordinating Flower Fusion flower stems together. I used the same basic technique as before. Although, this time around I stamped the stems across the entire length of the card.
Stamped and attached a vellum sentiment strip with some hidden dimensional adhesive and embellished with a few die cut Flower Fusion flowers.


Also, Train Tracks by Beth Silaika. This train is so stinking cute!!! Cutest train I've seen yet. I created a hand stamped pattern using the different train parts stamped in Pure Poppy, Ripe Avocado, Summer Sunrise and Stormy Sky Distress Ink.
And this little guy makes me smile, because he was so easy to make and he's adorable. Die cut from kraft cardstock and then touched him up with a few matching Copic markers.
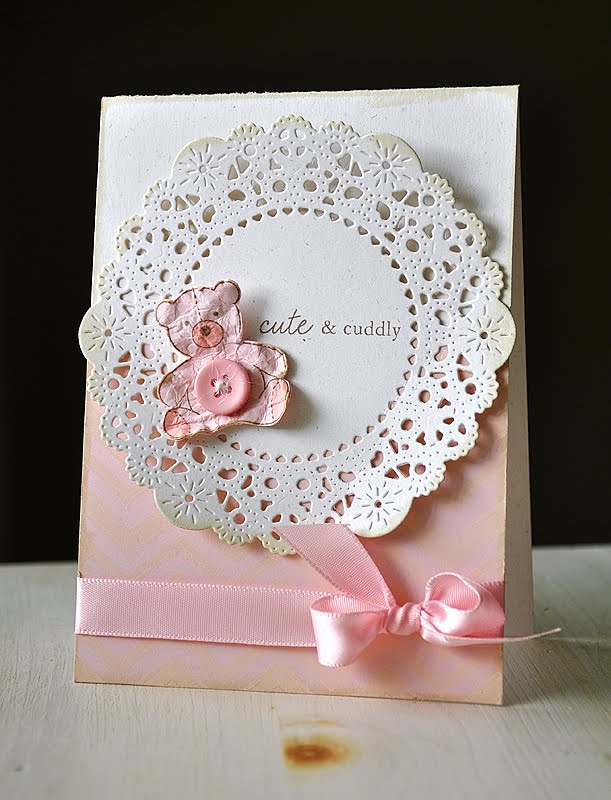
Last, but not least! Ad Sense and Boy Basics: Simple Circles both by Lisa Johnson. Check out this label, love the shape! Stamped it using a few of the images and sentiments from Ad Sense.
And this border die is soooooo versatile, it can go from this (with a few buttons) to this (pictured above) using the coordinating Boy Basics: Simple Circles set and a few other images from Ad Sense.

So there you have it! All supplies used are listed in the Papertrey Ink gallery.


I hope you've enjoyed the goodies from yet another fabulous release! I'd love to hear what you all are looking forward to receiving the most from this months release! Can't wait to see what you create!


Maile

Wednesday, April 13, 2011

Introducing Background Basics: Chevron Stripes Day Five

Hello, all! Today is the final day of the Papertrey Ink April Countdown! I hope your as excited as I am! So, this means that at midnight EST, tonight, all the goodies you've seen will be available for purchase at Papertrey Ink! And that does include Background Basics: Chevron Stripes! Also, be sure to stop by Nichole's blog and the Papertrey Ink Forum early (10pm EST) for the release night party.

Now, how about a couple more cards using Background Basics: Chevron Stripes. I tend to create most of my cards in a portrait orientation (meaning an A2 card with 5 1/2" as the height and 4 1/4 as the width). For my first card, I thought I would change things up a bit... This card started with a few stamped clouds, from Up, Up & Away, in Fresh Snow ink. Along the bottom I stamped a chevron pattern in Pure Poppy, Berry Sorbet and Summer Sunrise onto a strip of white cardstock. Die cut a Fillable Frames #4 from Berry Sorbet cardstock, trimmed, attached and stamped with the sentiment. Stamped a few balloons, also from Up, Up & Away, in the same colors and attached with dimensional adhesive. Then embellished with a True Black button and silk ribbon.

The images in Background Basics: Chevron Stripes measure approximately 5" wide. But don't let this intimidate you, it's rather quite easy to continue an entire row across the width of a landscape oriented card. I'll show you how (but please excuse the messiness of my red stripes, my ink pad was in dire need of a re-inking)... Here's How: I started by stamping my chevron stripe closest to one side. Next, ink up again (this time you don't have to ink the entire stamp, your only using the end) and stamp image as close to the end of the previously stamped image as possible. I like to mix things up within the pattern. In order to help keep my seams hidden, I stamp them in different spots. For example, in the images above, I stamped my chevron stripe closest to the opposite side of my cardstock from where I started. This way the next seam is in a different place, making it less obvious. Here's the finished sample! Isn't it pretty?!
By the time I finished stamping, I was left with very little time to create something using this freshly stamped pattern paper before I ran out of good picture taking day light. So I quickly whipped up this Chevron Notes In A Tin ensemble in practically no time flat... I created a wrap for this Clear Top Nugget Tin with a strip of white cardstock. Cut a strip of my freshly stamped pattern paper to fit the top and attached. Wrapped with Berry Sorbet Ribbon and attached a Tiny Tags tag with some white silk ribbon. For the notes I attached all 7 chevron stripe images to my acrylic block and stamped all at once, onto colored cardstock, in coordinating inks... Stamped onto Berry Sorbet cardstock with Berry Sorbet ink, onto Summer Sunrise cardstock in Summer Sunrise ink, and onto Pure Poppy cardstock with Pure Poppy ink. Wrapped each card with coordinating ribbon and stamped each with a Modern Basics sentiment in Fresh Snow ink. These card measure 4 3/4" X 3 1/4", so they fit perfectly into the Clear Top Nugget Tins.
Well, I hope you've enjoyed today's samples of Background Basics: Chevron Stripes. Don't forget, the Papertrey Ink countdown ends tonight at midnight EST and my new set will be available for purchase. I'm so excited, I can't wait to see what you talented crafter create once you have this set in your hands! Once you do, I'd love to see what you've done, so please email or leave me a comment so I can see! Now it's time to check out the rest of the happenings for tonight. These Ladies have much more of their very own sets to share with you tonight too...

Thanks for stopping by, have a great one!

Maile


Thank You:

Chevron Notes In a Tin:

Boy Basics

My four year old son thinks he is the coolest little skater dude. He can't actually ride a skateboard yet, but he can do a couple simple tricks and he thinks it's awesome. So when Nichole assigned the Design Team the second Papertrey Ink Group Post, which was to create a project using any one of the new sets included in the Boy Basics stamp line-up, I knew just which one to choose... Boy Basics: Skater Dude! Of course! Earlier, when my Papertrey Ink package for this month arrived and I opened it, my little man insisted that I die cut and stamp him a few skateboards and guitars. Just like me, he truly enjoyed this months Papertrey Ink products as much as I did. Anyways, here is what I came up with using Boy Basics: Skater Dude... As many of you know, this weeks Make It Monday technique is masking. I found Lisa's card to be so inspiring and I love the technique of masking, that I new it would be perfect to combine this technique with Boy Basics: Skater Dude to create a totally cool single-layer card.One cool green and blue card for a Skater Dude!

And one cool hot pink and blue card for a Skater Chick!

Here's How: Since I needed to visually line up the three skate boards, I chose to create a mask from vellum cardstock. I simply cut a rectangle of vellum, die cut a skateboard from the center and ran some prepositional adhesive around the edge of the skateboard opening. Positioned the mask and sponged different colored inks onto either side, blending in the middle. Once happy with my sponging, I removed the mask, repositioned it below and started this process over.

Above is a look at the sponged skateboards. From this point, I then stamp the images from Boy Basics: Skater Dude directly over the sponging. The board logos in Enchanted Evening and the wheels and trucks (just confirm with my hubby, the part that the wheels attach to are trucks, he used to be a skater dude himself) in True Black.

The last added detail was a True Black cardstock strip attached to the base of the cards. Simply trimmed a 1/4" off the base of the card front and attached a 1/2" strip of True Black cardstock behind.


I'm pretty please with the way these simple single-layer cards turned out and so is my son. He was so stoked to wake up from his nap and see these cool cards sitting in the window, ready and waiting for their snapshots. Needless to say, he approved. I hope you all approve too!


Now be sure to check out the rest of the happenings for today. These Ladies have much more of the Boy Basics line-up to share with you today...


Thanks for stopping by, have a awesome one!


Maile


Totally Stoked:


Tuesday, April 12, 2011

Introducing Background Basics: Chevron Stripes Day Four

So, it's day four of the Papertrey Ink Countdown and that means I get to share another day of Background Basics: Chevron Stripes with you today! That also means one more day till Background Basics: Chevron Stripes is available for purchase (April 15th at Papertrey Ink), yeah! I've been on a Enchanted Evening kick the last couple days. So today's samples feature a lot of navy, hope you don't mind... First up, I could not wait to pair Background Basics: Chevron Stripes with my other and very first Stamping Simply stamp set, Modern Basics! And once I did, this is what I came up with. I took a white card base and stamped it with a few rounded rectangles, from Modern Basics, to create a focal point. Stamped them in Raspberry Fizz, Summer Sunrise and Enchanted Evening. Stamped a white cardstock strip with chevron stripes in the pattern of: 5 solid large stripes, 5 solid small stripes and repeat. Attached the stamped strip above and below the stamped Modern Basics focal point. Finished it off with a few Enchanted Evening buttons. Next up, more navy! Started by stamping the chevron stripe pattern onto white cardstock (pattern how-to below). Stamped a Labels Basics rectangle label in Enchanted Evening. A sentiment (from Think Big Sentiments #3 avail. April 15th) and a bird (from Grunge Me avail. April 15th) in Berry Sorbet. Attached a Berry Sorbet doily and an Enchanted Evening banner behind the label and attached all to the hand stamped chevron patterned cardstock. Trimmed the edge and then attached to the card base. Embellished with a fun and glittery button.
Here's another way to put these background stripes to use on your projects... Here's how: I started with two chevrons stripes attached to my acrylic block. Inked them up and stamped. I love my Stampin' Up! Grid Paper pad, not only does it keep my work space clean and ink free, but it helps me to keep border images straight. I can see through my acrylic block and line the ends of the background images up along the grid lines on the paper pad. Can you see how this is done in the photo above? For the next line I flipped the entire block around, so the bottom stripe was now the top stripe, and stamped again. Flipped again and stamped. Repeat.

Well, I hope you've enjoyed today's samples of Background Basics: Chevron Stripes.

Be sure to check out the rest of the happening for today. These Ladies have much more of their very own sets to share with you too...

Thanks for stopping by, have a great one!

Maile


Modern Hello:

Navy Hello Friend:

Alpha-blocks

Today is day four of the Papertrey Ink countdown, as well as Design Team Group Post day. For today's assignment, Nichole has asked us to create a project using the new Alpha-blocks (available the last day of the countdown, April 15th). I love this unique, fresh and modern take on the typical alphabet set. It's so my style! I've been having fun stamping these Alpha-blocks in a myriad of colors and pairing the letters with words to create the perfect greeting. Here's is what I came up with...This first card pairs both Background Basics: Chevron Stripes, Make A Wish and Make A Wish Additions with Alpha-blocks. I stamped the boldest chevron stripe in True Black along the bottom of a white card base.
Stamped the Alpha-blocks in Ripe Avocado, Summer Sunrise and Stormy Sky Distress Ink into Alpha-blocks die cuts to say "Happy". Then using a couple sentiments from Make A Wish & Make A Wish Additions I was able to complete the phrase "Happy 2nd Birthday". To finish the card off, I topped the "H" with a present bow and embellished with a True Black button.This next card pairs Make A Wish & Make A Wish Additions again with Alpha-blocks, creating the phrase "You're 7... Happy Birthday" into a cake. I die cut the edge of the stamped panel with an Edgers #1 Die. Die cut a second edge and then traced twice, with a marker, for added detail.

Also from Make A Wish, I stamped the cake stand and candles in True Black. Embellished with a flower from Up, Up & Away, a tiny flower from the new Tag-it's #3 (available April 15), a felt Flower Fusion #3 felt flower and Stickles glitter.

See what I mean?! So my style and I'm loving it!

For even more Alpha-block fun, stop by and check out what the rest of the Design Team has up their sleeves...


    Thanks for stopping by, have a great one!


    Maile


    Happy 2nd Birthday:


    • Stamps: Background Basics: Chevron Stripes, Alpha-blocks, Make A Wish & Make A Wish Additions

    • Ink: True Black, Ripe Avocado, Summer Sunrise & Stormy Skys Ranger Distress Ink

    • Cardstock: White

    • Accessories: True Black Vintage Button & Alpha-blocks Die

    You're 7... Happy Birthday:


    • Stamps: Alpha-blocks, Make A Wish, Make A Wish Additions, Up, Up & Away & Tag-it's #3

    • Ink: True Black, Summer Sunrise, Berry Sorbet & Smoky Shadow Distress Ink

    • Cardstock: True Black & White

    • Accessories: True Black Felt, True Black Vintage Buttons, White Embroidery Floss, Stickles Glitter Glue, Edgers #1 Die Collection & Flower Fusion #3 Die

    Monday, April 11, 2011

    Introducing Background Basics: Chevron Stripes Day Three

    It's the third day of the Papertrey Ink countdown and I hope you are enjoying everything so far. Today, I bring you a couple more samples of Background Basics: Chevron Stripes. Background Basics: Chevron Stripes will be available April 15th at Papertrey Ink, along with all the other goodies that are introduced during the Papertrey Ink Countdown. Today is also the day that the fabulous Nichole Heady will be showcasing Background Basics: Chevron Stripes herself. So be sure to stop by her blog here and check it out. Onto today's cards...In yesterdays post, I shared a rainbow chevron pattern that I created using a single solid chevron strip. Today's first card features another rainbow pattern as well, but this pattern was much simpler and quicker to create. This time around I attached three different stripes to my acrylic block, inked them up and stamped all at once. So I was able to create this rainbow strip in six easy stamps. The stamped strip was attached to a kraft card base and then I stamped a sentiment (from Think Big Sentiment #3 also available April 15th) in True Black. I die cut the Simple Circles Border (also available April 15th) from Rustic White cardstock, attached it to the card and embellished with buttons and a ribbon tab.This next card uses the same combo of chevron strips. This time stamped in Aqua Mist and Hawaiian Shores ink onto white squares. The squares were cut using a couple Rectangular Label Dies and the new Alpha Blocks Die (Available April 15th).Stamped the sentiment (also from Think Big Sentiments #3), arranged and attached the rectangles onto a Fine Linen card base. Embellished the card with a few buttons and a die cut Flower Fusion #3 flower (the die available April 15th).

    Well, I hope you've enjoyed today's samples of Background Basics: Chevron Stripes.

    Be sure to check out the rest of the happening for today. These Ladies have much more to share with you too...

    Thanks for stopping by, have a great one!

    Maile


    Hello Friend:

    Merci:

    • Stamps: Background Basics: Chevron Stripes & Think Big Favorites #3
    • Ink: True Black, Aqua Mist & Hibiscus Burst
    • Cardstock: Fine Linen & White
    • Accessories: Rustic Cream Button Twine, Vintage Buttons, Flower Fusion #3 Die, Rectangular Labels Die Collection & Alpha-block Die

    Sunday, April 10, 2011

    Introducing Background Basics: Chevron Stripes Day Two

    Hello and welcome to day two of the Papertrey Ink countdown! Today, I'd like to share a couple more samples with Background Basics: Chevron Stripes (available on April 15th here). This set features 7 background building chevron stripes that work together perfectly to create dozens of color and pattern mixing options. Yesterday I featured a couple fun options and today I'll show you a couple more. Plus, at the bottom of today's post I'll give you a peek at the stamps themselves and give you an idea of how to attach them to your acrylic blocks. So, let me get started with a few samples using Background Basics: Chevron Stripes combined with a new and old set... First up, a card using Background Basics: Chevron Stripes combined with another fun new set, Tag-it's #3 (also available April 15th). This card features the widest solid chevron stripe stamped repeatedly in a rainbow of colors onto a Rustic White card base. Created a focal point by stamping a few Tag-it's #3 images onto a kraft cardstock circle. The circle frame in Ripe Avocado, flowers in Fresh Snow and sentiment in Dark Chocolate. I then colored the flower centers with Copic markers and attached it to a scalloped Simply Chartreuse circle. Finished the card off with a Simply Chartreuse button and white silk ribbon.
    Next up, is a softer look to create a baby card. Started by stamping a couple chevron stripes onto Sweet Blush cardstock in Vintage Cream. Then attached the Sweet Blush cardstock to a Rustic White card base.
    Wrapped the card base with Sweet Blush ribbon and here's a closer look at the stamped chevron stripes. Click on the picture above for a better look.
    Here I was going for a cuddly look to the Baby Button Bits teddy bear, by crinkling her up a bit. Stamped the teddy onto Sweet Blush cardstock in Dark Chocolate, added a touch of color with a light pink Copic marker, cut out and then crumpled it all up. Not sure if it really looks soft and cuddly, but it sure does look well loved. Attached the teddy to a die cut doily. Inked all the edges with Vintage Touch Chamomile ink and then attached the doily to the card base.

    Here's a look at how to attach these chevron stripes to an acrylic block...

    Here's How: First, I like to drop the stripe (face down) onto my work space, to allow it to stay true to its original form.
    I then pick it up with the acrylic block, looking through the block to line the stripe up with the etched lines in the block. The Acrylic Gridline Block is what I like to use.
    A quick way to stamp these chevron patterns is to attach multiple stripes onto your block and stamp all at once. Again, I drop the next image onto my work space.
    Then I carefully align and attach the next strip right next to the previously placed stripe. Repeat these steps to attach any number of stripes to an acrylic block.

    Well, that's all I have for you today. I hope you enjoyed! Again, I'd love to know what you think.

    Don't forget to check out the rest of the happenings for today. These Ladies have much more to share with you too...


    Thanks for stopping by, have a great one!


    Maile


    Enjoy:


    Cute & Cuddly:


    BLOG DESIGN BY: SHERBET BLOSSOM DESIGNS