Thursday, January 19, 2012

Paper Crafts Card Creations 9

Hello all! As I mentioned in my last blog post, I'm catching up on sharing my published creations and doing so by starting with older cards that hold a special spot in my heart. Being a clean and simple kind of girl, vintage creations are not an easy task for me to accomplish. So this card is near and dear to my heart because I feel that this was a successful attempt at capturing that vintage feel. This one was published in Paper Crafts Card Creations 9...I started by stamping a Rustic White cardstock panel with Make Your Own cling stamp in Dark Chocolate. Then colored the dresses in with Copic Markers (V91, Y21 & Y32). Stamped a journaling circle in Vintage Touch Chai and a sentiment in Dark Chocolate, both are from the Journaling Circle stamp set. Then attached the panel, with dimensional adhesive, to a Fine Linen card base.Here's How: To make the yellow strip appear to wrap around the card... I started by die cutting a Fillable Frames #9 tag and trimmed a small cardstock strip to the same width, both from Harvest Gold cardstock. Attached the die cut tag to the left side of the Make Your Own stamped panel, with dimensional adhesive, and the small strip was tucked under and attached to the right side. Here's A Note: The houndstooth stamp I used is no longer available, but Background Basics: Houndstooth makes the perfect alternative. Then finished the card off with a Dark Chocolate button strung with Rustic Jute Button twine.

That's it for today. Thanks for stopping by and have a wonderful day!

Maile


Celebrate This Day:

Monday, January 16, 2012

CARDS Magazine Publication

So, it's been a while since I last share any of my published projects with you. I thought it was about time I started up again. I figured I would start with a few of my favorite older creations from previous magazine publications. So, in case you missed it, here is a sympathy card from the March 2011 CARDS issue....This card features two of my all time Hero Arts stamp favorites... the Lace Background and the Dogwood. I started by stamping the Lace Background in Versamark ink onto a kraft card base. Here's A Tip: The card base was trimmed to 3 3/4" wide, to accommodate the flower extending over the edge.I then stamped the card base with the Dogwood image and sentiment in True Black. Here's A Tip: When working with wood mounted rubber stamps (such as the two used on today's card) use a stamp positioning tool, such as a Stamp-a-ma-jig, for perfect placement. Stamped the Dogwood a second time onto Rustic White cardstock, trimmed and attached. Here's A Tip: For added detail, I attached the flowers, at the centers, with a flat Glue Dot and the petals with dimensional adhesive. Then finished the card off with Fine Linen ribbon and True Black buttons.

That's all I've got for you today, I hope you enjoyed! Thanks for stopping by!

Maile


With Sympathy:

Sunday, January 15, 2012

Papertrey Ink January Release Projects

The Papertrey Ink January Countdown is about to come to an end and I'm here to share my final projects with you today. But, before I do, let me remind you that everything you've seen peeks of will be available for purchase through Papertrey Ink beginning 10 pm EST tonight.

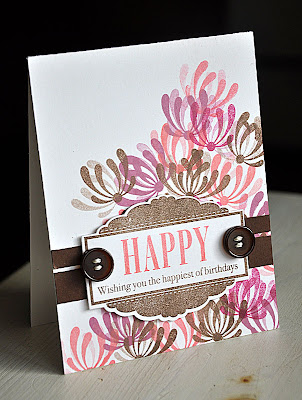
Now, let me get started!...First up, the new sentiment set... Celebrations, created by Dawn McVey, which I paired with a single image from the Mat Stack 5 Collection.I started by randomly stamping a Rustic White card base with the single image from Mat Stack 5 Collection. Here's How: Stamped the image once, then turned slightly and re-stamped (without re-inking). Die cut, stamped and attached a Celebrations label to finish it off.Next, Tag-its #12 by Heather Nichols. I stamped this new tag and "hello" in True Black onto a Rustic White card base. Stamped, trimmed and attached a Tag-its #11 heart.Then stamped "hello" in a rainbow of colors and finished the card off with a rhinestone.Flower Fusion #12, by Melissa Bickford, is up next. Die cut and stamped the flower and center in Aqua Mist and Canyon Clay. Stamped a row of grass (from the Hanging Out set) and a row of "hello". Then attached a die cut XL Rickrack Border trim.Here's another sentiment set by Dawn Mcvey... Happily Ever After, paired with Lace Bouquet by Nichole Heady. Stamped the lace in a color combo of Spring Moss, Aqua Mist and Smoky Shadow.Finished the panel off with a sentiment stamped in Smoky Shadow ink and then mounted it all to a True Black card base.Lastly, I have a tri-fold card to share with you.Which pairs Lace Bouquet with Script Sentiments by Candice AguilarI stamped the lace in Smoky Shadow and colored with a couple Copic Markers (R02 & GB11).Here's How: Trim cardstock to 11" x 5 1/4". Score at 4" from the bottom edge and fold.Temporarily adhere cardstock into place on the Front & Center #2 Die and then cut. (This would work perfectly with the Front & Center #1 Die as well)Once cut, score another line at 4 1/4" from the bottom edge.Fold over the top and embellish to your hearts desire!

Well, that's all of them!

Be sure to check out the rest of the Design Teams fabulous projects as well:

Thanks for stopping by!

Maile


Happiest of Birthdays:

Hello:

Hello with Flower:

Much Love:

Just Because Tri Fold Card:

Saturday, January 14, 2012

Simply Jane

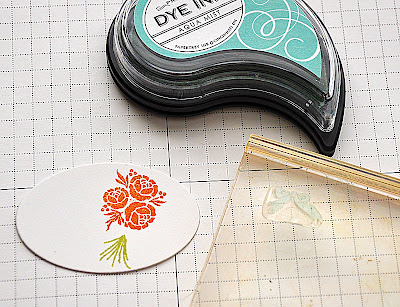
The final day of the Papertrey Ink Countdown is here and the Design Team has one final group post to share with you today. This time around we bring you a look at Simply Jane, designed by Nichole Heady. The phrase "simply splendid" is what comes to mind when I think of the new stamp set. It's such a beautifully designed set and that frame... it's to die for! Creating stunningly gorgeous creations is going to be a breeze when working with these images. Check out the loveliness I have to share with you today!...Even though I've kept things super simple, the Simply Jane images give my card just the right touch of beauty to keep from being too boring.Here's How: I started with the bouquet image. I love how this entire image was designed in two parts... the bouquet itself as one stamp image and then the bow as a second. This makes it easy to stamp using multiple colors. I inked the top portion of the bouquet in Canyon Clay and the bottom in Spring Moss.Stamped the bouquet onto a die cut oval. Next, I inked the bow in Aqua Mist.Then stamped it into place. Easy peasy and it looks pretty too!Stamped a sentiment (also from the Simply Jane stamp set) in True Black. Then, using Smoky Shadow ink, I stamped this gorgeous frame onto a kraft card base. Then, with dimensional adhesive, I mounted the stamped oval within.Then finished the card off with a couple Canyon Clay buttons strung with embroidery floss.

Well, that's it from me today. Be sure to see what the rest of the Papertrey Ink design team has in store for you today...

Thanks for stopping by!

Maile


Thank You So Much:

Friday, January 13, 2012

Mat Stack 5 Collection

Hi there! So glad you could join me for day 4 of the Papertrey Ink January Countdown. Today, for the 1st Design Team group post, we bring you the Mat Stack 5 Collection stamp set (available January 15th). This set comes with two "full-size" mat stacks and is packed full of additional building images. For our projects, we've put all it all to use! I've got a lot to share with you today, including both traditional and non-traditional ideas, so let me get started...First up, a traditional use for this mat stack image. I stamped the mat stack in Smoky Shadow ink onto a kraft card base. Die cut, stamped and attached a flourish from the Fancy Flourishes set. Then layered an oval (stamped with lace from the Lace Bouquet stamp set) onto a Melon Berry scalloped oval and adhered to the card base.Stamped and attached a sentiment strip (sentiments from Celebrations stamp set) using Canyon Clay and True Black inks. Then finished the card off with a couple Melon Berry buttons strung with white embroidery floss.Veering slightly from the typical use of the mat stack image, but still keeping to its traditional look, I've created a super fun and perfectly flat card. I started by stamping the mat stack image onto a white card base, in a color combo of Raspberry Fizz, Canyon Clay and Summer Sunrise.Within the mat stack opening I stamped cupcakes from the Cupcake Collection set. Finished the card of with a "Happy Birthday" sentiment from the Think Big Favorites #12 set and "Wishing you...." from the Mat Stack 5 Collection set, stamped in True Black.Thinking outside of the box... I came upon a very non-traditional use for pretty much any mat stack image. After playing around a bit, I ended up stamping and rotating the mat stack image in a rainbow of colors. What do you think?!I punched out the center with a 2" circle punch, stamped with a sentiment and wrapped with ribbon. Before mounting onto the True Black card base, I trimmed a white cardstock block, die cut a 5 and attached both directly to the card base. Then, with dimensional adhesive, I attached the mat stack stamped panel.Up next, I did some fooling around with a few of the building images to create a couple more almost perfectly flat cards (depends on if you count the embellishments). I stamped a beautiful border using two of the building images, in a color combo of Spring Moss and Canyon Clay.Finished the card off with a bit of ribbon and a sentiment from the Script Sentiments set.This last card features two other building images, this time stamped in Fresh Snow onto a Simply Chartreuse card base.Stamped a sentiment from the Happily Ever After set. Then finished the card off with a few scored lines, a bit of ribbon and a few rhinestones.

Well, that concludes my look into the wonderful Mat Stack 5 Collection stamp set. Be sure to see what the rest of the Papertrey Ink design team has in store for you today. I know I can't wait to see!...

Thanks for stopping by!

Maile


Celebrate:

Happy Birthday:

Hurray:

With Heartfelt Thanks:

For The Happy Couple:

Monday, January 9, 2012

Clean & Simple Card Making Class Starts Today!

Just poping in to share something fun with you all today...

Class starts today and it's not too late to sign-up! I'm featured as the guess designer today and I love the cards that Kristina Werner and I have to share on this first day...

So, join Kristina Werner, Jennifer McGuire and special guest teacher Julie Ebersole for Clean & Simple Card Making!

In this class we aim to take the mystery out of creating a minimalist card that looks “complete,” and wow you with numerous tips and techniques for clean and simple cards! This upbeat and inspirational class will include nine fabulous guest artists (including me!), discounts to our favorite retailers, giveaways and a few surprises along the way! Clean and Simple Card Making will feature over 25 new card ideas and over 15 instructional videos. What better way to start the new year than with a wealth of new ideas to add to your card making arsenal and simplify your creations!

Class begins today and ends January 23, but class materials (videos, pdfs, etc.) will be accessible for a lifetime. Click HERE for an introduction video and more info!

Thanks for stopping by!

Sunday, January 1, 2012

All Booked Up Revisited

First off, let me start by wishing you all a Happy New Year!

A new year is upon us and with it comes a new Papertrey Ink Senior Design Team Challenge. To start off the new year the Design Team is taking a look at another "oldie but goodie"... All Booked Up. It's been quite some time since I last pulled this set out, but I quickly remembered how fun these round images are to work with. For today's project I've whipped up a quick card and a few coordinating bookmarks. Take a look...
Drawing inspiration from the circular image I chose to work with I stamped a white card base with random polka dots in a color combo of Hibiscus Burst, Summer Sunrise, Aqua Mist & Spring Moss.To create a strong focal point amongst the dots, I stamped the book circle and a sentiment below in True Black. Attached a True Black cardstock strip and embellished with a couple True Black buttons and twine.I then stamped four bookmarks in the same way as the card above.First, with the colorful dots. Second, with the book circle and sentiment. Then topped each with a coordinating colored ribbon, which was tied into place with white silk ribbon through a True Black button.

Well, that's it from me today. Now be sure to visit the other Papertrey Ink Senior Design Team girls for more All Booked Up goodness...

Thanks for stopping by today!

Maile


I Think Of Us As Bookends Card & Bookmarks:

 
BLOG DESIGN BY: SHERBET BLOSSOM DESIGNS