Hello, all! Today is the final day of the Papertrey Ink April Countdown! I hope your as excited as I am! So, this means that at midnight EST, tonight, all the goodies you've seen will be available for purchase at Papertrey Ink! And that does include Background Basics: Chevron Stripes! Also, be sure to stop by Nichole's blog and the Papertrey Ink Forum early (10pm EST) for the release night party.
Now, how about a couple more cards using Background Basics: Chevron Stripes. I tend to create most of my cards in a portrait orientation (meaning an A2 card with 5 1/2" as the height and 4 1/4 as the width). For my first card, I thought I would change things up a bit... This card started with a few stamped clouds, from Up, Up & Away, in Fresh Snow ink. Along the bottom I stamped a chevron pattern in Pure Poppy, Berry Sorbet and Summer Sunrise onto a strip of white cardstock. Die cut a Fillable Frames #4 from Berry Sorbet cardstock, trimmed, attached and stamped with the sentiment.
  Stamped a few balloons, also from Up, Up & Away, in the same colors and attached with dimensional adhesive. Then embellished with a True Black button and silk ribbon.
The images in Background Basics: Chevron Stripes measure approximately 5" wide. But don't let this intimidate you, it's rather quite easy to continue an entire row across the width of a landscape oriented card. I'll show you how (but please excuse the messiness of my red stripes, my ink pad was in dire need of a re-inking)...
 Here's How:
 I started by stamping my chevron stripe closest to one side.

Next, ink up again (this time you don't have to ink the entire stamp, your only using the end) and stamp image as close to the end of the previously stamped image as possible.

I like to mix things up within the pattern. In order to help keep my seams hidden, I stamp them in different spots. For example, in the images above, I stamped my chevron stripe closest to the opposite side of my cardstock from where I started. This way the next seam is in a different place, making it less obvious.

Here's the finished sample! Isn't it pretty?!
By the time I finished stamping, I was left with very little time to create something using this freshly stamped pattern paper before I ran out of good picture taking day light. So I quickly whipped up this Chevron Notes In A Tin ensemble in practically no time flat...

I created a wrap for this
Clear Top Nugget Tin with a strip of white cardstock. Cut a strip of my freshly stamped pattern paper to fit the top and attached. Wrapped with Berry Sorbet Ribbon and attached a
Tiny Tags tag with some white silk ribbon.

For the notes I attached all 7 chevron stripe images to my acrylic block and stamped all at once, onto colored cardstock, in coordinating inks... Stamped onto Berry Sorbet cardstock with Berry Sorbet ink,

onto Summer Sunrise cardstock in Summer Sunrise ink,

and onto Pure Poppy cardstock with Pure Poppy ink.

Wrapped each card with coordinating ribbon and stamped each with a
Modern Basics sentiment in Fresh Snow ink. These card measure 4 3/4" X 3 1/4", so they fit perfectly into the
Clear Top Nugget Tins.
Well, I hope you've enjoyed today's samples of
Background Basics: Chevron Stripes. Don't forget, the
Papertrey Ink countdown ends tonight at midnight EST and my new set will be available for purchase. I'm so excited, I can't wait to see what you talented crafter create once you have this set in your hands! Once you do, I'd love to see what you've done, so please email or leave me a comment so I can see! Now it's time to check out the rest of the happenings for tonight. These Ladies have much more of their very own sets to share with you tonight too...
Thanks for stopping by, have a great one!
Maile
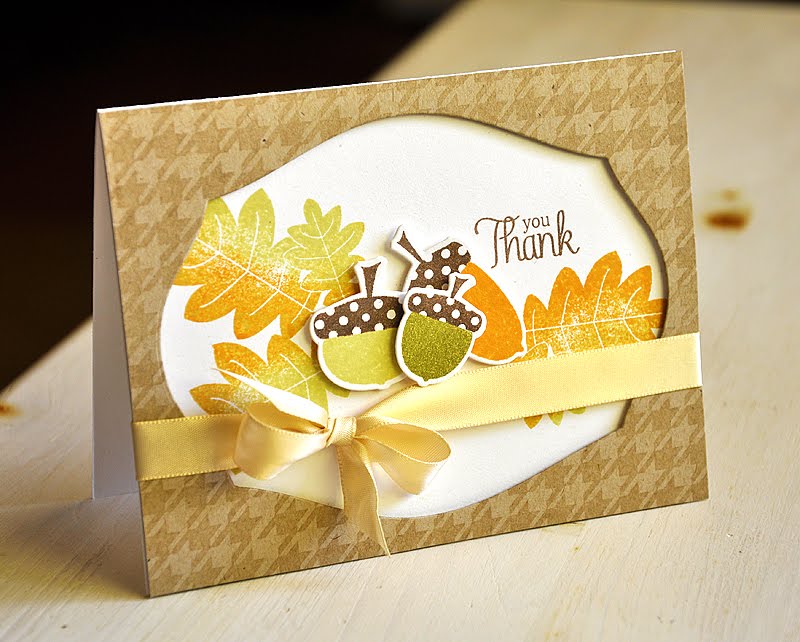
Thank You:
Chevron Notes In a Tin:


 This Wine Bottle Tag Die measures 2" x 7" and will be available for purchase beginning October 15th (at Papertrey Ink). It's perfect for accessorizing any bottle to create the perfect gift just in time for the holidays and festive gatherings.
 By using the Wine Bottle Tag I was able to package and present a little something for a gracious hostess. I started by die cutting a tag from Rustic Cream and Spring Moss cardstock. I trimmed off the bottom of the Spring Moss tag and attached it to the bottom of the Rustic Cream tag.
 Stamped a Rustic Cream cardstock strip with flowers from the Iconic Images (sorry, this set is not available for purchase but a few images from Garden Variety can be used instead) in Spring Moss, Berry Sorbet and Summer Sunrise. Stamped a sentiment from Gracious Vases, attached with dimensional adhesive and wrapped with white silk ribbon.


