
How about a couple simple Christmas cards to start, perfect for recreating in multiples and flat for mailing...
 Started by flipping the rectangle frame upside down so the opening was at the top. Stamped it onto an Aqua Mist card base in True Black ink. Stamped "Joy", from Snowflake Serenade, in True Black into the bottom corner.
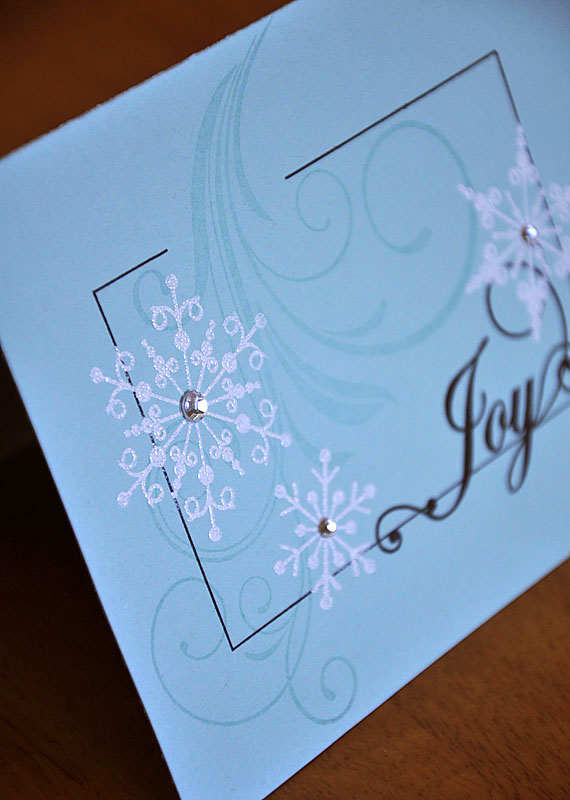 Inside the frame, I created a little burst of a frosty breeze by heat embossed three snow flakes (also from Snowflake Serenade) in white. Inked the largest flourish, from Fancy Flourishes, in Versamark and stamped it onto the card base, through the opening and over the embossed snowflakes. Finished it off with a few clear rhinestones.
 I found that this sentiment, from Winter Swirls, is a perfect fit for the frame opening. Stamped both the frame and sentiment in True Black onto a Simply Chartreuse card base.
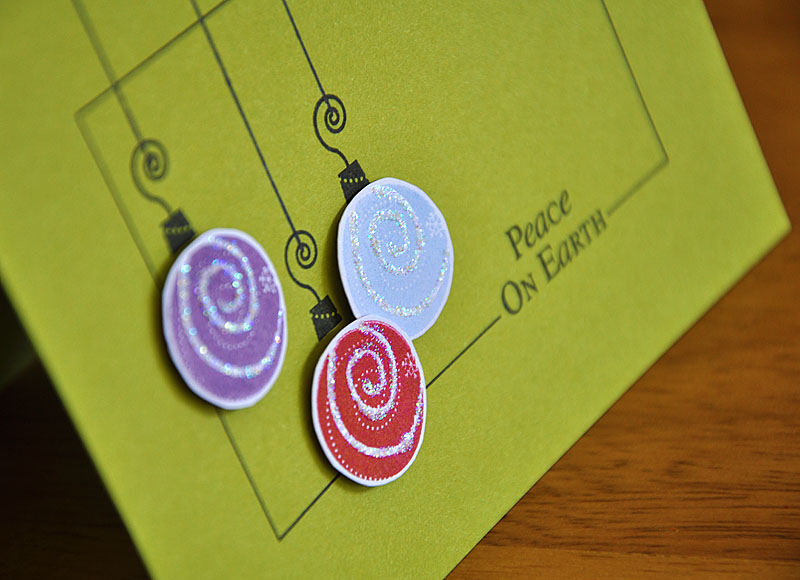 Stamped three ornament toppers, also from Winter Swirls, into the frame and hung them by hand drawn lines. Hand cut Plum Pudding, Pure Poppy & Spring Rain stamped ornaments and attached them with dimensional adhesive. Finished it off with a swirl of glitter onto each ornament.
Framed is a perfect fit for any occasion as well...
 Hand stamped my own patter paper, onto a white card base, using "Happy Birthday" from Say It With Style in Pure Poppy, Hibiscus Burst & Summer Sunrise.
 This time I stamped and heat embossed the square frame in black. Covered the frame opening with a white punched circle stamped with "to you" and embellished with True Black buttons and some crochet twine.
 I thought this one would do for a wedding...
 With this card I hope to share a neat idea with you. I've been dying to try the letter press technique that Heather Nichols came up with and shared here. I wanted to combine it with a new technique I've been trying my self, dry emboss masking.
 Here's a closer look.
 Here's a fun idea: Started by creating a double cardstock mask. Stamped and cut out the square frame from cardstock twice and adhered the two together. With removable adhesive, adhered the mask onto the center of the kraft card base. Making sure to adhere it ink side up.
 Inked up the Impression Plate in Fresh Snow. Laid the card front face down onto the inked impression plate, created an embossing sandwich and then ran it through my Die Cutting Machine.
 And this was the result.
 Once done with the embossing, stamped the frame and sentiment with in and embellished. I've embellished my card with a die cut and hand stamped felt Dahlia from Delightful Dahlia. Here's A Tip: I've been asked many times how I adhere felt to a card. Well, here's how. I start by figuring out the arrangement of my felt pieces. When I'm ready to adhere, I usually try to adhere my adhesive directly to the cardstock first. The glue dots in the picture above are placed for the leaves.
 Once the leaves are firmly pressed into place I adhere the glue dots for the flower, as pictured above.
Then firmly press the flower into place and embellish with a button and twine.
So what do you think? Wouldn't it be fun to pull out your PTI sets and see what other sentiments fit into the frame?! You'll get your chance soon, Framed is available September 15th.
That's it from me today. But, for even more Papertrey Ink Countdown goodness stop by and see what these talented ladies have in store for you...
Thanks for joining me today! Have a wonderful weekend!
Maile
Joy:
- Stamps: Framed, Snowflake Serenade & Fancy Flourish
- Ink: True Black, Fresh Snow & Versamark
- Cardstock: Aqua Mist
- Accessories: White Embossing Powder & Clear Rhinestones
Peace On Earth:
- Stamps: Framed & Winter Swirls
- Ink: True Black, Plum Pudding, Pure Poppy & Spring Rain
- Cardstock: Simply Chartreuse & White
- Accessories: Stickles Glitter Glue & Fine Tip Black Sharpie
Happy Birthday to You:
- Stamps: Framed & Say It With Style
- Ink: Pure Poppy, Hibiscus Burst, Summer Sunrise & True Black
- Cardstock: White
- Accessories: True Black Vintage Buttons, White Crochet Twine, Black Embossing Powder & 2" Circle Punch
Bliss:
- Stamps: Framed & Delightful Dahlia
- Ink: Fresh Snow & Palette Noir
- Cardstock: Kraft
- Accessories: Vintage Cream & Fine Linen Felt, True Black Vintage Button, Cream Rustic Button Twine, Background Basics Diamond Impression Plate, Delightful Dahlia Die Collection & Glue Dots


