Wednesday, December 30, 2009

Blooming Birthday

Hello my friends! Hope you are all doing great. In my corner of this world that I call home, some rain has snuck up on us today. It's gloomy and wet, but I don't mind it at all. I love weather like this!

So, check out today's card...
I love this card in brown! But wouldn't it look great in raspberry, purple, red or any other color you heart desires? These flowers, from In Bloom, look so gorgeous stamped in cream ink onto any dark cardstock.
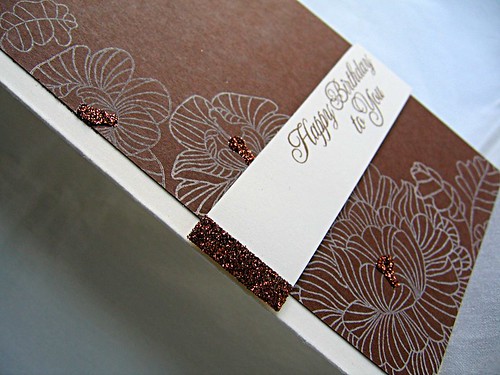
Finish it off with some glitter and you've got yourself a simply elegant creation.

I must be on some odd sized card kick, I haven't posted a regular A2 card in a while. Hope you don't mind. I just love how you can use a layout, that you would normally use for an A2 card, on a different sized/shape card and get a completely new and different look to the very same layout. Great way to boost your creativity, with out having to think too hard.

As always, thank you for stopping by today!

Maile


Happy Birthday To You: (All PTI unless noted)
  • Stamps: In Bloom
  • Ink: Vintage Cream & Dark Chocolate
  • Cardstock: Vintage Cream & Dark Chocolate
  • Accessories: Bon Bon Doodle Bug Glitter & Corner Rounder

Card Measures: 7" X 7"

Tuesday, December 29, 2009

Butterfly Wishes

Happy Tuesday to you all!

One of my favorite things to do with the butterfly image from With Sympathy is to stamp it onto small punched circles. As done before on this and this card. I love how they can be rotated to flutter by in all directions and then be embellished with glitter, rhinestones or what ever. This time they were stamped in summer sunrise and berry sorbet onto punched kraft cardstock circles, adhered to the left side of a polka dot stamped block, and then embellished with rhinestones. Rounded the corners (another one of my favorite things to do) of the polka dot block to coordinate with the butterfly circles.

Finished the card off with a sentiment (a rhinestone dot for the I) then wrapped with white embroidery floss.

Things are starting to go back to normal again around here, my Mother-in-law left for home today (so sorry to see her go). Well that's all from me today. Thanks for stopping by and have a wonderful day!

Maile


Best Wishes: (All PTI unless noted)
  • Stamps: With Sympathy, Polka Dot Baics II & Beyond Basic Borders (Sentiment)
  • Ink: Berry Sorbet & Summer Sunrise
  • Cardstock: Berry Sorbet, White & Kraft
  • Accessories: DMC Embroidery Floss, Hero Arts Rhinestones, Marvy Uchida Circle Punch & Corner Rounder

Card Measures: 7" X 7"

Monday, December 28, 2009

Thanks to You!

Hello all! I hope you had a wonderful holiday and didn't eat too much (like I did, hehe). I find it hard to believe that Christmas has come and gone, and that now we are preparing for a brand new year!

Today I have a super simple card to share with you...The kraft cardstock block was stamped with a tree (from Beyond Basic Borders), over the tree branches are cream polka dots (from Polka Dot Basics) and a green scalloped border at the base (from Beyond Basic Borders).
Attached a strip of ocean tides cardstock behind the tree image block. Another rounded strip over the top, then embellished with a button and stamped sentiment.
I would like to take a moment and thank you all for the warm Christmas wishes I received from you over the holiday, and for taking the time to visit me here at my little old blog. You all have been a blessing to me and have been great inspiration and motivation for me to keep creating. Thanks for all the wonderful comments you leave me, I love to hear from you all and every one of them puts a smile on my face. Looking forward to spending another year with you!
Maile
Thank You: (All PTI unless noted)
  • Stamps: Beyond Basic Borders & Polka Dot Basic Borders
  • Ink: Dark Chocolate, Spring Moss & Vintage Cream
  • Cardstock: Spring Moss, Kraft & Ocean Tides
  • Accessories: Cream Vintage Button & DMC Embroidery Floss

Wednesday, December 23, 2009

Christmas Blessings

Hello all! Isn't it exciting, Christmas is only a couple of days away. I've got a few more present to wrap and then I should be ready.

No Christmas card to share with you today, but I do have some fun butterflies... The card base is created from Rustic Cream cardstock. The butterflies were punched from the same paper, crinkled, embellished with raspberry rhinestones, and then randomly placed onto the card to look like they were fluttering by to wish someone a happy anniversary.

My mother in law is arriving today and Christmas will be celebrated at my house this year. So, I am really looking forward to spending time with family and together rejoicing in the greatest gift ever given, the birth of our Savior.

"She will give birth to a Son, and you are to give Him the name Jesus, because He will save His people from their sin." Matthew 1:21
I truly hope you all have a blessed and a Merry Christmas!!!

Happy Anniversary: (All PTI unless noted)
  • Stamps: Damask Design (Sentiment)
  • Ink: Raspberry Fizz
  • Cardstock: Rustic Cream
  • Accessories: Martha Stewart Butterfly Punch, Hero Arts Rhinestones, Corner Rounder

Saturday, December 19, 2009

'Tis The Season

Happy Saturday to you, my friends! Hope you are enjoying your weekend. I find it hard to believe that Christmas is less than a week away! So, today I bring to you a Christmas card... Just full of glittery goodness! The card base was stamped with stripes from Background Basics: Retro. First they were stamped in versamark, heat embossed with Heat and Stick powder, glittered and then heat set again.
The gift boxes (from Winter Swirls) were stamped in moss, berry and aqua; then touched up with glitter using a glue pen. You should have seen the mess I made when I was done!
I am off to enjoy my weekend. Thanks for taking a peek today!
Maile
'Tis The Season: (All PTI unless noted)
  • Stamps: Background Basics: Retro & Winter Swirls
  • Ink: Spring Moss, Berry Sorbet, Aqua Mist & Versamark
  • Cardstock: Aqua Mist & White
  • Accessories: Martha Stewart Fine Crystal Glitter, MS Glue Pen, SU! Heat & Stick Powder

Thursday, December 17, 2009

Embellish Snowflake Color Combo

To kick off the winter season and to end the year with a bang, Ashley over at Embellish has selected a tasty new color combo for the latest (and last of the year) Snowflake Color Challenge... What a wonderful, unexpected and colorful winter color combo wouldn't you say?! Here is my creation for the challenge...
The strip at the top of the card was stamped with Houndtooth, in aqua onto white cardstock, and wrapped with a yellow bow. The sentiment, (from Winter Swirls) was stamped in dark chocolate and embellished with a row of rhinestones.
My inspiration for the snowflakes came from the Papertrey Ink home page here. Did you see the falling hearts on the right side of the page? What a perfect idea for falling snow! To create, all I did was lightly draw the lines in pencil, pierce the holes, erase the pencil line and then attach the rhinestone embellished snowflakes with foam adhesive.

Thanks for popping in today, hope you enjoyed your visit!

Maile


Let It Snow!: (All PTI unless noted)
  • Stamps: Winter Swirls & Studio Calico Houndstooth
  • Ink: Aqua Mist & Dark Chocolate
  • Cardstock: Kraft & White
  • Accessories: Lemon Tart Satin Ribbon, Martha Stewart Lg Rhinestones, Recollection's Sm Rhinestones, Martha Stewart Snowflake Punch & Paper Piercing Tool

Wednesday, December 16, 2009

Another Raspberry Suite Color Challenge #20 Card

Did I say what a fabulous color combo this is! Thanks Dawn for another great one! No really, I really like it. So much so, that I tried it again... Trying something new here, covering the aqua panel with aqua buttons for something different and for a lot of fun texture. What do you think?

Above the buttons is a vine image, from Beyond Basic Borders, stamped in Aqua Mist. Over that is the sentiment, from Damask Design, in dark chocolate. Finished off with more of that lush rust colored satin ribbon.

So, I think that will be it from me today. I think I've really have missed this blogging business, two posts in one day! Hope you have a wonderful rest of the day and thanks for stopping by.

Maile


Happy Birthday To You: (All PTI unless noted)
  • Stamps: Beyond Basic Borders & Damask Design
  • Ink: Aqua Mist & Dark Chocolate
  • Cardstock: Kraft, Vintage Cream & Aqua Mist
  • Accessories: Aqua Mist Vintage Buttons, Rust May Arts Satin Ribbon & Corner Rounder

Raspberry Suite Color Challenge #20

Hello my friends! Hope you are enjoying the Christmas season. Time for another beautiful Raspberry Suite Color Challenge...I realized this morning that today was the last day to participate, so here is what I quickly came up with...
I stamped a kraft cardstock base with an outlined image of the mug from Warm Happiness, in brown and rounded the bottom corners.
Rounded the bottom corners of a cream block, stamped stripes (from Background Basics: Retro) in rust and a sentiment (from Shapes by Design) in brown. Attached an aqua polka dot mug and embellished with aqua buttons, strung onto cream twine. Then layered the cream block over some rust colored May Arts satin ribbon.
So, I am finally feeling better from my cold, but now my little boy has got it. Poor boy, I hate it when he is sick and miserable, I always feel so helpless.
Thanks for stopping by, have a wonderful day!

Maile


Thanks: (All PTI unless noted)
  • Stamps: Warm Happiness, Background Basics: Retro & Shapes by Design
  • Ink: Aqua Mist, Dark Chocolate & Rust (CTMH)
  • Cardstock: Kraft & Vintage Cream
  • Accessories: Aqua Mist Vintage Buttons, Cream Twine, May Arts Rust Satin Ribbon, Corner Rounder

Friday, December 11, 2009

Enjoy The Wild Ride

Hello all and happy Friday! Boy have things been really quiet around here (the good old blog). The holidays do make thing busy but getting sick doesn't help. Forgive me for not posting or sharing much these days, I've been sick with a cold since Sunday and I am still not completely well. This cold just keeps lingering on. I took my first trip into town today, since getting sick, and I am tuckered out.

Anyways enough about that, I'll move on to the card... This bicycle image is on of my favorites from the Everyday Button Bits Set and it pairs so well with this sentiment. I thought I would go ahead and create one wild ride for this bike down a hill. This would be a fun card to give some one a smile, when things really do get wild. The hill was created by cutting a slop from ripe avocado and spring moss cardstocks, stamping the spring moss cardstock with a background from Background Basics: Retro, then distressing the edges.
The sentiment was stamped above a button tied to some spring rain twill ribbon. Then everything was attached to a kraft cardstock base. I love kraft cardstock, it goes with just about anything! Don't you think?

Well, I am going to put my son down for a nap now and maybe take one my self, hehe. Thanks for stopping by today and hope you have a wonderful weekend.

Maile


Enjoy The Ride: (All PTI unless noted)
  • Stamps: Everyday Button Bits & Background Basics: Retro
  • Ink: Spring Moss, Dark Chocolate & Versamark
  • Cardstock: Kraft, White, Ripe Avocado & Spring Moss
  • Accessories: Spring Rain Twill Ribbon, Spring Rain & Dark Chocolate Vintage Buttons, DMC Embroidery Floss, Close To My Heart Edge Distresser

Wednesday, December 9, 2009

Christmas Belles

Hello there friends! So, some of you have asked to see my Christmas tree. I have always enjoyed decking my house out for Christmas so I am very excited to share some photos of my decorations with you. But first I wanted to let you know that we did receive the snow fall I was hoping for the other day. When the snow was done falling we had about 8 inches! The usual snow fall for us is about 5-6 in. It was the perfect amount to play in, here is a picture of my son in our fresh snow....
Be prepared, I have a lot of photos to share with you. I don't think I have ever taken this many photos of my decorations before, this will be so much fun to look back on in the future. To start, here is my dinning table...
I've wrapped three Princess House crystal cylinders with my most favorite green, with gold edging, holiday wired ribbon. This ribbon looks so much better in real life, it kind of has a gold shimmer to it. It looks amazing on a gift wrapped with kraft paper. :) The cylinders are sitting on a gold charger and one of these days I will put some votive candles inside each one.

Above the table is this...
Tiny gold jingle bells draped over the chandelier then tied with more ribbon. (Can you tell that I really like ribbon!).

A garland above our entertainment center...

Yep, more of that same ribbon that was used on the chandelier.

Here is the Nativity scene on the coffee table...
This was given to me by my mother in law. I love it! It's so simple, but so representative of the true reason I celebrate Christmas. It's supposed to hold a tea light candle, but I am all out as of now. It sits on another gold charger with little ornaments randomly placed around it.

Now onto the tree...
This tree is an assortment of red, gold and green decorations, that I have collected over the 8 and half years that I have been married to my hubby. The bottom of the tree is a little bare, we have a dog that has a very strong tail wag and a son that loves to help redecorate. So kid friendly and non fragile ornaments hang from the bottom.

Here is the star tree topper, stars are the main theme of my tree. Oh and of course, more ribbon (he, he!)...
Here are some shots of my favorite ornaments...

In the photo below is a jingle bell candy cane...
It's a little hard to see, but somewhere in the photo below is a gold wired carolling angle...


So there you have it, I am finally ready for Christmas (all except for the gift shopping part)! I do hope you enjoyed, I know I've enjoyed sharing. Thanks for stopping in and have a blessed day.

Maile

Monday, December 7, 2009

Hero Arts Holiday Tag Challenge

Hello my friends! Hope you had a great weekend. I was finally able to put up our Christmas decorations and tree on Saturday. I plan on sharing some photos with you soon. Today, I am waiting for some snow! My town is under a sever winter storm warning and there's talk of a lot of snow. Just trying not to get my hopes up too much in case nothing much happens.

The last challenge over at the Hero Arts blog was to create Holiday Tags. I really enjoy making tags so I couldn't pass the challenge up. Here is what I came up with... I went with an unusual but fun Christmas color combo of: Spring Moss, Aqua Mist, Melon Berry and Gray. I kept them super simple by stamping and cutting out an image (from Winter Swirls), stamping a sentiment (from Hero Arts Holiday Messages) over the stamped image and the tag, then attach the image with dimensional adhesive. Finished the tag off with satin ribbon tied to the top with embroidery floss.

Here is the Melon Berry tag, with a snowflake button...
Here is the Aqua Mist tag, with an ornament hung from embroidery floss...
Lastly is the Spring Moss tag, embellished with a rhinestone star topped tree...
Well, thanks for stopping in today. Hope you enjoyed and have a wonderful start to your week.

Maile


Merry Christmas Tags: (All PTI unless noted)
  • Stamps: Winter Swirls & Hero Arts Holiday Messages
  • Ink: Melon Berry, Aqua Mist, Spring Moss & Gray
  • Cardstock: White
  • Accessories: Melon Berry, Aqua Mist & Spring Moss Satin Ribbon, DMC Embroidery Floss, Snowflake Button, Rhinestone Star & Creative Memories Tag Punch.

Thursday, December 3, 2009

CARDS November 2009 Publications

Hello my friends! Sorry I do not have a new card to share with you today, it's been busy around here. I may have to slow down a tiny bit on the blog postings, at least until after Christmas. I do hope you don't mind too much. After the holidays I plan on going back to posting daily.

However, I do have a link and a couple published cards to share with you today. Check this out, over at the CARDS Blog they are showcasing one of my Christmas tags. Here are a couple cards that were published in the November 09 Issue of CARDS Magazine...
This one was created using a dollar stamp I had picked up at the craft store. The polka dot pattern paper is from PTI Raspberry Fizz Mix and the sentiment is from Green Thumb.
This one is a mix of Making Memories (pattern paper, felt letters and ribbon from the Noteworthy Collection) and PTI (cardstock, buttons and With Sympathy stamp set). The little butterfly is a Cuttlebug Die Cut. I really like this layout, one of these days I will have to give it another try.


So, unfortunately (even with the best intentions) my Christmas tree is not set up yet. This is unusual for me, my tree is always set up right after Thanksgiving. The tree is buried too far into the garage for my hubby to get to right now, so this weekend he will dig it out for me.


Glad you stopped by today!


Maile


Right Shoes: (All PTI unless noted)
  • Stamps: PTI Green Thumb (Sentiment) & Design from Studio G/Hampton Arts
  • Ink: True Black & Versamark
  • Cardstock: Raspberry Fizz, True Black & White
  • Pattern Paper: Raspberry Fizz Mix
  • Accessories: Raspberry Fizz Satin Ribbon, KaiserCraft Rhinestones, Bazzil Black Tie Brads & Labels Three Nestabilites

For My Girl: (All PTI unless noted)

  • Stamps: With Sympathy & Men of Life (Sentiment)
  • Ink: Raspberry Fizz
  • Cardstock: Vintage Cream & Berry Sorbet (for Butterfly)
  • Pattern Paper: Making Memories Noteworthy Collection
  • Accessories: Vintage Buttons, MM Ribbon & Felt Letter Stickers, Cuttlebug Two Step Butterfly Die, Circle Punch & Corner Rounder

Tuesday, December 1, 2009

Embellish Leaves, Acorns & Pine Cones Color Challenge

Hello my friends! The latest challenge over at Embellish is inspired by the autumn season, perfectly fitting since most of us are still finishing our Thanksgiving leftovers. So here is my fall submission... I don't really own any fall type stamps but I did happen to pick up some pattern paper and acrylic frames, from the Making Memories Autumn Splendor Collection, on sale from the craft store. The frame was backed with cream cardstock, stamped with a sentiment, wrapped and tied with ribbon then attached to the card base over a leafy pattern paper strip. I kept the card simple, to not distract to much from the shimmery frame (the shimmer is hard to see in the photo but it's there).

So do any of you already have your Christmas trees up? I am thinking of putting mine up tonight.

Thanks for stopping by today!

Maile


Thanks: (All PTI unless noted)
  • Stamps: Shapes By Design (Sentiment)
  • Ink: Ripe Avocado
  • Cardstock: Dark Chocolate & Vintage Cream
  • Pattern Paper: Making Memories Autumn Splendor
  • Accessories: Making Memories Autumn Splendor Acrylic Frame, Ripe Avocado Satin Ribbon

Monday, November 30, 2009

Merry Christmas & A Happy New Year

Hi there! Hope you all had a wonderful and blessed Thanksgiving Holiday! Mine was very busy but I truly enjoyed it. So now getting back into the swing of things, here is a card I created based on the Fall To Layout #69... The leaves from PTI Beautiful Blooms were stamped in green, then with red embroidery floss I tied French Knots to create berries. Stamped the sentiment, rounded the corners and attached the stamped panel to the card base.

Thanks for stopping by today, hope you have a great start to your week!

Maile


Merry Christmas And A Happy New Year: (All PTI unless noted)

  • Stamps: Beautiful Blooms & Signature Christmas
  • Ink: Ripe Avocado & Dark Chocolate
  • Cardstock: Ripe Avocado & White
  • Accessories: Embroidery Floss & Corner Rounder

Wednesday, November 25, 2009

November PTI Blog Hop

Hello and welcome everyone! Today is PTI Blog Hop day and this months challenge is in honor of the fast approaching holidays. With this in mind, we are to create a quick and inexpensive tag or wrap idea that can be the perfect solution for "grab and go" gifts.

I was on a roll for this challenge, I have a few creations to share with you. First up are Tags... This tag set was stamped using labels from Vintage Labels set, images from Winter Swirls set and sentiments from Signature Christmas, then cut out by hand (since I don't have the label 1 dies). Colors used were: Dark Chocolate, Scarlet Jewel & Spring Moss. Each tag was finished off with just a touch of glitter added to the swirls and dark chocolate floss. To use just stamp or write To & From onto the back side and attach to the gift.

Keeping with the quick and inexpensive ideas, here are a couple of bags...
It doesn't get any easier than this! Just stamp a sentiment in Ocean Tides and a few snowflakes in white, both from Snowflake Serenade. Then embellish with a big button bow, glitter and call it good.
Last and certainly not least is a simple yet classy look. Started with a strip of Scarlet Jewel cardstock, stamped it with snowflakes from Winter Swirls in Versamark. Layered one of the tags from above onto the strip and embellished with ribbon. Easy Peasy!

I do hope you enjoyed my creations and found some useful and easy ideas to help you out this holiday season (which will be here before we know it!). Thanks for hopping by and have a blessed Thanksgiving day tomorrow!

Maile

Tags: (All PTI unless noted)
  • Stamps: Vintage Labels, Winter Swirls & Signature Christmas
  • Ink: Dark Chocolate, Scarlet Jewel & Spring Moss
  • Cardstock: Rustic Cream
  • Accessories: Brown DMC Floss & Rangers Stickles Stardust Glitter

Joy Bag: (All PTI unless noted)

  • Stamps: Snowflake Serenade
  • Ink: Ocean Tides & Fresh Snow
  • Accessories: Kraft Bag from Craft Store, Ocean Tides Saddle Stitch Ribbon & OT Vintage Button

Happy Holidays Bag: (All PTI unless noted)

  • Stamps: Vintage Labels, Winter Swirls & Signature Christmas
  • Ink: Dark Chocolate, Scarlet Jewel & Spring Moss
  • Cardstock: Scarlet Jewel & Rustic Cream
  • Accessories: Scarlet Jewel Satin Ribbon

Tuesday, November 24, 2009

Embellish Color Challenge With Brads

Hello! The latest Brad Challenge over at Embellish really through me for a loop, I am not used to working with such bright colors. Definitely a step out of my comfort zone.So combining these colors with sweet Emma's Sketch Challenge #4, here is what I came up with...
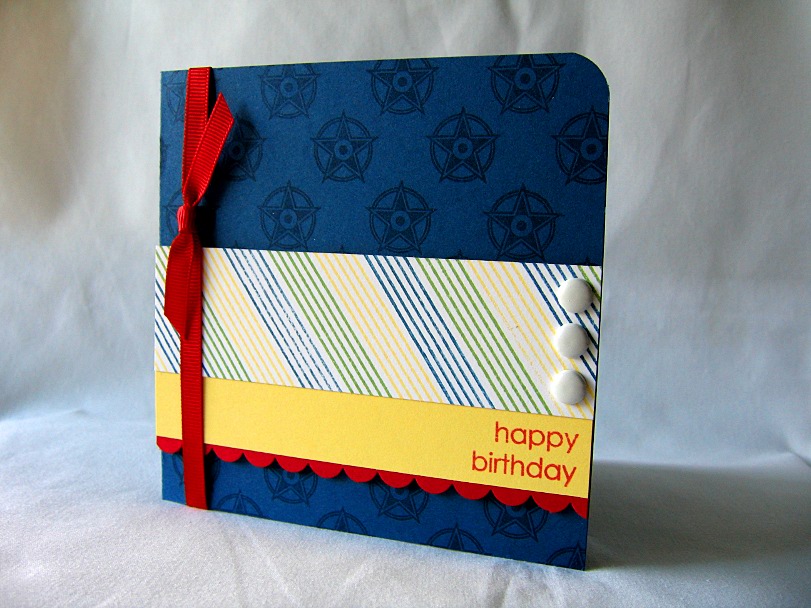
The white strip was stamped using stripes from Background Basics: Retro and the star background is from BG Basics: Stars. I really like these stars and I haven't used them in a long time, I find them hard to work with sometimes. I think I may challenge my self to use the stamp set more often.

Thanks for dropping in, hope you enjoyed your visit today!

Maile


Happy Birthday: (All PTI unless noted)
  • Stamps: Background Basics: Retro & Stars & Shapes By Design (Sentiment)
  • Ink: Enchanted Evening & SU Real Red, Barley Banana & Wild Wasabi
  • Cardstock: Enchanted Evening, White, Pure Poppy & SU Barley Banana
  • Accessories: SU Real Red Ribbon, MM White Brads, SU Scalloped Edge Punch & Corner Rounder
 
BLOG DESIGN BY: SHERBET BLOSSOM DESIGNS