Showing posts with label In Bloom. Show all posts

Wednesday, December 30, 2009

Blooming Birthday

Hello my friends! Hope you are all doing great. In my corner of this world that I call home, some rain has snuck up on us today. It's gloomy and wet, but I don't mind it at all. I love weather like this!

So, check out today's card...
I love this card in brown! But wouldn't it look great in raspberry, purple, red or any other color you heart desires? These flowers, from In Bloom, look so gorgeous stamped in cream ink onto any dark cardstock.
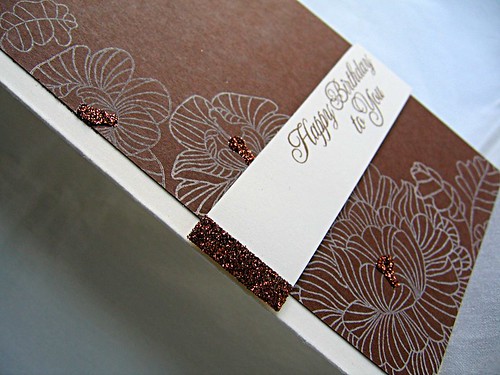
Finish it off with some glitter and you've got yourself a simply elegant creation.

I must be on some odd sized card kick, I haven't posted a regular A2 card in a while. Hope you don't mind. I just love how you can use a layout, that you would normally use for an A2 card, on a different sized/shape card and get a completely new and different look to the very same layout. Great way to boost your creativity, with out having to think too hard.

As always, thank you for stopping by today!

Maile


Happy Birthday To You: (All PTI unless noted)
  • Stamps: In Bloom
  • Ink: Vintage Cream & Dark Chocolate
  • Cardstock: Vintage Cream & Dark Chocolate
  • Accessories: Bon Bon Doodle Bug Glitter & Corner Rounder

Card Measures: 7" X 7"

Monday, November 23, 2009

Gratitude Set

Happy Monday! Hope you enjoyed your weekend. Just wanted to share with you a card set I made for a friend. She was married a couple of weekends ago and I though a set of thank you cards would come in handy and make a great gift. The colors used were from her wedding. I went with the same two stamp sets (In Bloom & Spiral Bouquet for the sentiment) and came up with four different layouts.
Added a touch of glitter to all but one, I wanted to keep one a little less feminine so she could use it for either a male or female. The set included a total of eight cards, two of each design.

Thanks for stopping in today! Hope you have a great start to your week.

Maile


Gratitude Set: (All PTI unless noted)
  • Stamps: In Bloom & Spiral Bouquet
  • Ink: Spring Moss & Dark Chocolate
  • Cardstock: Dark Chocolate, Vintage Cream & Spring Moss
  • Accessories: Doodlebug Design Bon Bon Glitter, DMC Floss, Upper Crest Border Punch & Corner Rounder

Friday, November 20, 2009

EBTKS Sketch Challenge #1

Hello There! Over at the Everything But The Kitchen Sink blog there having their first sketch challenge. What a great sketch, I just had to play along... Here is what I came up with...
I created the panels by adhering double sided sticky tape and then gave it a good coating of Doodle Bug Bon Bon glitter. For the center image I went with a tag to play along with the latest Inspire Me Challenge #4: Tag It, over at Dawn's blog.

Stamped the In Bloom flower in brown onto the tag and cream card stock, cut out the layers and adhered with dimensional adhesive. Tied a tab of ribbon, embellished with a little more glitter and attached a sentiment.

On the camera front, I received an email today that it has been repaired and has been shipped back to me. Hurray!

Well, thanks for stopping by today!

Maile


Always: (All PTI unless noted)
  • Stamps: In Bloom & Heart Prints (Sentiment)
  • Ink: Dark Chocolate & Spring Moss
  • Cardstock: Dark Chocolate, Vintage Cream & Spring Moss
  • Accessories: Dark Chocolate GG Ribbon, Twine, Doodle Bug Bon Bon Glitter, Creative Memories Tag Punch & Corner Ronder

Wednesday, October 21, 2009

CAS37 With Sympathy

Hello there! This weeks CAS Challenge is to create a Sympathy Card. Since this is a skinny card it works perfectly for the Caardvarks A Tall Order challenge too. Here is what I came up with... I've had this bloom assembled for a few weeks now, just sitting on my desk patiently waiting for me to use it. The bloom image is from PTI In Bloom stamp set. It was stamped onto Aqua Mist, Ocean Tides & Spring Moss cardstock in Versamark, then heat embossed with black embossing powder. Cut out and then layered together. The bottom of the card was samped with Background Basics: Text Style in black.
Thanks for your kind comments on my French Knot tutorial I posted yesterday, I am very glad that some of you found it helpful. Just remember if you ever give it a try leave me a link, I would love to see what you create!

Thanks for stopping by today!

Maile


With sympathy: (All PTI unless noted)
  • Stamps: In Bloom, Background Basics: Text Style & Beyond Basic Borders (Sentiment)
  • Ink: True Black & Versamark
  • Cardstock: Kraft, Ocean Tides, Aqua Mist & Spring Moss
  • Accessories: JoAnn's Craft Essentials Black Embossing Powder, KaiserCraft Black Rhinestones & Corner Rounder

Card Measures: 7" X 3 1/2"

Thursday, October 8, 2009

Hello Blooms

Hello all! Hope you are having a great day. My day is a little on the chilly side but yet still sunny and bright, I'm loving this perfect fall day! So here is the card for today... The flower image, from In Bloom, was stamped in ocean tides and red onto white squares then layered over brown cardstock with dimensional adhesive. I glittered the centers of each flower and layered the hand cut flower centers with dimensional adhesive.
The sentiment was stamped onto a die cut tag, strung with twine and then wrapped and tied around the card.

Thanks for stopping by! I hope you liked the card.

Maile


Hello: (All PTI unless noted)

  • Stamps: In Bloom & Shapes By Design (Sentiment)
  • Ink: Ocean Tides & SU Real Red
  • Cardstock: Kraft, White & Dark Chocolate
  • Accessories: Doodlebug Design Bon Bon Glitter, Twine from Craft Supply, Cuttlebug Tag Die

Wednesday, September 30, 2009

For A Special Friend

Happy hump day to you my friends! Today I am taking a very special friend out to lunch for her birthday and this is the card I made for her... I stamped four square panels with a flower and leaf image from In Bloom, detailed the flower centers with french knots. Punched the bottom edge of the purple panel with the Fiskers Upper Crest Border Punch, stamped the sentiment and wrapped it with white floss. Stamped white tiny polka dots, from Polka Dot Basics II, on the card base.
I hope she likes it, I know she likes purple and my cards with the square panels are her favorite. Something I like to do when giving cards out is to write out the message on a piece of white computer paper then lightly tack it into place on the inside. That way the message can be easily removed and the receiver can reuse the card.

Hope you all have a wonderful Wednesday! Thanks so very much for visiting me to day!

Maile

Friend: (All PTI unless noted)
  • Stamps: In Bloom, Polka Dot Basics II & Beautiful Blooms (Sentiment)
  • Ink: Ripe Avocado, SU Perfectly Plum & SU Craft White
  • Cardstock: Kraft, White & SU Perfectly Plum
  • Accessories: DMC Floss, Upper Crest Border Punch

Saturday, August 22, 2009

Purple Inspired

Hello all! Hope you are enjoying your weekend!

Ok so I must admit, purple is really growing on me. :) When I saw this beautiful card (scroll down to the second card on her post) by Dawn McVey I knew I had to try that color combo. Here is a simple card I came up with in no time...
Again with the embroidery floss, french knots and the In Bloom stamp set. I hope you aren't sick of them yet. :) This is such a cheery color combo, thought it would work well for a "pick me up" card.
Sorry for such a quick post. I have company coming over for dinner today and need to prepare.
What kind of weather are you guys having today? We are getting a little rain! I'm loving it, reminds me that fall is just around the corner. Hope you have a great weekend!
Oh, and one more thing... I think I finally figured how to upload my pictures so that when you click on them, they enlarge. Hope it works. Bye, bye!
Maile
Hope you're feeling better: (all PTI unless noted)
  • Stamps: In Bloom
  • Ink: SU Perfect Plum
  • Cardstock: Summer Sunrise, Kraft & Vintage Cream
  • Accessories: DMC Floss, Apron Lace Border Punch

Tuesday, August 18, 2009

Bringing Back the Blooms & Good News!

Hello my friends! I've brought In Bloom back out to play...

Yes... I still love this set! :) It's hard to see in the photo but the green strip is embossed with blooms in cream embossing powder. Behind that I slipped in a textured torn edge and then tied it together with a button and bow. The bloom image is stamped in vintage cream ink onto the craft card base...Then embellished with a few french knots, more of that wonderful embroidery floss I've been using lately. Oh, and added a few stitches to the sentiment for good measure! What do you think of the color combo? It totally reminds me of sorbet ice cream, mmmmmm! I'm not sure if sorbet ice cream and flowers mix well together, oh well.

Anyways, I'm very excited to share my news with you! Today I received a very sweet email from Susan Opel with PaperCrafts Magazine, accepting a few of my cards for publication in the March/April 2010 issue! This will be my first time ever being featured in PaperCrafts! I can't wait to see them in print, it's going to be a long 7 months!

So, thank you all for taking the time to visit me and for all your wonderful comments. Have a blessed Tuesday!

Maile


There's Nothing Better Than A True Friend: (all PTI unless noted)

  • Stamps: In Bloom
  • Ink: Vintage Cream, Dark Choc & Berry Sorbet
  • Paper: Kraft, Spring Moss, Berry Sorbet & Vintage Cream
  • Accessories: Summer Sunrise GG Ribbon, Berry Sorbet Vintage Button, DMC Floss, Fiskers Apron Lace Border Punch & JoAnn's Embossing Powder

Saturday, August 15, 2009

Gettin' My Brain In Gear

Hope you are having a fabulous weekend!

Do you ever get stuck on a card, just can't make it work, and have to walk away? It happens to me quite often. Anyways today's card was one of those cards...
I started on it yesterday and knew I wanted to work with this topiary image and I thought it would look great pair with embossed leaves from In Bloom. So the original color combo was ripe avocado, brown, kraft and cream. I played around with different layouts, different buttons, whatever I could think of! Nothing was working! So I though enough is enough and left to go to my work out class. I guess getting a good buns kicking work out must have kick my brain into gear! As soon as I got back I took one look at my card and thought "COLOR!" So that's when the raspberry fizz came into play and everything else just fell into place.It's kind of hard to tell in the pictures but the leaves are embossed with clear embossing powder. The topiary pot was stamped a second time and cut out, then mounted with dimensional adhesive for a little bit more dimension. For the selection of the buttons, I thought it would be neat to pair a fun textured button (top, but it's hardly noticeable) with a simple one (bottom).

I think it turned out all right, considering the struggle I had with it.

Thanks for stopping in! I hope you enjoyed spending a little time with me today.

Maile

From Me To You:

  • Stamps: Everyday Button Bits & In Bloom
  • Ink: Dark Choc. & Versamark
  • Cardstock: Dark Choc., Ripe Avocado, Kraft, Cream & Raspberry Fizz
  • Accessories: Apron Lace Punch (Fiskers), Raspberry Fizz Vintage Buttons & Twill Ribbon, DMC Floss & Clear Embossing Powder

Monday, August 10, 2009

Flourishes In Bloom

Happy Monday to you! Hope the weekend didn't go by too fast.

So today I have yet another In Bloom card to share with you. This time I paired it with some flourishes. I layered the bloom again, but this time I used raspberry ink on kraft cardstock (Mmmmmmm, love the look). So this is how it turned out...
I used my apron lace border punch on kraft cardstock, then stamped text using raspberry ink onto the punched border. A small and a large flourish were stamped behind the bloom, its amazing how flourishes just add the right touch to a card. I added a little something special to the center of the bloom...The way I cut and layered the bloom enabled me to tuck a little black button in the center. Just thought it was a unique and cute little detail. It's the details that count right?

So have I exhausted you with this set yet? I hope not, I plan to be using it a lot. It has now become a go-to set for me. Although, I do plan to use a different stamp set on my next post! :)

I hope you liked the card today. So, just like the sentiment on the card... Thank You for stopping by today and for all the wonderful comments you leave me. It's like a little bit of extra sunshine in my day, I love each and every one of them!
Maile
Thank You:
  • Stamps: In Bloom, Fancy Flourishes, Background Basics: Text Style and Beyond Basic Borders (Sentiment)
  • Ink: Raspberry Fizz, Ripe Avocado & True Black
  • Cardstock: White, Raspberry Fizz, Kraft & Black
  • Accessories: PTI Vintage Buttons, DMC Floss, Apron Lace Border Punch, Corner Rounder

Sunday, August 9, 2009

True Friend

Hello my friends!

So, I am excited to share today's card with you all! As you know already I am having a blast playing around with my In Bloom stamp set. I love it, it's such a versatile set and I can't quite put it down! On yesterdays card I layered the bloom image and showcased it as the main focal point. Today card uses it as a background for the sentiment. So onto the card...
Since the sentiment is so long I chose to layer the sentiment over the image. The sentiment comes as one stamp, but to get the two colors I carefully inked up one side in brown and then the other in raspberry. Then placed a few buttons in a way to help draw the attention to the sentiment.

Are you loving this color combo as much as me? I think it may be one of my faves! Oh, and can you believe it, I resisted the corner punch on this one!!! LOL!

Hope you are enjoying your last bit of the weekend! We are headed to a friends house for dinner and dessert, I'm bringing the strawberry shortcake! Mmmmmmmm! :)

Maile


Nothing Better Than A True Friend:

  • Stamps: In Bloom & Background Basics: Retro
  • Ink: Dark Choc, Summer Sunrise & Raspberry Fizz
  • Cardstock: Kraft, White, Summer Sunrise, Raspberry Fizz & Dark Choc
  • Accessories: Rasp Fizz Vintage Buttons, Twine, Apron Lace Border Punch

Saturday, August 8, 2009

In Bloom

Hi there! Hope you are all enjoying you're weekends!

So as promised yesterday, today I share with you my card using the new In Bloom stamp set from Papertrey Ink. So here you go...
This flower image would be fabulous all colored in, but I am not a colorer at all! lol! So my way of adding color is to stamp the images in different colors. The large bloom was stamped in Raspberry Fizz and the smaller ones were stamped in red. I stamped the images multiple times and cut out different sections of each flower, then adhere them together with dimensional adhesive to give it a layered look. Just like Nichole Heady did for this card.

I gave the card a little extra detail with black rhinestones, black scallops and a sentiment stamped in black as well. Again with the "skinny" card, it just makes such elegant cards. So this may seem like a lot of work for a card, since this is the first time playing around with this set. But I have had this idea in my head ever since ordering it and couldn't wait to create it. It turned out just like I had envisioned, which rarely happens. Usually my cards come out completely different from the original idea. How about you, do your cards usually come out as planned or off on some other tangent?

So, I'm loving this set and have already made a few more cards with it. I look forward to sharing them with you soon. So hope you'll stop in again soon. Talk at you later!

Maile


Thank You:

  • Stamps: In Bloom & Damask Design (Sentiment)
  • Ink: Raspberry Fizz, Ripe Avocado, True Black & SU Real Red
  • Cardstock: Kraft, Vintage Cream & Bazzil Black
  • Accessories: Kaiser Craft Black Rhinestones, Apron Lace Punch & Corner Rounder
 
BLOG DESIGN BY: SHERBET BLOSSOM DESIGNS