Thursday, December 19, 2013

December Freebie: Ruby Reprise

Papertrey Ink has something special up its sleeve.  Check out the details...

Papertrey Ink is offering a wonderful customer incentive this month, a little holiday gift that everyone can enjoy! Receive the limited edition Ruby Reprise stamp set for FREE with orders placed now until January 14th, 11:30pm EST totaling $70 or more (after rewards points or other discounts have been applied). This is a limited edition set and will only be available during this promotional period. As an added bonus, the images in this set coordinate with the previously released Ruby Rose dies! This set will be automatically added to your package and there is no need to add it to your cart at check out.

How sweet is that?!  I've got a sample to quickly share with you today, using this adorable limited edition set...
So, I knew I wanted to incorporate this set underneath one of the cover plates.  I chose to work with the Cover Plate: Hexagon die.  Just seemed to fit with a botanical feel well.
These floral images are perfect for layering!  The details, when layered like so, add so much detail to this simple card.  Colors used... summer sunrise, melon berry and berry sorbet.
Before attaching the cover plate, with dimensional adhesive, I embellished the flower groupings with enamel dots.  Then finished the card off with a raised sentiment strip on top of all the layers.

Well, that's all I've got for you today.  Now, be sure to see what some of the Papertrey Ink design team has in store for you today...
Thanks so much for stopping by!

Maile


Celebrating With You
Stamps: Ruby Reprise
Ink: Summer Sunrise, Melon Berry, Berry Sorbet & True Black
Cardstock: White
Others: Enamel Dots & Cover Plate: Hexagon die

Sunday, December 15, 2013

Papertrey Ink December Release Projects

The Papertrey Ink December countdown is about to come to an end and I'm here to share my final projects with you today. But, before I do, let me remind you that everything you've seen peeks of will be available for purchase through Papertrey Ink beginning 10 pm EST tonight.

Now, let me get started!...
The Best is Yet To Be by Heather Nichols and the Tag Sale #9 Die Collection by me.
Here's a shot at the second tag, a bit of shimmery black cardstock was added to the bottom edge.
 Cupid's Arrow by Lexi Daly.
I layered a few of the images and the perfect sentiment in a color combo of soft stone, melon berry, berry sorbet and smokey shadow, onto a die cut banner from the Notched Hearts Banner die collection.
Wonderful Words: Love by Heather Nichols and Happy Hearts by Nichole Heady.
Stamped "love" in enchanted evening and soft stone and then a touch of hibiscus burst via the trio of heart hearts.
 Boutique Borders: Valentine by Dawn McVey.
Stamped only a portion of the frame just under the sentiment.  Then wrapped twine, strung with tiny hearts from the Valentine Stitches die collection, around the cardstock panel.
Solid Stitches & Swirls by Nichole Heady.
I opted to use the images alone, without the coordinating stitched images found here.  Love the look!
Polka Dot Parade #11 by Melissa Bickford.
Finishing this blog post off with another Tag Sale #9 tag.  Topped the tag with a button and embellished this cute owl with felt wings.

Well, that's all of them!

Be sure to check out the rest of the Design Teams fabulous projects as well...
Thanks for stopping by!

Maile

Saturday, December 14, 2013

Love is in the details...

Welcome to the final day of the Papertrey Ink December countdown and the second design team group post day. Today's group post is focused on many of the new love and heart themed dies.  We've paired them up with a variety of other sets to create an assortment of "Love" themed projects and to offer up ideas that can be used year round.  The featured product... 

Tag Sale #9 dies (designed by me!)
Valentine Stitches dies
Limitless Layers: Heart Stitches dies
Stitched Pinked Edge Label dies

As in the title of this blog post, love is in the details... of these new dies! Each one has been carefully and lovingly thought out and it shows when you put them to use.  They are such versatile pieces to be added any stampers collection and you won't want to be left without them.

Here's how I was inspired to use them...
This first gift package ensemble puts the stitched dies to use in a non-stitching form.  Pillow boxes die cut from pure poppy, sweet blush and smokey shadow cardstock. 
For the smokey shadow box I used the arrows from the Valentine Stitches die collection, stamped a heart from the Happy Hearts stamp set and a sentiment from the Wonderful Words: Love stamp set.  Then finished it off with a rhinestone and white baker's twine.
The pure poppy box uses the "X" and "O" also from the Valentine Stitches die collection.  Finished the box off with a touch of rhinestones and pure poppy baker's twine.
This sweet blush box was die cut using one of the dies from the Limitless Layers: Heart Stitches die collection and the small heart from the Coffee Cozy Details Die Collection.  It also features a stamped heart from the Happy Hearts stamp set and a sentiment from the Heart Squared stamp set.  Then finished off with a bit of baker's twine and I'm just now realizing that I forgot to add a rhinestone (oops!).
One final group shot for ya.  :)  Here's How: Begin by die cutting the pillow boxes from cardstock or pattern paper.  Die cut the desired stitched images/dies from the flat die cut box and then assemble last.  Keep in mind, when die cutting with the stitched dies, it is best keep the sealing edge of the box form at the top, this way it can be folded over, sealed on the backside and won't show through the tiny holes. Wishing I would have taken a picture of this, but I forgot. Sorry. 
Up next, a wedding card and tag set.  Here's a Tip: These simple designs are suited to work perfectly with any color combo of your choice.  Try coordinating your color choice with the wedding colors, just take a cue from the invitation.
My inspiration for this set began with the use of the Tag Sale #9 dies.  These tags were designed to layer on top of one another so that a second color of a scalloped edge could peek out from underneath.  You can also use them separately and have two different sizes at your disposal!
In the same fashion as above, I die cut the double row heart (from the Limitless Layers: Heart Stitches die collection) from the top tag. Stamped with an ampersand and phrase from the Grand Ampersand stamp set.  The second tag layer was cut from pure poppy and then the two were tied together with a bit of coordinating baker's twine.  I just love how the colored tag underneath shows through the heart holes in the top tag!
To coordinate, the card features the same die cut heart idea placed over a pure poppy base.
The bottom edge of the white panel was cut using the Small Scallop Border die (yet another coordinating touch), stamped with a heart and sentiment from the The Best is Yet To Be stamp set and embellished with a stamped heart from the Happy Hearts stamp set and rhinestones.  Just a Note: The top white panel was attached using a single strip of adhesive, placed only at the top.  This allows the bottom edge to bow out a bit (as shown in the photo above), giving the card a bit of lift but keeping it fairly flat.
This simple anniversary card features a fun use for the Stitched Pinked Edge Label die collection.
I simply die cut the label, stamped as desired (heart from the Happy Hearts stamp set and sentiment from the The Best is Yet To Be stamp set), threaded baker's twine through a few holes (wrapped around the card too) and tied ends together into a big bow.  Here's a Tip: The twine holds everything into place, but you could use a bit of dimensional adhesive to ensure a more permanent hold. Not sure if it gets any simpler than this!  :)

Well, that's all I've got for you today. Just remember...  everything you've seen peek of today will be available for purchase through Papertrey Ink, beginning December 15th

Now, be sure to see what the rest of the Papertrey Ink design team has in store for you today...
Thanks so much for stopping by!

Maile

Friday, December 13, 2013

Introducing Happy Hearts

Hello and welcome to the fourth day of the Papertrey Ink December countdown and the first Design Team group post! 

Today's group post is all about showcasing the new Happy Hearts stamp set and coordinating Cover Plate: Hearts die.  It doesn't take much to make my heart go a flutter, when it comes to stamping.  I'm quite pleased with today's featured products and could not be happier to play with them!  This is the coolest cover plate as of yet, it's simple and features an unexpected space perfect for a sentiment. 

Check out what I've cooked up for you today...
Instead of the expected portrait use of the Cover Plate: Hearts die, I opted to use a portion of it on a landscape layout.  I love the look of layering white on white.
To keep things simple, yet interesting, I embellished the heart openings with a pretty assortment of pearls.  By attaching the cover plate die cut like so I did need to trim off the bottom and top edges.

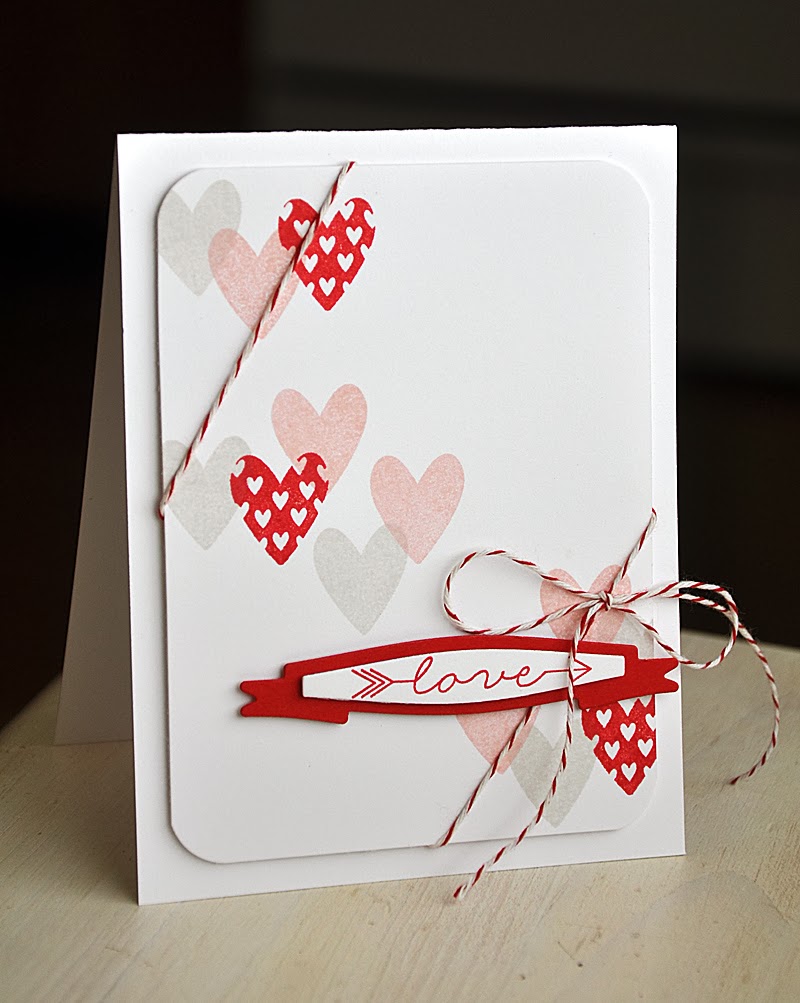
I love to make love cards!  And this one makes me happy (well, the one above does too).  I stamped a white cardstock panel with an assortment of solid and pattern hearts in a color combo of soft stone, sweet blush and pure poppy.  Soft and pretty.
I wrapped the stamped panel with pure poppy baker's twine and tied the ends into a big bow.  Then finished the card off with a sentiment banner (made using the new It's a Banner Day die).

Well, that concludes my look at the Happy Hearts stamp set and coordinating Cover Plate: Hearts dieJust remember... this collection will be available for purchase through Papertrey Ink, beginning December 15th

Now, be sure to see what the rest of the Papertrey Ink design team has in store for you today...
Thanks so much for stopping by!

Maile

Thursday, December 12, 2013

Propose a Toast and Framed Love die

Hi there! Just popping in quickly for day three of the December Papertrey Ink countdown to share a few samples using one of the new sets... Propose a Toast (designed by Lizzie Jones).  This unique set features these sweet champagne flutes which can be used to toast almost any celebratory event. With the sentiments included, this is a wonderful set to play around with!  

I'll also be featuring one of the new dies... Framed Love Die A fun accent that is easy to layer on cards or tags.  

Keep in mind that this set and die will be available for purchase beginning December 15th at Papertrey Ink.

So, let me get right to it...
First up, a card utilizing Propose a Toast and a few pretty gold touches.
I crossed two flutes and filled them with the tilted champagne filler images, using gold ink.  Perfect for adding a bit of movement to your projects.  The edge of the card was finished off with a strip of gold cardstock.
Up next, a simple white on white number.  I began by stamping the Propose a Toast sentiment onto a white cardstock panel.  Then embossed the Framed Love die over it and rounded the corners of the panel.
One final touch... I stamped a trio of berry sorbet hearts for a tiny pop of color.
My next card features a layered use for the Framed Love die.  
The frame was die cut from shimmer black cardstock.  The white panel below it was cut to fit by hand and stamped with a gold bubble border and a sentiment (both included in Propose a Toast).
My final card features the same bubble border image as used above.
Stamped two flutes in a color combo of true black, lavender moon and aqua mist.  The bubbles were stamped next using the second generation stamping technique, to achieve a lighter/softer look.

Well, that concludes today's look at Propose a Toast and Framed Love die. Just remember... they will be available for purchase through Papertrey Ink, beginning December 15th

Now, be sure to visit Nichole Heady and Lizzie Jones for even more peeks at this setAlso, Heather NicholsDawn McVeyMelissa Bickford, Erin Lincoln and Lexi Daly have peeks to share with you of their newest sets and dies for the month.  Betsy Veldman has even more to share with you today too!

Thanks so much for stopping by!

Maile


Congratulations
Stamps: Propose a Toast
Ink: True Black and Gold
Cardstock: White & Gold Shimmer

May All Your Hopes & Dreams
Stamps: Propose a Toast
Ink: True Black & Berry Sorbet
Cardstock: White
Others: Framed Love die

Love & Best Wishes
Stamps: Propose a Toast
Ink: True Black and Gold
Cardstock: Kraft, White & Onyx Shimmer
Others: Framed Love die

Cheers
Stamps: Propose a Toast
Ink: True Black, Lavender Moon & Aqua Mist
Cardstock: White
Others: Clear Rhinestones

Sunday, December 1, 2013

Bells & Boughs Revisited

Hey everyone! Thanks for joining me today for the December Papertrey Ink Senior DT Challenge. This time around we are bringing back Bells & BoughsI'm thrilled to be joining in today's activities!  To be bringing back one of my favorite oldie but goodie Christmas stamp sets.  I may be a little partial to this set, since it is one I designed, but the design team and I will share with you today why this set is one to turn to time and time again. Here's a card and tag I've created just for today. I hope you enjoy them.  

Take a look...
Today's set features Bells & Boughs along with a few other things in common, such as... the use of the Tipped Tops die collection and a color combo of ocean tides, new leaf, limeade ice, berry sorbet, pure poppy and true black.
The top edge of the largest Tipped Top die was stamped using the three bough images included in the stamp set.  Then it was finished off with a few sprinkles of berry sorbet berries and a sentiment from 'Tis the Season Sentiments.  Then fixed to the white card base using dimensional adhesive.
The tag features the small bell image, included in Bells & Boughs, as well as the small bow.
I used the small Tipped Tops die to die cut a portion from a separate white tag, as shown above.
The white portion was stamped with the bell and sentiment (also from 'Tis the Season Sentiments) and then mounted onto another tag, using dimensional adhesive, which was die cut from pattern paper.  This was then topped with a pure poppy bow and cream baker's twine through the top of the tag.


Well, that's it from me today. Now be sure to visit the other Papertrey Ink senior design team girls for more Love Lives Here: Holiday goodness...
Thanks for stopping by today!

Maile


Supplies Used
Stamps: Bells & Boughs and 'Tis the Season Sentiments
Ink: Ocean Tides, New Leaf, Berry Sorbet, Pure Poppy & True Black
Cardstock: White
Pattern Paper: Limeade Ice Pattern Paper Pack
Others: Cream Cotton Baker's Twine, Bells & Boughs Die Collection, Tipped Tops Die Collection & Tag Sale #7
 
BLOG DESIGN BY: SHERBET BLOSSOM DESIGNS