Friday, April 26, 2013

Heat Embossed Edges

Thanks for joining me today for this weeks Papertrey Ink Design Team Tip!

I’ve been having fun exploring a technique I have recently discovered.  It all began by adding a touch of color using ink pads applied directly to the edges of white cardstock.  Drawing inspiration from this previous project...
This then transformed into using a watermark ink pad/pen and embossing powder to coat edges.  
It adds such unique touch to a project check it out...
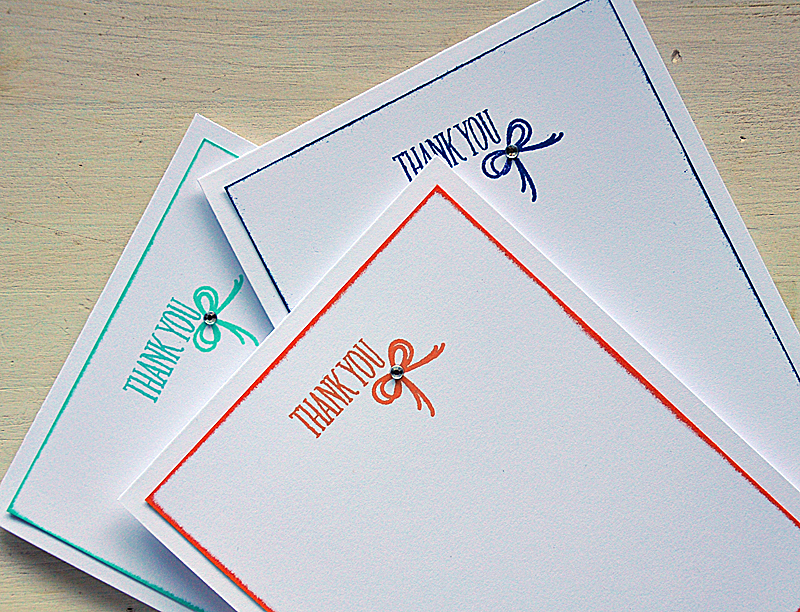
After stamping the sentiment onto the cardstock strip I heat set a colorful border.  Here's How: Using gentle pressure, rub/drag the edge of cardstock across the top of a Versamark ink pad.  Holding the paper at a slight angle and draging for a thick build up (I'd say at about a 45 degree angle dragging towards yourself).  Coat with embossing powder and heat set.  
It adds a nice colorful and glossy touch.  Just A Note:  The twine was attached into place using a Tiny Attacher and then tied into a bow.
The easiest way to apply this technique is using the ink pad, but to take it up another notch, I used my handy dandy Embossing pen.  Same idea as the ink pad, giving you a sticky surface to work with, but in a free hand pen form.
Here's How:  After die cutting the desired shape (here I've used a Bountiful Banners die cut) I simply traced along the edge with the pen, covered in embossing powered and then heat set.  I love how it helps this simple white banner to pop!  Here's A Tip: I found it easiest to emboss one side of the banner at a time, this way I had a place to hold onto.
For this last card I pulled out my Chevron Stripes Border die and the embossing pen.  Here's A Tip:  When covering a larger/longer surface, work with one small area at a time, working your way gradually to the end.  This ensure the watermark ink will remain sticky enough.
Take a closer look.  Here's A Tip:  To create a thicker build up of embossing powder... immediately after using the heating tool while the powder is still hot, dip the freshly embossed edge back into your embossing powder and heat set again.  Repeat if necessary.

That's it from me today.  I hope you'll give this look a go.  Have fun!

Thanks for stopping by.

Maile


Thank You Card...


Blooming Hello There Card...

Chevron Hello There Card...

Monday, April 15, 2013

Papertrey Ink April Release Projects

The Papertrey Ink April countdown is about to come to an end and I'm here to share my final projects with you today. But, before I do, let me remind you that everything you've seen peeks of will be available for purchase through Papertrey Ink beginning 10 pm EST tonight.

Now, let me get started!...
Let me begin with Boutique Borders: Father by Dawn McVey.
I grouped a few cool Studio Calico pattern papers together and topped them with a Boutique Borders: Father sentiment and frame. Embellished with a die cut notched strip (from the Sketched Shapes Die Collection) and rhinestones.
Handy Hardware by Lizzie Jones.  I stamped a fun border along the bottom edge of the card using a number of image from this set.
In a fun color combo of summer sunrise, terracotta tile, Hero Arts soft pool and Hero Arts wet cement.
Wonderful Words: Memories by Heather Nichols.  I began by stamping a row of "memories" at a slight angle.
Then finished the card off with a veneer speech bubble, pattern paper strip and sequins.
Polka Dot Parade #3 by Melissa Bickford.  This set features an adorable tiny TV images which I stamped in a colorful row.
Topped each with a set of antennas and completed with a trio of "It's Your Day!" sentiments.
7th Inning Stretch by Lizzie Jones.  This cool baseball set was perfect for making a card for my niece who is currently playing in her first year of softball.
I had a blast stamping the bats in a girly color combo and then topping them off with a personalized cap.
Happiness In Bloom by Nichole Heady.  This last card utilizes a fun technique I've been dying to try. One that requires the use of a miny water mister to create a pretty water color look.
Here How:  Simply ink up your stamps, spray stamp 2-3 times with water and them stamp.  Easy peasy!  Ain't these mini misters adorable?!... 

Well, that's all of them!

Be sure to check out the rest of the Design Teams fabulous projects as well...

Thanks for stopping by!

Maile


Happy Father's Day Card...


A Cut Above Card...

Thanks For The Memories Card...


It's Your Day! Card...


Way To Go Slugger! Card...


A Good Life Card...
 
BLOG DESIGN BY: SHERBET BLOSSOM DESIGNS