
 Staying true to my style, first up is a super simple number with just the right amount of details to really make it shine. I started with a Soft Stone card base (I seriously can't get enough of this color these days). I then heat embossed the door, steps and sentiment with white embossing powder and outlined the images with a light gray Copic marker, to help it all stand out.
 One of these days I'd love to have me a gray Kraftsman house with a yellow door. Taking some inspiration from my dream house I colored the door with a yellow Copic marker. And since it's finally starting to feel like fall around here, I gave this door/entrance an autumn feel by adding a few pumpkin groupings. I die cut them from white cardstock, stamped the images in gray and colored in shades of orange and green. Then popped them up with some dimensional adhesive.
 Next up, a wintry scene. I started with a Soft Stone card base (of course) and heat embossed the double doors and hardware with white embossing powder. Outlined in gray and colored the doors blue. After masking off the doors I stamped the snowflakes (from Winter Penguin, also available November 15th) in Smoky Shadow ink.
 Topped the doors off with an gray embossed overhang, touched it up with a gray marker and embellished with some glitter to give it a snowy look.
 Gave the card a snowy base by attaching a strip of white cardstock, layered a die cut and glittered snow drift and finished the card off with a sentiment.
For these next two cards I took a couple of the smaller accent images, included in the Door to Door set, and used them in unexpected ways...
 Using the tiny banner image, I stamped it end to end and extended it across the card front.
 This was super simple to do: Simply stamped the first banner onto a Rustic White cardstock strip. Masked it off and stamped again. A Post It Note works perfectly for this step! Just stamp, cut out and place. I repeated these steps until I achieved the desired length and then colored.
 Attached the banner cardstock strip to the base of my card, topped with some Holiday Flourishes & Swirls pattern paper (available beginning November 15th), wrapped with Fine Linen ribbon, stamped with a sentiment and embellished with rhinestones.
 Last, but not least, is this fun window card featuring the little spring flower bunch from Door to Door. I found that the previously released set, Home Made, pairs perfectly with Door to Door! I pulled out all the window from the Home Made set, stamped the focal window in Dark Chocolate and then stamped the other windows (in Vintage Touch Chai ink) randomly along the Rustic White card base.
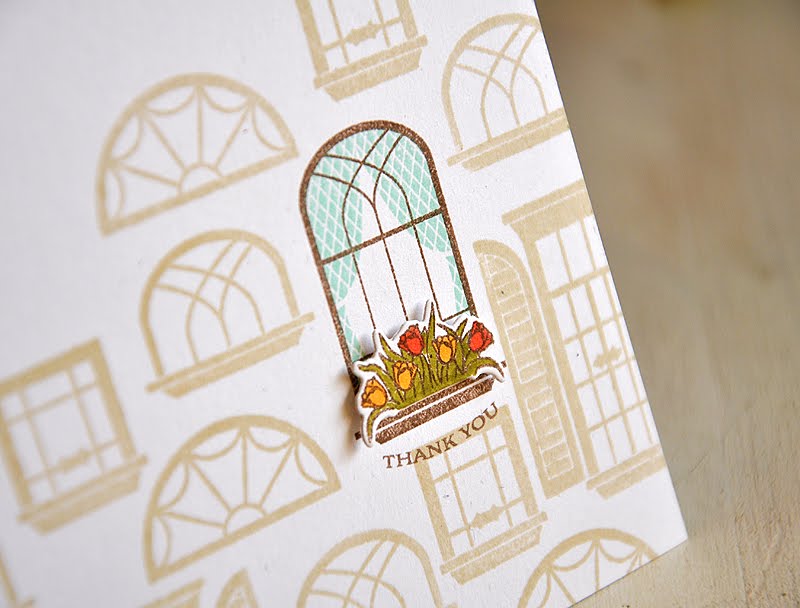 Stamped the Home Made curtains in Aqua Mist. The flower bunch was die cut, stamped in Dark Chocolate, colored and attached with dimensional adhesive. Then finished the card of with a Door to Door sentiment.
Well, that's it from me. Be sure to see what the rest of the Papertrey Ink design team has in store for you today. I know I can't wait to see!...
- Nichole Heady
- Betsy Veldman
- Dawn McVey
- Heather Nichols
- Lisa Johnson
- Melissa Phillips
- Erin Lincoln
- Jessica Witty
- Danielle Flanders
- Ashley Newell
Thanks for stopping by!
Maile
Give Thanks:
- Stamps: Door to Door & Fillable Frames #7
- Ink: Versamark & Gray
- Cardstock: Soft Stone
- Accessories: White Embossing Powder, Copic Markers (T1, Y21,YG93,YR18 & YR15) & Door to Door Accessories Die Collection
Winter Wishes:
- Stamps: Door to Door, Winter Penguin & Fillable Frames #9
- Ink: Versamark & Smoky Shadow
- Cardstock: Soft Stone & White
- Accessories: White & Gray (American Crafts Zing) Embossing Powder, Martha Stewart Glitter, Copic Markers (T1, T4 & B41) & In The Meadow Die Collection
It's A Party:
- Stamps: Door to Door
- Ink: Palette Noir
- Cardstock: Rustic White
- Pattern Paper: Holiday Flourishes & Swirls
- Accessories: Fine Linen Satin Ribbon, Green Rhinestones & Copic Marker (YG93)
Thank You:
- Stamps: Home Made & Door to Door
- Ink: Vintage Touch Chai, Dark Chocolate & Aqua Mist
- Cardstock: Rustic White
- Accessories: Door to Door Accessories Die Collection & Copic Markers


LOVE all these projects! I think my fave is the one with the yellow door, but I love them all! Love the Home Made windows too!
ReplyDeleteOh, wauw, Maile! These are gorgeous and sooo original!! I love the one with all the windows there! So pretty! Love these stamps, so gracious!
ReplyDeleteHugs, Wendy
Maille, I love all your cards but this window card is SO Cool!! I remember you did something similar with birdcages on a past release. Just Beautiful!!!
ReplyDeleteFantastic cards! I especially love the "it's a party" card. So clever!
ReplyDeleteLove your little banner!! And the window card is really unique!! Great design!!
ReplyDeleteSuper cards1The last one is my fav..so cute with all those windows..great idea!
ReplyDeleteWow! Did someone say versatility? I love how you showcased this set and all that it can do besides the traditional door-in-the-center-of-the-card treatment. That Winter Wishes card made me think how cool the doors could be as barn doors, paired with some of the nativity scenes inside from last month's release. As always, you get my wheels spinning! :)
ReplyDeleteLove what you did with those windows! Totally unexpected and completely fabulous in every way! Oh...and those green and white snowflakes? I die for that pattern. What a stunner! Have a good one, Maile!
ReplyDeletesuper creative...cool crisp door card and the windows great I have that Home made set too...so much inspiration... Thanks
ReplyDeleteYour clean and simple style makes using a set like this a lot less intimidating. Your projects are all just beautiful.
ReplyDeleteYikes, so chic, so lovely and sophisticated :o)
ReplyDeleteI love your cards! My favorite is the It's a party. The banner is so sweet. I also like the autumn door.
ReplyDeleteGreat projects, Maile! I think my favorite is the way you connected the little banners to border the bottom of the card! Brilliant! I love to see such innovative ways to use these fabulous stamps!
ReplyDeleteGreat cards. You did great card designs with this new set. : )
ReplyDeleteI absolutely love all of your projects. It's hard to say which is my favorite. I love the tone on tone look of the first one, the elegant simplicity of the third and the cleverness of the last one. I think I'm going to have to get this set now. My hubby thanks you...not. :)
ReplyDeleteOMGosh Maile! You are my idol! :) These cards are so beautiful!
ReplyDeleteI'm not particularly digging the whole door concept (not my taste), BUT, what you did with the stamps on that last card is BRILLIANT, Maile! Very unique and fresh and out of the box designing, that one!!!
ReplyDeleteCan I just say you are truely an amazing designer! These cards are spectacular, especially your yellow door and the last window card. You truely amaze me!!
ReplyDeleteAmazing! Maille, I LOVE the way your brilliant mind works. You are so creative! I look forward to adding this set to my collection and seeing what I can come up with, using your ideas for inspiration.
ReplyDeleteKathy McDonald
Love all your cards this post, but my favorite is the Home Made with Door to Door sets. I was wondering if the two were going to be useable together. The card style is reminiscent of European windows along the street. Wow! Thanks for sharing.
ReplyDeleteholy wow-ness!!!!
ReplyDeleteI especially like the pumpkins on the steps. So cute!
ReplyDeleteI love your windows and flower box card - so pretty!
ReplyDeleteI love your "unexpected" designs with this set. It's now on my list. Congrats on your DT membership. Have fun with it! Pamela
ReplyDeleteOh my goodness. I love what you have done with this set and all the ideas and elements.
ReplyDeleteI love that white embossing on soft stone cardstock! Must try! Also love your lovely window scene!
ReplyDeleteThese are gorgeous Maile! This set has a natural 'cute' quality about it, which you transformed into a something unbelievably ELEGANT! Love them all.
ReplyDeleteFantastic! It's going to be a tough decision on the 15th! :)
ReplyDeleteI have really enjoyed browsing your blog posts.
ReplyDeleteIn any case I will be subscribing to your feed and I hope you write again very soon!
ReplyDeleteI need to to thank you for this fantastic read!!
ReplyDeleteI definitely loved every little bit of it.
ReplyDeleteI’ve got you saved as a favorite to look at new stuff you post…
ReplyDeleteidfwehwx664
ReplyDeletegolden goose outlet
golden goose outlet
golden goose outlet
golden goose outlet
golden goose outlet
golden goose outlet
golden goose outlet
golden goose outlet
supreme outlet
golden goose outlet