Saturday, July 14, 2012

Fabulous Frames and Mega Gracious Vases Day Five


Welcome to the final day of the Papertrey Ink July Countdown and the second design team group post day. This time around we bring you Fabulous Frames and dies.  Just like yesterdays group post, for today's assignment we bring you two types of projects... one card application and one scrapbook application using Fabulous Frames.   I am extremely pleased with the way my projects turned out. Let me share... 
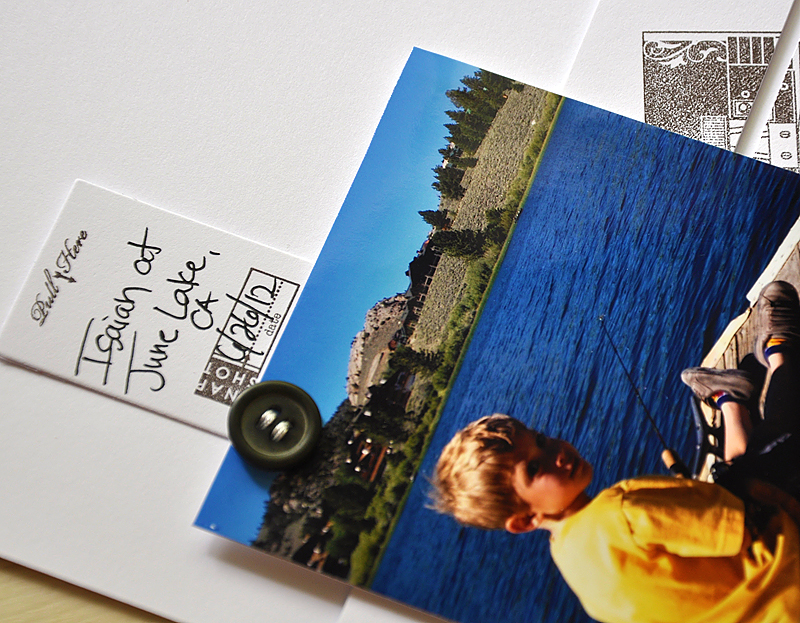
First up, the scrappy project. I chose to create a Polaroid style mini photo flip book.  Which features photos of our adventures from our last vacation.  Below you will find a shot of each page...
Under the first flap is a layered frame, created using images from Fabulous Frames, which includes info such as what, where and a date.  I worked with a simple color combo of Kraft, Simply Chartreuse, Spring Moss and Smokey Shadow.  I'll let the remainder of the page photos do the talking themselves.
That fish look almost as big as my son!
The cover look is continued from the front to the back.  The last little feature is a date plate, simply stamped and die cut the frame, stamped it with "date:", filled in the proper info (with some more of my sloppy handwriting, lol) and attached.  Please Note:  I'll share the how to info below, but beware... it includes many more pictures.  So, scroll down when you are ready.

Moving onto the cards.  These next two feature both Fabulous Frames and Mega Gracious Vases...
This card all began with that fabulous frame.  I just love it!!!
To achieve a lighter shade of gray for my vase, I inked it in Smokey Shadow ink, stamped the vase first onto scrap paper and then onto the Rustic White card base.  Next, I layered a Signature Greeting II sentiment on top.  Layered the frame, the flowers and a button... then called it done. Oh, almost forgot, these flowers were stamped in Sweet Blush, Summer Sunrise and Canyon Clay.  Love them!
Moving onto card number two.  I knew I wanted a huge pop of color, so I stamped the die cut Fabulous Frames frame in Orange Zest.
Within the frame I stamped a Soft Stone vase (from Mega Gracious Vases) and a few Garden Variety II blossoms.  Finished the card of with a sentiment tab (sentiment from Framed Out #6) and a couple Smokey Shadow buttons. Bright, but easy on the eyes.

Last but not lease, the mini flip book how-to...
Here's How: It all begans with this accordion style strip.  Cut the strip to 11" x 2 3/4" and score at every 1 1/2".  Depending on the amount of photos, you may need to add an extension like I did in the photo above.
Now, die cut a ton of Polaroid style frames (using the Fabulous Frames dies). Not the funnest part, I know.
Trim and attach photos. Once complete, arrange into the proper order. Good To Know: Arrange your photos backwards, you will need to begin by attaching the last photo and continue working back to front.  Here's A Tip: If you choose to do so, now is a great time to embellish each one.
Attach the first photo to the end of the accordion folded strip.  Here's Another Tip:  When attaching the photos make sure there is a slight gap at the accordion folds, this allows your book to fold flatter.  If you take a close look in the photo above, you can see how I've left about a 1/16" of space at the top of the frame.
Attach the second photo just above the first, like so.
Fold the first two photos together and attach the third on top.  Continue in this fashion until complete.
Once all photo are attached, you will need to close up the gaps pictured above.  Simply tuck in a piece of adhesive and press down.
Your book will then look like this!  Now all you need is a cover.  I trimmed my cover to 9" x 3 1/8" and scored (from both ends) at 4 1/4".
Wrap the cover around the book and adhered on the backside.  All done!  Now embellish to your liking.

Well, there you have it. I hope you've enjoyed! Just remember that both the Fabulous Frames and Mega Gracious Vases (and their coordinating dies) will be available beginning July 15, at Papertrey Ink. Now, be sure to see what the rest of the Papertrey Ink design team has in store for you today...
Thanks so much for stopping by!

Maile

Friday, July 13, 2012

Mega Gracious Vases Day Four

Howdy everyone! Welcome back, so glad you could join me for day 4 of the Papertrey Ink July Countdown. Yep, you guessed it... another day of Mega Gracious Vase and dies.  I've only had enough daylight to create one card for today, but I assure you that it is a good one!

Shall I get started?!  I think I will...
Today's project showcases the versatility of the Mega Gracious Vases dies.  Not only can these vases be filled with just about any type of flower.  There are endless options as to the look or style of the vases.  When you put the dies to action you can cut anything from cardstock, pattern paper, vellum, clear cardstock, felt and etc... you name it!
The vase I created today began life as a plain Rustic Cream die cut shape.  I stamped a woodgrain pattern in Fine Linen ink, using one of the images from the Modern Wood Mats stamp set, directly over the entire shape.  Giving it a whole new look!
Poping out from the vase are these pretty roses, but not just any old roses... spray roses (which happen to be my favorite type). Anyways, I stamped one of the stem like images from the Peaceful Garden stamp set and instaintly created stems. Topped the stems with a few tiny rose images from The Sweet Life stamp set (available begining July 15th), stamped in a color combo of Sweet Blush, Melon Berry & Canyon Clay.  Finished the card off with a Signature Greetings II sentiment (set also available begining July 15th).

Well, that's it from me today but do remember...Mega Gracious Vases stamp set and dies available for purchase through Papertrey Ink, beginning July 15th. In the mean time, I'd love to know what you think so far, so please share!

Now, be sure to visit Nichole Heady for more peeks. Also, Dawn McVey, Heather Nichols & Melissa Bickford have peeks to share with you of their newest sets for the month.


Thanks so much for stopping by!

Maile


I'm So Sorry Card

Shutterbug Special

Hello and welcome to the fourth day of the Papertrey Ink July Countdown and the first Design Team group post. Today's post is all about the new Shutterbug Special stamp set and dies. For today's assignment we bring you two types of projects... one card application and one scrapbook application using Shutterbug Special

Honestly, I first shuttered at the idea of having to create a scrapbook layout or project (as you may know, scrapbooking almost never happens around here) but as it turns out... I truly enjoyed it!  I've adored working with this adorable set and I found the gorgeously detailed camera image so inspiring that I've created a bunch of projects to share with you today.  So, let me get started...
First, lets begin with (gasp!) the scrapbook layout.  I chose to work with an 8 1/2" X 11" size (only because I currently do not own and 12" x 12" sheet of cardstock.  Shocking... I know).
As per my usual style... I kept things simple.  I grouped all the elements together, creating a visual flow across the mid section of the layout.  The colors are simple too, allowing the photo to truly shine and become a strong focal point. 
I began the layout by stamping a cardstock strip with the camera image and sentiment in Smokey Shadow ink.  I then trimmed the panel into three strips and adhered with dimensional adhesive.
I trimmed the photo to a 3 3/4" square, rounded the bottom right corner and attached with dimensional adhesive.  Behind the photo I attached an interactive tab stamped with "Pull Here".
The tab pulls out to reveal a bit of useful info and a date.  This is a photo from our camping trip a couple of weeks ago.  As the sentiment implies... a happy time for sure!
Here's How: The pull-out tab was simple to make.  It only took a few pieces of dimensional adhesive to holed it into place.  Two pieces, one per side, as a guide. Another at the bottom edge as a stop, to keep it from disappearing behind the picture permanently (you can find more info on this die and how it works at Nichole's blog).  I carefully set the pull-out tab into place as I was layering the page pieces together.  Then finished the layout with a few well placed buttons.

Now, how about we move onto more familiar territory... cards!
This friendly little card features a kraft panel stamped with the camera image three times, in a color combo of Orange Zest, Hawaiian Shores & Berry Sorbet.  Which is attached to a kraft card base.
I used the pull-out tab as a perfect spot for my chosen sentiment... die cut, stamp, attach and trim.  Then finished the card off with a few Smokey Shadow buttons.
Feeling inspired by the trimmed image from the above layout, I again chose to work with three panels.  This time around I went with a bit more color... Aqua Mist, Melon Berry & Spring Moss.
Mounted the panels over some Smokey Shadow pattern paper and finished the card off with a few matching buttons.
Last, but definitely not lease...  a sweet and innocent little number.  This one features a little surprise, but I'll get to that in a bit.  I began by attaching an Aqua Mist pattern paper strip to the left edge of a Rustic White card base and rounded the bottom corner.
I then impressed the camera die into a matching Rustic White cardstock panel and carefully (using a sharp kraft knife) cut open the designated slit at the bottom of the camera.
And for the little surprise... within the slit, I inserted this bright and loving message.  I chose to use Summer Sunrise and Canyon Clay inks on the pull-out tab, giving the recipient of this card a little unexpected pop of color.

Well, there you have it. I hope you've enjoyed! Just remember that both the Shutterbug Special stamp set and dies will be available beginning July 15, at Papertrey Ink. Now, be sure to see what the rest of the Papertrey Ink design team has in store for you today...
Thanks so much for stopping by!

Maile


Never Too Much Happy Layout


True Friends Card


Say Cheese & Eat Cake Card


You And I Just Click Card
 
BLOG DESIGN BY: SHERBET BLOSSOM DESIGNS