Friday, April 23, 2010

Embellish Color Challenge With Embossing

Hello my friends! It's Embellish Challenge time!!!... What a happy inspiration piece, wouldn't you say?! This time around our awesome sponsor is Practicing Creativity Design!!! Check out their excellent products (which I personally love!) here.
The challenge: create a project using Embossing (can be either heat embossing or dry embossing) and use the colors pictured above. Here is what I came up with...
Using Look Up, I heat embossed the flag banner and sentiment in black. Then stamped each flag individually using the colors of the challenge (Lemon Tart, Spring Moss, Hibiscus Burst & Spring Rain).
Punched a circle from the flag banner panel and adhered the sentiment behind it, using dimensional adhesive. Then attach the whole panel to a Lemon Tart card base, using the same adhesive. Embellished the card with coordinating ribbon tabs and buttons.

Such a fun challenge! You can find the challenge and prize details here. You have until the May 6th to submit your projects, can't wait to see what you all create!!!

Thanks for taking the time to visit me today, I really do appreciate it!

Maile


You Light Up My Life:

Thursday, April 22, 2010

Embroidered Flower Anniversary

Hello everyone! I am really loving the new Mat Stack #1 Die from Papertrey Ink. I couldn't help but use it on today's card...This time I paired it with the vine image from With Sympathy. Stamped it in Spring Moss onto a Vintage Cream cardstock base and rounded the corner. The Mat Stack die was cut from Lavender Moon cardstock and then embossed/impressed using the new Argyle Impression Plate. Punched a circle from Vintage Cream cardstock, stamped with vines and attached to the center of the embossed die cut.
Stamped a Spring Moss cardstock strip with a sentiment, attached it over the circle and trimmed the edges. Finished it off with a gorgeous little Jolee's Boutique Embroidered Flower attached next to the sentiment.

For some reason I have a hard time using scrapbook embellishments on my cards, I usually stick to my usuals: buttons, ribbon, floss & rhinestones. But when I was browsing JoAnn's the other day, I found this pack of Embroidered Flowers and loved them. So I made a deal with my self, I would only buy them if I promised my self I would use them and not hoard them. So there you have it, I've broke open the package and put one to use. I know, crazy right?! Lol!

Thanks for stopping by, hope you have a wonderful day!

Maile


Bold
Happy Anniversary:

Tuesday, April 20, 2010

All Eyes On...Masking

Hello all! Dawn of Wplus9 has started a new monthly feature on her blog called "All Eyes On...". Each monthly feature will concentrate on a new and fun technique or current trend. The feature for this month is masking. Here is my creation using this technique... To create this look, I used the three different sized butterflies from both Woodgrain Silhouettes & Woodgrain Silhouettes Additions. Stamp them onto Post It Notes and cut them out. Post It Notes make the perfect mask, they are sticky (yet removable) and very thin. But, be sure to stamp and cut out your images from the sticky part of the Post It Notes.
Arrange and attach butterflies and and then stamp the woodgrain, from Woodgrain Silhouettes, over the top. Peel off the butterfly masks and embellish.

Stop by Dawn's and Karrianne's blogs to see what they've created using this same technique.

Hope you all have a wonderful day!

Maile


Thinking Of You Mom:

Monday, April 19, 2010

Handmade Bloom

Hello all and happy Monday! Hope you had a wonderful weekend!
Today's card was one I created for Kim Wilson's challenge from last week. I've completely missed the dead line, but I loved the inspiration photos so much I still had to play along. You can check out her latest Off The Wall Craftiness Challenge and huge prize here.I was really inspired by the white flowers pictured on the wedding cake. So, to create my own I used the Beautiful Blooms II #2 Die Collection. Die cut the three different sized blooms from white cardstock, cut slits between the petals, crinkled each layer up real good and assembled the layers together using glue dots. Then embellish with a button in the center. Can't you just see these blooms recreated in so many different colors. Such fun!
Attached the blossom to a black mat, cut from Mat Stack #1 Die and then impressed with the Argyle Impression Plate. Punch small holes on either side of the mat, strung black satin ribbon through and tied a bow. Finished the card off with a sentiment from Delighful Dahlia.

Thanks for stopping by, hope you all have a great start to your week!

Maile


Congratulations:

Friday, April 16, 2010

Color Cue {3} Challenge

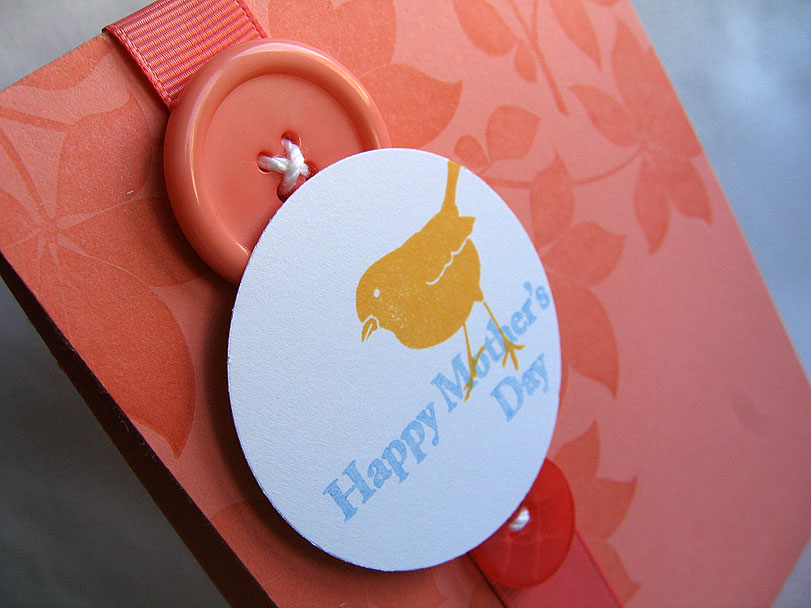
Hello all, time for another Color Cue Challenge brought to you by Wplus9! These colors are just gorgeous together, perfect for Spring. But boy, what a challenge I found them to be. The matching colors I chose to work with were: PTI Stamper Select White, Melon Berry, Spring Rain & Summer Sunrise. Here is what I came up with...
Using a gorgeous leaf image from one of the newest sets, Woodgrain Silhouettes Additions, stamped it in Versamark onto a Melon Berry card base. At first glance I thought these leaves were very pretty, but once I put them to work and stamped them onto paper, I was in aw. These leaves are gorgeous!
Stamped the sentiment (from Woodgrain Silhouettes) and a sweet little bird (from Woodgrain Silhouettes Additions) onto a punched white circle. I didn't want to cover the stamped leaves too much, so I layered the circle over a Melon Berry ribbon strip and buttons.

Be sure to stop by Dawn's blog for all the details and to see the wonderful creations that she and the other Design Team members created. Hope you too will give these colors a try and I can't wait to see what you create.

Don't forget, Dawn is looking for another Wplus9 Design Team member. You can find all the details here.

Thanks for taking the time to visit me today! Hope you all have a great weekend!

Maile


Happy Mother's Day:

Thursday, April 15, 2010

Papertrey Ink - Apr 2010 Release Projects

Wow, what a spectacular release this month has had in store! I seriously needed a month like this, to get me out of my "comfort" zone and into the "masculine" zone. It was a stretch for sure, but using these new stamp sets made it a whole lot easier.

So onto this months projects... A Little Argyle is a build your own argyle background set. The sky is the limit when you use this set. I just love it! The pattern I created was a little time consuming, since I stamped each individual solid diamond, but fun and I love the way it turned out! The rocking chair is from Chair-ished, it was stamped off onto a scrap piece of paper before I stamped it onto the circle, for a lighter impression. Such a cute set, definitely will be playing with this one again.
Isn't this car, from Enjoy the Ride, just too adorable! When I first laid eyes on this set, I couldn't get racing stripes out of my head. So I went with it, and my trusty Copic markers did the job! To ground this little racer I used the border stamp, from For The Graduate, inked up everything but "Class Of" to make room for my own sentiment. The matching die makes for a super quick and easy card to create.
Next up is Fly Away, I so wish I would have had this set two years ago, when I did an airplane theme for my sons birthday. This fun set would have worked perfectly! I paired it with the frame from Fillable Frames #3. I was able to carefully stretch the sides out a little as I was attaching it to the acrylic block and this created more of a puffy cloud look. A perfect companion to those adorable soaring planes.
Can you guess what my High School colors were? Using For The Graduate, my idea behind this card was to create a background fitting for the sentiment I chose. And I am loving the frame and die, this Mat Stack 1 Die has got to be my favorite of all the PTI dies that have come out so far. It truly has so many uses!
Have A Ball was one set I really did have a ball with. I had fun giving this card some movement and creating the ball paths using rustic twine! The sentiment is from Fly Away, which is a sentiment that's already arranged into a curve. I just bent it a little more to fit snugly along side the ball.
Last but definitely not lease is my simple creation using Year of Flowers: Sweet Peas. What a gorgeous set! I stamped and heat embossed the sweet pea vine twice, once onto the kraft card base and then onto Lavender Moon cardstock. Colored both using Copics and cut the flowers out from the Lavender Moon cardstock and attached them with dimensional adhesive. Such a simple card but, it's loaded with details.

Now I can't wait to see what you all come up with! Thanks for stopping by!

Maile

Wednesday, April 14, 2010

Thanks for Everything

Would you love to join us on the Wplus9 design team?! Check out the details here. The Call ends May 30.

Here is a little Wplus9 for you today!... The woodgrain circle image is one of four from the Woodgrain Silhouettes set. Stamped it in Raspberry Fizz (at the top), Hibiscus Burst & Sweet Blush.

Completed the card off with three pops of black: sentiment, button and cardstock edge. I found inspiration for my color choice from Melissa Phillips' latest color challenge. Check out the gorgeous inspiration photo here.

So glad you stopped by today, have a wonderful one!
 
BLOG DESIGN BY: SHERBET BLOSSOM DESIGNS