Thanks for joining me today for this weeks Papertrey Ink Design Team Tip!
Watercolor is becoming wildly popular these days. I’ve seen it popping up everywhere… from wedding/party décor, invitations, fashion, fabrics, home décor and paper goods (just to name a few). It's amazing what a little wash of color can do and it doesn’t take an artist to create a watercolor masterpiece! I am in LOVE with this effect and I’ve been exploring a few techniques. So, let me share...
A watercolor effect can be achieved with, of course, watercolor paints. But if you are like me and don't own any, there are other options. Dawn McVey has a video on how to use your Papertrey Ink ink pads here. I've opted to use bottled spray inks/color misters. These are good for a high saturation of color, which was the look I was going for.
Let's get started shall we?!...
I was going for a watercolor panel on this card. I began by heat embossing the flower and vase image, from the Sunflower Bouquet stamp set, in white. Then over that, I began with the lightest color and started painting in the top left corner. Using back and forth strokes, I moved diagonally along the card front switching between colors until I reached the bottom corner.
Once dry... I embellished the card front with fine linen buttons and twine.
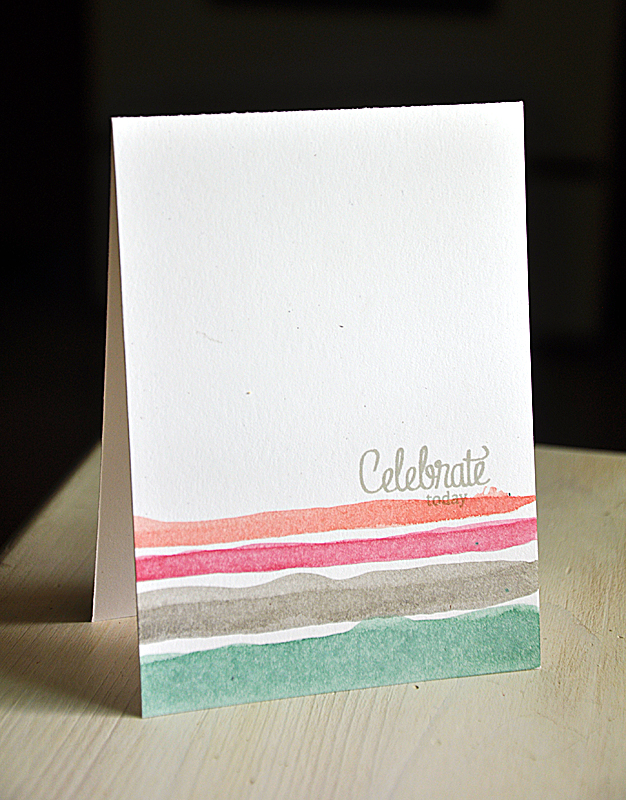
Just like above... I heat embossed a sentiment, from the Thanks All Ways stamp set, in white.
Using back and forth strokes I began to paint from just above the sentiment; allowing the color to fade and the brush to dry, as I painted down to the bottom. I then repeated the process a time or two.
Using four different sized brushes, I painted lines across the card front in a simple back and forth motion. Wasn't being too precise here.
Once dry... I stamped a sentiment from the Autumn Acorns stamp set.
This cheery card began by painting free form circles using different sized brushes. Simply swirl the brush around a few times, giving each circle a neat layered-color look.
Once dry... I stamped a sentiment from the Beautiful Butterflies stamp set and embellished with coordinating buttons.
Last, but not least... this time I took my largest brush and pounced the color on. Sort of like bouncing the brush up and down and swirling a bit to give the spots of color a more random look.
Once dry... I stamped the same flower image as above, from the Sunflower Bouquet stamp set, and a Think Big Favorites #19 sentiment in black ink.
Here are a few handy tips:
- For best results use watercolor paper or heavy weight cardstock (I've used both for today's cards and have achieved the same results with each).
- When painting with spray inks, I chose to dip my wet brush directly into the bottle and scrape excess back into it.
- Use a combination of different sized brushes.
- When painting over a heat embossed image, wait until the paint is absorbed (but not quit dry) before wiping the embossing clean with a tissue.
- Warping of the cardstock will happen. So create your watercolor masterpiece on a block of cardstock that is cut to your desired size. Once it is completely dry, attached the painted block to a card base using a good/strong adhesive.
- Take the time to play around and make discoveries. Quickest way to learn this technique is to just do it.
- Remember... there are no mistakes! Any mishaps just add to the uniqueness of your masterpiece. :)
I've found a ton of inspiration via Pinterest and I've rounded them up, for you and I to refer to, here.
So go ahead! Pull out your watercolors, ink pads or spray inks and see what you come up with. I do warn you though... be prepared to get messy. Have fun!
Maile
Sunflower Watercolor Panel Card


 Enjoy Card


