Saturday, August 23, 2014

Time After Time Challenge

Hey there! Hope your busily enjoying all the festivities from today... Papertrey Inks Stamp-a-faire!

Our current Time After Time challenge is all about pulling out our early cards, the more amateur the better, and updating them with a more modern look and style.  Here's an oldie of mine...
This stunner (ha!) can be found here.  I've recently had to severely pare down my crafty supplies and card stash to make room for a new baby boy (hard to believe he is nearly 8 months old already) so I no longer have any of my ancient cards on hand and so I turn to my early blogging years for reference. 
I pretty much stuck true to the original mono chromatic melon berry color scheme and basic layout. I updated the pattern to a more modern triangle and polka dot theme.
Angled the sentiment strip and changed out the lace detail for something more clean and simple.  I'd say this card pretty much sums up my current style pretty well.  Quite a change over the years!  Still staying true to clean and simple yet keeping up with the fads.    

It's been fun returning back to the old days!  Now, be sure to see what the rest of the Papertrey Ink design team has in store for you today...
Thanks so much for stopping by!

Maile

Friday, August 22, 2014

Cutout Panels

Thanks for joining me today for this weeks Papertrey Ink Design Team Tip!

Today's little cutout technique allows you to add a special touch to your projects.  By carefully and selectively trimming out a panel you can reveal an unexpected detail hidden beneath the top layer.  I'm here to show you just how easy this detail is to achieve!
Let me begin with the simple version.
I began by stamping a simple rectangular shaped image.  Then using my paper trimming tool, I cut slices from the top of the card to the image and from the bottom of the card to the base edge of the image.
With scissors I then trimmed off the excess (between the two first cuts) by hand, creating the cutout portion of the panel.  Takes a bit of wiggling to fit the scissors into place, but it's really a simple step.
This opening allows the embossed pattern below to show through beautifully.
Next, let me take it up a notch with the use of a more detailed and curvy shape.
Same technique as above, just a bit more attention needs to be paid to how close you come to the stamped image. This can be done by carefully lifting the blade occasionally for a peek and by being careful not to move the cardstock from its original position. 
Trim by hand.
Here are the layers needed for assembly... top cutout panel, a strip of material (your choice) for the hidden detail panel and the card base.
Be sure to attach the top layer with dimensional adhesive, this will further enhance the hidden panel.

So what do you think?!  Could this become your next go-to technique?  I sure do hope so!  Well, that's it from me today.  

Thanks for stopping by.

Maile


Just For You Card
Stamps: Botanical Blocks
Ink: True Black
Cardstock: White
Others: Wrought Iron Impression Plate, Studio Calico Gems and Copic Markers

Beautiful Card
Stamps: Life Is Beautiful
Ink: True Black, Summer Sunrise and Berry Sorbet
Cardstock: White
Pattern Paper: Canyon Clay pattern pack
Others: Orange Zest Button and twine

SAF Free Exclusive: Filled With Joy!

Papertrey Inks Stamp-a-faire begins tomorrow!!!  For today the design team and I are sharing projects using the SAF exclusive set... Filled With Joy!

A few details...

Saturday, August 23rd is the BIG day to earn the Stamp-a-faire exclusive stamp set, Filled With Joy ($15 value). This stamp set will be available for free on Stamp-a-faire day (August 23, 2014) to all customers who make a qualifying purchase of $100 or more between 7am EST and 11:30pm EST, limit one per customer.

-Filled With Joy is limited edition for this years Stamp-a-faire event. It will never be made available for sale.
-Filled With Joy can be earned for FREE on Stamp-a-faire Day only, August 23rd, as a freebie to all customers placing an order of $100 or more, limit one set per customer.
-Qualifying orders need to be placed between 7am EST and 11:30pm EST that day only.
This simple sample of the feature stamp set features a floral focal point stamped in the colors of sweet blush, orange zest and limeade ice.
This lovely layered sentiment is perfect for any number of occassions.

We hope you will take advantage of this great opportunity!

Thanks for stopping by!

Maile


Joy In the Everyday Card
Stamps: Filled With Joy!
Ink: Sweet Blush, Orange Zest, Smokey Shadow and Limeade Ice
Cardstock: Limeade Ice and White
Other: Smokey Shadow button and twine

Friday, August 15, 2014

Papertrey Ink August Release Projects

The Papertrey Ink August countdown is about to come to an end and I'm here to share my final projects with you today. But, before I do, let me remind you that everything you've seen peeks of will be available for purchase through Papertrey Ink beginning 10 pm EST tonight.

Now, let me get right to it!...
Phrase Play #7 by Nichole Heady.
Along with the previously released stamp set Autumn Acorns.
Tick Tock by Dawn McVey.

Happy Spooky Halloween by Heather Nichols and Haunted Borders by Lexi Daly.
Also paired with the largest web from the Spider Wed Trio die collection.
Autumn Adornments and Keep It Simple: Thanksgiving by Nichole Heady.

All righty, that's all I've got for you today.  Be sure to check out the rest of the Design Teams fabulous projects as well...
Thanks for stopping by!

Maile


Thankful For You Card
Stamps: Phrase Play #7 & Autumn Acorns
Ink: Dark Chocolate
Cardstock: White
Pattern Paper: Simply Chartreuse paper pack
Other: Brown Rhinestone and Phrase Play #7 die

Time To Celebrate Card
Stamps: Tick Tock
Ink: Enchanted Evening, Autumn Rose and Soft Stone
Cardstock: White
Others: Tick Tock Dies

Boo! Card
Stamps: Happy Spooky Halloween & Haunted Borders
Ink: Orange Zest, Soft Stone and True Black
Cardstock: White
Pattern Paper: Plum Pudding paper pack
Other:  Spider Wed Trio die collection and Happy Spooky Halloween die collection

Happy Thanksgiving Card
Stamps: Autumn Adornments & Keep It Simple: Thanksgiving
Ink: Simply Chartreuse, Dark Chocolate and Kraft
Cardstock: White

Thursday, August 14, 2014

Introducing Superstition

Welcome to the final day of the Papertrey Ink August countdown. 

Today's group post is focused on the new Superstition & Everyday Cat Sentiments. The cat is out of the bag!  Today we share details on this new cat friendly and stamper friendly set.  I've got a couple of easily reproduced single layer cards you won't want to miss!

Here's what I've come up with...
This first one-layer wonder was created using Superstition and Full Moon stamp sets.
I combined the two sets to come up with a spooky night sky, complete with a black cat on a witches broom stick.  Color combo here... true black, soft stone and weather vane (ink by Jenni Bowlin).
Nothing more perrrrrrrr-fect than a row of cuddly kittys to go with this adorable sentiment.
I stamped them in a color combo of autumn rose, winter wisteria and canyon clay.

Well, that's all I've got for you today. Just remember... everything you've seen peek of today will be available for purchase through Papertrey Ink, beginning August 15th

Now, be sure to see what the rest of the Papertrey Ink design team has in store for you today...
Thanks so much for stopping by!

Maile

Wednesday, August 13, 2014

Introducing Fancy That

Hello and welcome to the fourth day of the Papertrey Ink August countdown! 

Today's group post is all about the new Fancy That stamp sets Fancy That is exactly that... fancy!  These stunning outlined medallions make such fancy focal points and backgrounds with ease.  I'm quite certain you'll enjoy working with this set as much as I have.  Hope you like what I have to share with you today...
First up, the fancy focal point.  This is my simple card.  Simply stamped the outlined medallion in black ink and colored.
The coloring was done in an ombre fashion.  Transitioning from green on the outer edges to blue in the center, using the Copic markers pictured above.
I finished the card off by stamping a sentiment, trimming the medallion panel into two pieces and then embellishing with a coordinating button.
Second, the fancy background.
Here's a before shot I took to give you an idea of how I built the pattern.  I rotated every other medallion to create a sort of interlocking effect, carefully paying attention to the placement and color of each impression.
And the after close up shot.
This sentiment is from the soon to be released Birthday Classics: September stamp set.

Well, that concludes my look at Fancy ThatJust remember... this stamp set and other product I've used today will be available for purchase through Papertrey Ink, beginning August 15th

Now, be sure to see what the rest of the Papertrey Ink design team has in store for you today...
Thanks so much for stopping by!

Maile

Tuesday, August 12, 2014

Monthly Moments: August

Hi there! Welcome to day three of the August Papertrey Ink countdown.  I'm joining the design team today in sharing sneak peeks of the new Monthly Moments: August.  This month's Monthly Moments collection includes a great assortment everyday images and phrases.  And for you today I've created a card perfect to give to the love in your life at any time in your relationship.  

So, let me get right to today's project...
This card got its start by my stamping the border image in soft stone.  I then carefully stamped the heart first (directly into the center of the circle), then the girl and boy on either side of it, and finally the "love" from this months Phrase Play set.
Once done I trimmed the border out by hand, attached with dimensional adhesive and wrapped with baker's twine.

Well, that concludes today's look at Monthly Moments: August. Just remember... this set will be available for purchase through Papertrey Ink, beginning August 15th

Now, be sure to see what the rest of the Papertrey Ink design team has in store for you today...
Thanks so much for stopping by!

Maile

Monday, August 11, 2014

Along Came a Spider and Text Block: Halloween

Hi there! Welcome to day two of the August Papertrey Ink countdown.  I'm here today to share a few samples using some of this months new dies... Along Came a Spider and Text Block: Halloween. The Along Came a Spider die and stamp set collection is designed to work well for both paper crafting and felt stitching projects. You can use the dies as is, or you can die-cut and then stamp the *stitching* with the coordinating stamps.

Keep in mind that these items will be available for purchase beginning August 15th at Papertrey Ink.  Plus, more info and a detail look at these items can be found on Nichole Heady blog today.

So, let me get right to today's projects...
First up, I used the spider die to stitch a creepy yet cute spider onto my card front.
I stitched and hung him from a piece of orange zest pattern paper using black embroider floss.
My next card uses the die cut spider which I stamped with the coordinating "stitches" image.
I die cut him from royal velvet and mounted him on top of a die cut Text Block: Halloween panel.  Then finished the card off with a Keep It Simple: Halloween sentiment on an angle.
My last card focuses on the Text Block: Halloween die.  I began by die cutting the text block panel from smokey shadow cardsock and mounted it onto my card base.  The card base was embossed using the Along Came a Spider dies and then stamped.
I then die cut the text block from orange zest and plum pudding pattern papers.  Trimmed the words out by hand and attached them into place with a bit of adhesive.

Well, that concludes today's look at Along Came a Spider and Text Block: Halloween. Just remember... this set will be available for purchase through Papertrey Ink, beginning August 15th

Now, be sure to visit Nichole Heady for the details on today's featured new product.

Thanks so much for stopping by!

Maile

Friday, August 1, 2014

Vegetable Garden Revisited

Thanks for joining me today for the August Papertrey Ink Senior DT Challenge. This time around we are bringing back Vegetable Garden
Many of you are harvesting homegrown veggies of your own.  What a splendid time of year to offer up a bundle of fresh veggies or fresh baked goods to someone special alongside a handmade vegetable card.  The design team has a bountiful selection of projects to share with you today. Check out what I've got for today...
Let me begin with my first inspiration piece, found here.
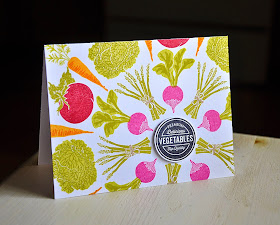
Instead of mixing florals with the polka dot I figured veggies would look just as good.  Boy was I right, this hand stamped pattern paper is so cute.
I love it so much that I had a hard time convincing myself to cut it up, but I manged to anyhow and squeezed in a fitting sentiment (from the Garden Grace stamp set).
My second inspiration piece (this beautiful Anthropologie pie pan) can be found here.
I was inspired to create this super fun and easy circular pattern using these two step veggies.
I began by stamping the "vegetable" circle and then stamped my pattern around it.  It helps to have a plan by first playing around with the arrangement on scrap paper.

Well, that's it from me today. Now be sure to visit the other Papertrey Ink senior design team girls for more Vegetable Garden goodness...
Thanks for stopping by today!

Maile