Friday, April 30, 2010

I'm Cuckoo For You

Hello all and happy Friday! I've got some Hero Arts goodness for you today, they sent me a box of goodies earlier this week and have been dying to play with them. So late last night, once I finished a few To Do's, I stayed up until 1:30 in the am (which I do too often!) creating a couple Hero Arts cards using the Cuckoo set...This cuckoo clock is just too cute and I just had to pull out the Copics! I've been doing a little practicing with my Copics and I love them! Think I'm starting to get the feel for them.
I love the way the woodgrain turned out using three different shades of brown, such a fun look.

Going for a CAS single layer card here...
Same idea as the card above, just no layering and colored directly onto the kraft cardstock. I really like how coloring onto craft gives you a softer feel.

So, I think I am officially a colorer now. Yeah! Hope you enjoyed today's cards and have a wonderful weekend. Will be back tomorrow to share a card using the brand new Wplus9 stamps (which will be available tomorrow as well).

Maile


I'm Cuckoo For You:

Wednesday, April 28, 2010

The Lord Planted The Seed

Happy Wednesday everyone! Hope your having a good week.


For today's card, I decided to try and make my own hand stamped pattern paper. Using the newest stamp sets from Wplus9, Woodgrain Silhouette & Woodgrain Silhouette Additions... Using a color combo of: Spring Rain, Ripe Avocado, Melon Berry and Enchanted Evening, I was able to create a patterned paper with a botanical feel to it. Since the pattern was so busy, I wanted to keep the sentiment simple. So, I simply stamped it onto a white cardstock strip and embellished it with a Melon Berry button and leaves, hand cut from the leafy ferns, to create the look of a flower bud.
Finished the card off by rounding the top corners and embellished with a couple more buttons to emphasize the butterflies (which also conveniently helped create a visual triangle between the three buttons, love it when things just happen to work out like that).

I've got quite a bit to accomplish, so that's it from me today. Thanks for stopping by and hope you have a good one!

Maile


The Lord Planted The Seed:

Tuesday, April 27, 2010

{Spoiler Alert!} Papertrey Ink Anniversary Set

Hello all! Hope you had a great weekend. Thought I would quickly share my Papertrey Ink Anniversary Set projects. Round & Round is such a gorgeous set! I love the classic, clean and modern feel it has.


First up is more of a clean and modern look... I was going for a jeweled medallion idea here, by pairing the medallion circle with the frame (from For The Graduate, used with the coordinating Mat Stack #1 Die) and rhinestones.
By using clear rhinestones, I was able to use my Copic Markers to color them the exact color I was looking for.

Next, a classic and elegant look...
The flourished frame is a perfect match to the new Mat Stack #1 Die. So, I used the die to cut a negative space and stamp the frame image into.
Embossed the die negative with Argyle Impression Plate, attached the butterfly circle and sentiment (from the Anniversary Set) onto the center of the frame and embellished with a butterfly and rhinestones (colored using Copics to match).

Hope you enjoyed the cards and thanks for stopping by! Have a great start to your week!

Maile


Celebrate Today:

Thank You:

Friday, April 23, 2010

Embellish Color Challenge With Embossing

Hello my friends! It's Embellish Challenge time!!!... What a happy inspiration piece, wouldn't you say?! This time around our awesome sponsor is Practicing Creativity Design!!! Check out their excellent products (which I personally love!) here.
The challenge: create a project using Embossing (can be either heat embossing or dry embossing) and use the colors pictured above. Here is what I came up with...
Using Look Up, I heat embossed the flag banner and sentiment in black. Then stamped each flag individually using the colors of the challenge (Lemon Tart, Spring Moss, Hibiscus Burst & Spring Rain).
Punched a circle from the flag banner panel and adhered the sentiment behind it, using dimensional adhesive. Then attach the whole panel to a Lemon Tart card base, using the same adhesive. Embellished the card with coordinating ribbon tabs and buttons.

Such a fun challenge! You can find the challenge and prize details here. You have until the May 6th to submit your projects, can't wait to see what you all create!!!

Thanks for taking the time to visit me today, I really do appreciate it!

Maile


You Light Up My Life:

Thursday, April 22, 2010

Embroidered Flower Anniversary

Hello everyone! I am really loving the new Mat Stack #1 Die from Papertrey Ink. I couldn't help but use it on today's card...This time I paired it with the vine image from With Sympathy. Stamped it in Spring Moss onto a Vintage Cream cardstock base and rounded the corner. The Mat Stack die was cut from Lavender Moon cardstock and then embossed/impressed using the new Argyle Impression Plate. Punched a circle from Vintage Cream cardstock, stamped with vines and attached to the center of the embossed die cut.
Stamped a Spring Moss cardstock strip with a sentiment, attached it over the circle and trimmed the edges. Finished it off with a gorgeous little Jolee's Boutique Embroidered Flower attached next to the sentiment.

For some reason I have a hard time using scrapbook embellishments on my cards, I usually stick to my usuals: buttons, ribbon, floss & rhinestones. But when I was browsing JoAnn's the other day, I found this pack of Embroidered Flowers and loved them. So I made a deal with my self, I would only buy them if I promised my self I would use them and not hoard them. So there you have it, I've broke open the package and put one to use. I know, crazy right?! Lol!

Thanks for stopping by, hope you have a wonderful day!

Maile


Bold
Happy Anniversary:

Tuesday, April 20, 2010

All Eyes On...Masking

Hello all! Dawn of Wplus9 has started a new monthly feature on her blog called "All Eyes On...". Each monthly feature will concentrate on a new and fun technique or current trend. The feature for this month is masking. Here is my creation using this technique... To create this look, I used the three different sized butterflies from both Woodgrain Silhouettes & Woodgrain Silhouettes Additions. Stamp them onto Post It Notes and cut them out. Post It Notes make the perfect mask, they are sticky (yet removable) and very thin. But, be sure to stamp and cut out your images from the sticky part of the Post It Notes.
Arrange and attach butterflies and and then stamp the woodgrain, from Woodgrain Silhouettes, over the top. Peel off the butterfly masks and embellish.

Stop by Dawn's and Karrianne's blogs to see what they've created using this same technique.

Hope you all have a wonderful day!

Maile


Thinking Of You Mom:

Monday, April 19, 2010

Handmade Bloom

Hello all and happy Monday! Hope you had a wonderful weekend!
Today's card was one I created for Kim Wilson's challenge from last week. I've completely missed the dead line, but I loved the inspiration photos so much I still had to play along. You can check out her latest Off The Wall Craftiness Challenge and huge prize here.I was really inspired by the white flowers pictured on the wedding cake. So, to create my own I used the Beautiful Blooms II #2 Die Collection. Die cut the three different sized blooms from white cardstock, cut slits between the petals, crinkled each layer up real good and assembled the layers together using glue dots. Then embellish with a button in the center. Can't you just see these blooms recreated in so many different colors. Such fun!
Attached the blossom to a black mat, cut from Mat Stack #1 Die and then impressed with the Argyle Impression Plate. Punch small holes on either side of the mat, strung black satin ribbon through and tied a bow. Finished the card off with a sentiment from Delighful Dahlia.

Thanks for stopping by, hope you all have a great start to your week!

Maile


Congratulations:

Friday, April 16, 2010

Color Cue {3} Challenge

Hello all, time for another Color Cue Challenge brought to you by Wplus9! These colors are just gorgeous together, perfect for Spring. But boy, what a challenge I found them to be. The matching colors I chose to work with were: PTI Stamper Select White, Melon Berry, Spring Rain & Summer Sunrise. Here is what I came up with...
Using a gorgeous leaf image from one of the newest sets, Woodgrain Silhouettes Additions, stamped it in Versamark onto a Melon Berry card base. At first glance I thought these leaves were very pretty, but once I put them to work and stamped them onto paper, I was in aw. These leaves are gorgeous!
Stamped the sentiment (from Woodgrain Silhouettes) and a sweet little bird (from Woodgrain Silhouettes Additions) onto a punched white circle. I didn't want to cover the stamped leaves too much, so I layered the circle over a Melon Berry ribbon strip and buttons.

Be sure to stop by Dawn's blog for all the details and to see the wonderful creations that she and the other Design Team members created. Hope you too will give these colors a try and I can't wait to see what you create.

Don't forget, Dawn is looking for another Wplus9 Design Team member. You can find all the details here.

Thanks for taking the time to visit me today! Hope you all have a great weekend!

Maile


Happy Mother's Day:

Thursday, April 15, 2010

Papertrey Ink - Apr 2010 Release Projects

Wow, what a spectacular release this month has had in store! I seriously needed a month like this, to get me out of my "comfort" zone and into the "masculine" zone. It was a stretch for sure, but using these new stamp sets made it a whole lot easier.

So onto this months projects... A Little Argyle is a build your own argyle background set. The sky is the limit when you use this set. I just love it! The pattern I created was a little time consuming, since I stamped each individual solid diamond, but fun and I love the way it turned out! The rocking chair is from Chair-ished, it was stamped off onto a scrap piece of paper before I stamped it onto the circle, for a lighter impression. Such a cute set, definitely will be playing with this one again.
Isn't this car, from Enjoy the Ride, just too adorable! When I first laid eyes on this set, I couldn't get racing stripes out of my head. So I went with it, and my trusty Copic markers did the job! To ground this little racer I used the border stamp, from For The Graduate, inked up everything but "Class Of" to make room for my own sentiment. The matching die makes for a super quick and easy card to create.
Next up is Fly Away, I so wish I would have had this set two years ago, when I did an airplane theme for my sons birthday. This fun set would have worked perfectly! I paired it with the frame from Fillable Frames #3. I was able to carefully stretch the sides out a little as I was attaching it to the acrylic block and this created more of a puffy cloud look. A perfect companion to those adorable soaring planes.
Can you guess what my High School colors were? Using For The Graduate, my idea behind this card was to create a background fitting for the sentiment I chose. And I am loving the frame and die, this Mat Stack 1 Die has got to be my favorite of all the PTI dies that have come out so far. It truly has so many uses!
Have A Ball was one set I really did have a ball with. I had fun giving this card some movement and creating the ball paths using rustic twine! The sentiment is from Fly Away, which is a sentiment that's already arranged into a curve. I just bent it a little more to fit snugly along side the ball.
Last but definitely not lease is my simple creation using Year of Flowers: Sweet Peas. What a gorgeous set! I stamped and heat embossed the sweet pea vine twice, once onto the kraft card base and then onto Lavender Moon cardstock. Colored both using Copics and cut the flowers out from the Lavender Moon cardstock and attached them with dimensional adhesive. Such a simple card but, it's loaded with details.

Now I can't wait to see what you all come up with! Thanks for stopping by!

Maile

Wednesday, April 14, 2010

Thanks for Everything

Would you love to join us on the Wplus9 design team?! Check out the details here. The Call ends May 30.

Here is a little Wplus9 for you today!... The woodgrain circle image is one of four from the Woodgrain Silhouettes set. Stamped it in Raspberry Fizz (at the top), Hibiscus Burst & Sweet Blush.

Completed the card off with three pops of black: sentiment, button and cardstock edge. I found inspiration for my color choice from Melissa Phillips' latest color challenge. Check out the gorgeous inspiration photo here.

So glad you stopped by today, have a wonderful one!

Tuesday, April 13, 2010

Embellish Magazine is Available!!!

Check this out!....
A huge congrats to Ashley and Mac for creating this gem of an issue, that's packed full of amazing inspiration and perfect photography. A definite must see and you can't beat the price of $3 for 96 pages of goodness! Check it out here!

Monday, April 12, 2010

Boys to Men

Hello all and welcome! This months Papertrey Ink release is all about the boys and men in our lives. I personally know how tough creating a masculine project can be. But Nichole and the other designers have come up with the perfect stamps and supplies to make this tough task easily manageable! Nichole had given us, the Design Team, the task of reinventing the term "masculine" and to make it something fun so that you and I won't dread tackling it.

So here is what I came up with...I chose to work with the fish image from Masculine Motifs (which Nichole has not introduced yet, so here is a sneeky peeky!) and paired it with Background Basics: Woodgrain. My idea behind combing these sets was to create the look of water, using the texture of the woodgrain, for the fish. As soon as I saw the fish, my mind immediately turned the detail of the woodgrain into flowing or rippling water. I accomplished this by heat embossing the woodgrain onto Enchanted Evening cardstock. So what do you think, did it turn out? Don't you just love it when you can get so much more use out of stamps than what they were intended for?!
I don't know about you but, I rarely use those buttons with the brand names etched into the tops. I'm just too picky. But I have recently realized that these buttons make the perfect embellishments for masculine cards. The text really adds a lot to the texture and depth, yet aids in keeping the card clean and simple. Now that's my kind of embellishment!

To get a serious eye full of masculine inspiration, tips and ideas, check out what the others have come up with:
When you're done, I'm sure you all will be ready to tackle those dreaded "masculine" cards!

Thanks for stopping by!

Maile


Happy Fathers Day:
  • Stamps: Masculine Motifs & Background Basics: Woodgrain
  • Ink: Orange Zest, Dark Chocolate & Versamark
  • Cardstock: Kraft, Enchanted Evening & Vintage Cream
  • Accessories: Kraft Twine, Dark Chocolate Vintage Button, Clear Embossing Powder, Mat Stack 1 Die & Marvy Uchida Circle Punch

Friday, April 9, 2010

Embellish Color Challenge Parties

Hello again my friends! This is my second post today. In case you missed it, please scroll down to see my first post of the day.


You guessed it, it's time for another Embellish Magazine Color Challenge!!! What a fun one we have for you this time around. It's party time!...
That's right, so put your party hats on and use the colors pictured above to come up with a project perfect for a party! So, that means party favors, invitations, gift tags, gift bags and all kinds of party decor. This weeks sponsor is DeNami Design. There stamps make mixing and matching, to create your own design, a cinch!


Here's a simple and easily mass produced birthday party ensemble I came up with for the challenge...
The coordinating pattern papers were stamped using two of the images from the Party Time Stamp Set, stamped in True Black onto Pure Poppy cardstock.
Here is a better shot of the window invite. I created this look by first adhering the stamped Pure Poppy pattern paper to the kraft card base. Then punching the circle and carefully stamping the An Invitation Circle and party hat with in, onto the panel inside. Finished it off with a few perfectly placed buttons (which are also from DeNami Design) and colored the red onto the party hat.
This little wrapped gift box makes the prefect packaging for either a party favor or a birthday gift. To create a perfect match to the card, wrap the contents/gift in kraft butcher paper to fill the box and to coordinate with the kraft card base of the invite. Or simply fill with candy or treats of your choice. I thought Red Vines licorice or Twislers would create the perfect match as well.

So, now it's your turn to get crafty! Find the prize info and link your creations over at the Embellish Magazine blog.

Also, don't forget that the newest Embellish Magazine Publication Call is out. While you've got your supplies out for the latest challenge, why not create a few extra projects (using the call colors of course) to submit and have a chance at getting published!

Can't wait to see what you all create!

Maile

An Invitation:

Party Hat Gift Box:

Go-To Sketches Top 10 Blog Hop

Hello all and welcome to your next stop in the Go-To Sketches Top 10 Blog Hop! If you have stopped here first, be sure to hop on over to the Moxie Fab World Blog for the start of this Blog Hop celebration.


So, this is what the celebration is all about...This amazing Go-To Sketches issue! That's jam packed with inspiring and unique sketches, brought to you by the ever so talented Go-To-Gal's them selves! One of the sketches you will find amongst it's pages is the one pictured below, created by one of my inspirations: Jessica Witty. The top 10 most-published designers of this issue have all joined together and created a never seen before card, based off of this fabulous sketch...
For some reason I can't ever just stick to the rules, so here is my flipped take...
As you can see, not only did I reverse the scalloped border but I turned it into a row of yummy jumbled up buttons. To keep with the circular theme, I stamped the rectangular panel with polka dots from Dot Spot and rounded the bottom corner of the Kraft card base. Completed the card with a ribbon tab and more buttons.
I thought these jumbled up buttons created a super fun detail and a perfect compliment to this cheery color combo of Sweet Blush and Hawaiian Shores. For some reason this card kind of reminds me of bubble gum, mmmmmmmm!

To continue your inspiring Blog Hop journey, here is the list of participating designers:

In addition, we have a special guest who will be joining us: Donna Salazar! The Distrezz-it-All is one of the prizes that will be up for grabs, and since this is her tool, she wants to play along too. Please check out her blog as well to see her project using the sketch.

So, how about those prizes!!! Here is what will be given away to 2 lucky winners!
  • A Distrezz-it-All
  • 2 copies of Go-To Sketches (one to keep for yourself and another to share with a friend)

You have 12 chances to win, just leave a comment on the Moxie Fab World blog and the 11 other participants blogs.

One last tid-bit before I finish, be sure to stop by and post a comment on the Paper Crafts Connection blog for a chance to win a Card Companion Kit from Doodlebug Design.

Thanks for hopping by! Enjoy the Blog Hop and have a wonderful day!

Maile


Wish Big:

Wednesday, April 7, 2010

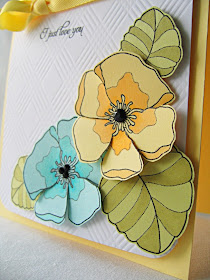
I Just Love You

Hi all! Hope you enjoyed the Blog Hop yesterday, I sure did! For today's card I pulled out the Copic markers again. Still very intimidated by these babies. So instead of coloring the entire flower, I've done what I have seen lots of others doing: stamping on colored cardstock and then touching up and adding depth using a darker shade of Copic markers.
After coloring, I cut out each flower and leaf then attached them to a white cardstock block embossed with the Picnic Plaid Impression Plate. If you look closely you can see how I cut each petal individually and then curled them up just a tad to give them a more realistic feel. Finished the card off with some Lemon Tart twill ribbon, black rhinestones and a sentiment (from Delightful Dahlia).

I've got a couple links for you all to check out:
  • Wplus9 is coming out with brand new stamp sets on Friday, April 9th. These new stamp images are incredible and so are Dawn's samples show casing their versatility. Keep updated on the latest happening by becoming a fan on the Wplus9 Facebook Fan Page and see what everyone has been creating using their Wplus9 stamps in the Flickr Gallery.

  • The latest Embellish Magazine Call is out!!! Here's your chance to get published, check it out here!

Thanks for visiting today! Have a wonderful day!

Maile


I Just Love You:

Tuesday, April 6, 2010

Paper Crafts Go-to-Gal & Friends Blog Hop

Hello and welcome to the Hop! My friend, fellow Cover Girl and ever so talented Go-to-Gal: Jessica Witty, has asked me to join her and her friends in today's Paper Crafts Go-to-Gal & Friends Blog Hop. To celebrate the release of the brand new and fantastic special issue called Go-to Sketches. If you haven't seen this issue yet, I highly recommend picking up a copy for your self as soon as possible! You can find it here. Also, be sure to stop on by the Paper Crafts Connection blog for a chance to win an issue and to join in on all the exciting festivities happening this week. As you probably already know, this issue is filled with 66 fabulous sketches all designed by the 6 Paper Crafts Go-To-Gals. Today I created a card based off of the sketch below, which was created by Jessica Witty her self!...
Here is my take...
I didn't stick to the sketch exactly, I made a few minor changes here and there, but any of the changes made were based off of the original sketch. Stamped the largest label (from Vintage Labels) in New Leaf on to Kraft cardstock and then textured it using the Picnic Plaid Impression Plate. The flower is my take on the rectangular element, cut the layers using Beautiful Blooms II #2 Die Collection (2 large & 1 medium), stamped Sweet Blush polka dots (from Polka Dots Basics) and topped it off with a button and silk ribbon. Here's a fun little tip: using Copic markers, color white silk ribbon to create a perfect match to your projects. The leaves are supposed to be the three embellishments pictured on the left in the sketch, used the leaf dies from Delightful Dahlia Die Collection to cut them from New Leaf cardstock.

This card ought to work perfectly for a wedding or a new babies arrival.

There is plenty more to see! Check out what Jessica and her other buddies have created:
And here are the other Go-To-Gals:

Enjoy the hop and thanks for hopping on by!

Maile


Celebrate:

Sunday, April 4, 2010

Spread Your Wings and Fly

Hello all! Hope you had a blessed and wonderful Easter Resurrection Sunday!

Forgive me for my brief absence the past few days, life has been busy and I just needed a little breather. You all have been so supportive and have left me such sweet comments on my last couple of posts, I just want to say thank you! I hope I haven't set the bar too high for my self now.

At the first of each month the Papertrey Ink Senior Design Team (Betsy, Dawn, Heather, Lisa, Michelle and Guest Designer Kelly) is given a challenge by Nichole Heady, this months challenge was to create a project highlighting Papertrey's new dies and impression plates. So, even though I am not a Senior Design Team Member and it's past the first, I thought it would be fun to participate anyways...
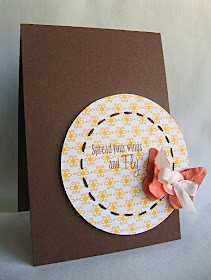
Using the Butterfly Die, I cut a couple butterflies from Melon Berry cardstock and crumpled them up. Assembled them together using a glue dot, embellished with a button strung with satin ribbon and attached it to the card with dimensional adhesive (that way the crumpled butterfly sits just above the card and gives it a bit more room to spread out).
The butterfly sits on a white cardstock circle, stamped with a background (from Background Basics: Botanicals) and a sentiment (from Butterfly Dreams). Then stitched with embroidery floss and attached just over the edge of the card base.

Thanks for taking the time to stop by today! I really do appreciate it!
Maile


Spread Your Wings And Fly: